Rocketeer Cirrus X3- The Veepy Build

Make sure your rocket boosters stick out more. There is a hole in the back that should match up with the hole on the tank. I know you chipped your rocket boosters but you can still align those holes. I hope. They need to stick out about 4mm from the bottom of the tank, and when you fold your flaps 90 degrees the boosters should sit right on the flaps.
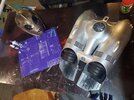
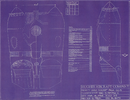
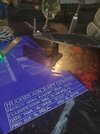
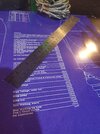
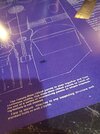
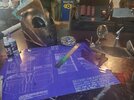
Your knowledge on this is amazing thanks man and MTB I can't wait to see your pack it's looking so amazing. Mine may not end up perfectly screen accurate because I'm a prop maker on a tight budget but these tips help alot so thank you.
 
I've made some progress. I sanded, puttied, and primed the hull. It will need a little more work as I still see some print lines. I was able to get the radiator sanded, puttied, and primed as well. But it still need slot of work. I see far too many lines. I finished all the small parts they are ready for paint. I've worked on tht cones a little, I made the edge a little more square so the top cone fits better and the gap is more even (this was due to printing not the model).

As for the flap rods, I think I'm going it use some spare arms from my printer. The rodents are almost the same size. I will be cutting the black sleeve to where my thumb is in the pic where it's next to the flap. Not sure how it will look finished but I'm going to test it.

As far as the screw for the flaps and all other hardware, I just follow the list that was provided. I went to home Depot and matched all the sizes that were listed.
PXL_20210218_034735042.jpg
PXL_20210218_034748181.jpg
PXL_20210218_034126130.jpg
PXL_20210218_034430154.jpg
PXL_20210218_034541460.jpg
 
Madness your rocket looks great!! Its really coming along.

I haven't figured out what paint I'm going to use yet. I want to air brush it, but haven't found the right colors yet as I am also a prop builder on a budget [emoji6]
 
Last edited:
Madness your rocket looks great!! Its really coming along.

I haven't figured out what paint I'm going to use yet. I want to air brush it, but haven't found the right colors yet as I am also a prop builder on a budget
emoji6.png
I was really impressed with how the rust-oleum aluminum enamel paint laid down. It came out very clean with excellent paint coverage and close to screen accurate color without dropping 100 dollars on paint. Also your finishing work is much better than mine so it should be even better for you. I still need to add the wires and drop the exhaust. Also the attached blue print is an exact copy of the screen used and prints great at 16x20 as you can see from the pic.
 

Attachments

  • 20210217_103051.jpg
    20210217_103051.jpg
    8.2 MB · Views: 170
  • Orignal Rocketeer Blueprinst.png
    Orignal Rocketeer Blueprinst.png
    2.3 MB · Views: 175
I was really impressed with how the rust-oleum aluminum enamel paint laid down. It came out very clean with excellent paint coverage and close to screen accurate color without dropping 100 dollars on paint. Also your finishing work is much better than mine so it should be even better for you. I still need to add the wires and drop the exhaust. Also the attached blue print is an exact copy of the screen used and prints great at 16x20 as you can see from the pic.
I'll have to get a can and do come test samples. Also where did you get the blueprint? Is the one you linked printable at that size?
 
It will print 16x20 and still looks pretty damn good with minimal loss. It's a copy of the orignal I found a poor photo online then I took a photo with my digital camera and cleaned it up a bit to make it printable at what appears to be the size from the film..
 
Here is some close ups of it at 16x20
 

Attachments

  • 20210218_115510.jpg
    20210218_115510.jpg
    1.6 MB · Views: 115
  • 20210218_115423.jpg
    20210218_115423.jpg
    2.2 MB · Views: 95
  • 20210218_115419.jpg
    20210218_115419.jpg
    1.9 MB · Views: 113
  • 20210218_115333.jpg
    20210218_115333.jpg
    3.5 MB · Views: 127
Any progress?
Yep! I was waiting for the engine parts to come in. I installed all the lines, nuts, and rings. I ran out of braided line so I only did the fronts for now. I also got the hull 98% done, still has a few imperfections Im going to fix. The radiator has been taking some time, its about 80% done. I need to give it one more round of spot putty and sanding then is should be done. The cones are 99% done, taking these pictures I just saw a few more spots that need to be fixed.

I'm going to finish up all that and then give it a high gloss black base coat. I haven't fully decided on the silver yet, but leaning towards this one: Alclad 1oz. Bottle Polished Aluminum Lacquer - Hobby and Model Lacquer Paint 853328001057 | eBay

They also have a dull Aluminum, might have to get both and do a test run.

I also have the fan and motor on its way. I'll post those when I get them installed.
PXL_20210305_023537495.jpg
PXL_20210305_023540482.jpg
PXL_20210305_023543923.jpg
PXL_20210305_024345358.jpg
PXL_20210305_024401477.jpg
PXL_20210305_024429181.jpg
PXL_20210305_024501298.jpg
 

Attachments

  • PXL_20210305_024403924.jpg
    PXL_20210305_024403924.jpg
    70.8 KB · Views: 82
Last edited:
Where did you source your braided line and was it all a good fit into the existing holes?
I got the one from your link, it fit perfectly. It just took some time because when you cut the line all the strands start to fray out. There was some blood that went in to this cause the strands kept poking me lol. Also you will need more than 10ft if you want to go all the way around the engines.

I got the flared nuts and the compression sleeves from this site for $16 shipped:

Www.DiscountHydraulicHose.com

Here are the model numbers:
341-04 - Flare Nut, Long, 1/4"
360-05 - 5/16" Brass Compression Tube Sleeve

The copper pipe I got from Home Depot for $10
PXL_20210305_041538397.jpg

It works great cause its really easy to bend. I didn't see anything shorter than 10 feet but I figured I'd use it on another project some day.
 
The last pic I posted with it setup and displayed with the map is where it sits. I have the tubes to connect to the engine but I am still kinda burned out on the build so I have started a few others things till I get motivated again :) Till then its setup like it's being worked on with blue prints and the other parts laying next to it. Not sure when I will go back to it, hopefully when you finish yours I will get motivated ;P
 
MTB your rocket pack is looking great! I realize you've already cut all your braided hoses but for anyone else who's going to do it. If you wrap some tape around the hose where your cut is going to be and then cut through the tape and hose with a cut off wheel it works pretty well.
 

Your message may be considered spam for the following reasons:

If you wish to reply despite these issues, check the box below before replying.
Be aware that malicious compliance may result in more severe penalties.
Back
Top