P90 sights for a Nerf Rayven

Fly4v

Sr Member
After watching a few too many episodes of Stargate, decided to modify a Nerf Rayven Elite to have a similar rail and sight as the P90 PDW.


Here are the templates that I used for the dot sight and the side rails.


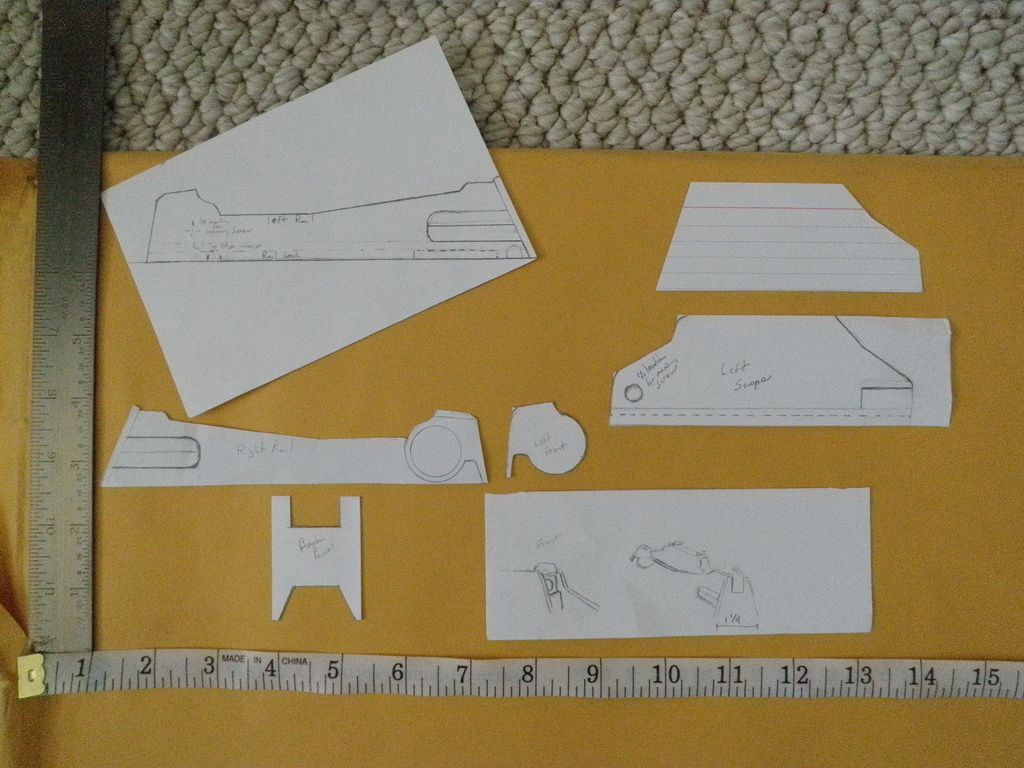
The dot sight will have maglight replacement lenses when finished. A red front and clear for the back. The inside is hollow thanks to the sheet styrene construction. It will be an easy matter to insert a single red led and battery if so inclined.

At first, I thought about using the standard Nerf rail system but then decided to use Picatinny style rails since I would have to make or buy a second Nerf tactical rail.


I had roughed everything out with cardboard before I made the templates out of 5x7 cards. The templates were used to transfer the shapes to the sheet styrene.


The styrene was cut with an x-acto knife and a metal ruler. The "complex" shapes were carved with files and everything is held together for fitting with masking tape.


Once the fit was correct and the sight could slide on and off the Nerf top rail it was glued together with hot glue.
 
I thought about using the original Nerf tactical rail for the Flashlight. This is not the screen used Scorpion but a cheap Lux-Pro Tac light. It can be found at Lowes and Amazon. I went with the Lux-Pro for the savings, it uses AAA batteries and has a daze/flash setting.


It didn't take long before I wanted the light mounted higher.

 
I didn't want to spend the money for real P90 short rails. Interesting that they are ITAR restricted. Also didn't want to buy resin copies and only found one TM rail for sale.... So I used the Picatinny engineering drawing and made my own.

Removal of the Nerf rail involved a single screw from inside the gun and replacing it with a dummy plate.


I was able to get a screen accurate cage mount for the flashlight. It fits my rails perfectly but my cheap-o flashlight is not 1 inch but just large enough that it does not fit.


Took the allen screws from the original mount and fabricated one of my own. I bent the plastic by dipping it in a pot of boiling water and then wrapping it around the flashlight. The groves to fit the rails were shaped with a file.


Not screen accurate but thanks to quick setting super glue. It took only less than an hour to finish.
 
If you plan on using multicam/scorpion camouflage in the future, plan on cutting out lots of peanuts.


I had lots of packing paper and made the unwise decision of making giant templates for the colors required. If I were to do this again, I'd have smaller templates that can better conform to the curves of the gun.


Painting multicam if fun because of all the blending required. I'd hate to do this with an airbrush since there are times that you need to shoot three colors at once. But an airbrush would help since rattle can colors are slightly off in color. I ended up using a mixture of Krylon Camouflage, Rustoleum Camo and sadly Rustoleum satin thanks to Krylon completely changing their Camo series of paint.
Only had minor orange peal problems and that was when mixing Rustoleum Sand and Rustoleum Satin Nutmeg for a Sand to Medium brown fade.

The order I painted was Khaki, Sand, Light Green, Dark Green, Medium brown, Dark Brown, and then Almond.

Almond isn't present in the photos since all the stores were out.
 
I have masked off the orange barrel to keep the safely orange clown nose when it is used as a Nerf and made a mock barrel extension out of 1 1/4 PVC pipe.


The end is a scrap piece of styrene glued on with super glue and then shaped with a file. The barrel hole is a wood drill that was used only enough to bore the center hole and cut the outer grove. This was the easy way to have both holes centered on each other.

It is a very effective silencer for the Nerf since the 5.7mm hole is too small for a Nerf Dart.
 
The mounting hardware for the sight and the rails is from Lowes.

The small screw on the front of the dot sight is a Hillman 8-32 x 3/8 Flat Head Cap Screw, Stainless.

The screw on the back of the dot sight and the four screws for the rails are Hillman 10-24 x 1/2 Flat Head Cap Screw, Stainless.

I would rather of had them black oxide but this is what was in stock so I sprayed them with Rustoleum ultra-flat black before I started to camo the gun.
 
That's a neat looking weapon you've put together, Fly4v! You've done a heck of a good job capturing the details on some of those P90 parts.

I've done more than my fair share of fabrication on P90 receivers, and am impressed with your results.
 
Thanks SG Merc!

Lowe's finally got a delivery of Almond in stock so I will be able to finish the camo paint job.

Here is the actual description of the paints used:
Krylon Ultra-Flat Camouflage Khaki 4291
Rustoleum Camouflage 2x ultra cover Sand 279180
Rustoleum Camouflage 2x ultra cover Army Green 279176
Rustoleum Camouflage 2x ultra cover Deep Forest Green 279175
Rustoleum American Accents 2x ultra cover Satin Nutmeg 280708
Rustoleum Camouflage 2x ultra cover Earth Brown 279178
DO NOT USE: Rustoleum Satin Almond 7758 DO NOT USE Edit: This only remains as a reference for the interim WIP photos below.

These colors are not perfect for multicam. The worst offender is the Deep Forest Green, which is too dark.... and the use of two Satins but could not find a suitable flat color. After a week of venting I plan to spray everything with a flat clear coat so that should solve the slight gloss on two colors.

Also, I am sure that a hunting/surplus store has the paints for a perfect match but I guess they would cost more than $3 a can.

Edit: If you copy and past this for a shopping list please do not buy Almond. It is too white to use. I got a can of Rustoleum Satin Putty 7772. At first glance it looks better. Will retake comparison photos on the uniform when it dries.
 
Last edited:
I wanted to point out that the template for the handle back plate is just the general shape.
It will need some minor work to represent the back up iron sights that are on the P90.


Also once you have the plate properly shaped it will need to be spit down the center if you want to take your gun apart for repairs or other modifications.


With flash and without, you can see the colors are slightly off. I'll go back and hand paint on light tan to tone down the almond.

Edit: Perhaps the color to have for the highlights/hotspots should have been Rustoelum Satin Putty and not Almond?
 
Last edited:


Here it is with the sight removed and the bottom cover off. Since it rests on top of the original Nerf rail and is unseen there was no reason to use anything more than masking tape to hold it in place.

Here is the view down the sights. The alignment of the flashlight is off to the right by quite a bit but its a Nerf for if it hits where the light is I'm happy.

 
Being off the side by 45 degrees and out of the cone of the flashlight shows how bright this is. I don't have a star filter, this was just an unaltered photo.

 
This thread is more than 8 years old.

Your message may be considered spam for the following reasons:

  1. This thread hasn't been active in some time. A new post in this thread might not contribute constructively to this discussion after so long.
If you wish to reply despite these issues, check the box below before replying.
Be aware that malicious compliance may result in more severe penalties.
Back
Top