New BMF coming

28/32 = 0.875 (87.5%) so about 12% too big. This assumes of course that both utilize the same dims for the various bits, however... e.g, if the Deag guns were inaccurate & too small, then they might work for the Hasbro. But no one has yet made such an assertion; AFAIK the Deag model is working out with good fidelity.

R/ Robert
 
Wow, hcr, the vents look pretty sweet!!! Is it in FUD (or is that the newer material)? And is the surface really smooth? They do look really good in the photo.
 
  • Like
Reactions: FZ6
It requires a lot of hacking out of existing panels and pegs, use a dremel. :)

- - - Updated - - -


I'm looking for the look I think of when I think of the Falcon.

Do you think it's possible to not cut out the panels in the Falcon because Randy's parts are so thick and instead just sand down the backsides of Randy's pieces so they are thinner? I would rather not hack up the Falcon. I'd prefer to just glue these pieces in place.
 
cheers crackerjazz, the vents come in FUD material, with a ultrafine surface texture, hard to notice. ribs and louvers are even.
I guess tHere was a pic in primer on shapeways (google shapeways hsbro engine vents)
 
Hi Guys

I am at a Workshop with my team from Work since Monday and I am sitting down in the Hotel waiting for the guys to come down for Breakfast...BOORING, so I thought I post some pics I took on the weekend.

Again its not 100% done but maybe 95% or so. Still to do, Paint the litte = markings on all the Panels, Correcting the graphics on the Radar Dish, Adding some rust to the Exaustports (mesh) and maybe paint or apply decals overall for graphics (labels red markings on the airlocks etc.

Its hooked up with four 9V batteries hidden under the polycarb plate and four on/off switches on the back cover of the base, these controls, Engine, Front lights, Underside Flood/Position lights and Cockpit. Did not have any good pics with the lights on but will post later.

View attachment 479385View attachment 479386View attachment 479387View attachment 479388

Wow we need you in the base building business this looks awesome!
 
cheers crackerjazz, the vents come in FUD material, with a ultrafine surface texture, hard to notice. ribs and louvers are even.
I guess tHere was a pic in primer on shapeways (google shapeways hsbro engine vents)

I have those vents and they look amazing, I will upload pic tonight when i get home..
20151215_061308.jpg
 
Last edited:
  • Like
Reactions: FZ6
Do you think it's possible to not cut out the panels in the Falcon because Randy's parts are so thick and instead just sand down the backsides of Randy's pieces so they are thinner? I would rather not hack up the Falcon. I'd prefer to just glue these pieces in place.

I'll chime in and say 'possible' but not 'ideal'. Even with the much, much thinner resin set from FZ6's Shapeways parts, glueing anything directly onto the existing sidewalls doesn't give you enough of an overhang of the hull plates. You can do it, but it doesn't look quite right. Luckily, the sidewalls aren't in any way actually structural, so they can easily go bye-bye.
 
Okay I've finished reading this entire thread. Jeeze that took a few days. I've got like a 6 page document of all the highlights on gluing, painting, etc to refer back to now.

I have a few questions.

1. Is anyone casting pieces to put in the recessed areas on the top of the hull that have sidewalls but shouldn't? This way it looks like the equipment continues beyond the opening in the hull but underneath it. I think people call these maintenance pits.

2. What are people using for cockpit windows when they are building out the cockpit? I definitely want something in there. Don't want to deal with dust buildup.

3. Does anyone have the template that someone was offering so that you can make the 40 or so panels that are missing on the hull because stickers are supposed to go there? I wrote the person offering but never heard back.

Oh and has everyone seen the guy who put a turntable in the Millennium Falcon?

1b382e528b6fdcddcbf22aab8ed30767.jpg

My Hasbro Millennium Falcon build: https://marksmillenniumfalcon.wordpress.com/
 
Last edited:
About the templates for the missing panels - if you can't get a hold of them (the computer I had ALL of my MF references and ALL of my PS working files on has suffered catastrophic HDD damage, so I've lost ALL of the templates I had, and ALL of my working files), you can always throw the stickers on sheet styrene and work from there. Don't stress too much, as you won't be able to use the templates for any panels that are actually part of existing panels (which is like, half of the miserable little bastards). I found myself doing a WHOLE lot of rubbings onto paper for those partial panels as the stickers are not quite the right shape to fill in those holes, and end up being significantly smaller than neccessary.
 
Also regarding the templates for the panels. I am in the process of making all of my panels right now. I have about 15 left and was planning to make a template out of them buy I am not sure the best way to do this that would benefit others. I could digitally scan them but I am worried that either parallax or the transfer into the computer would result in a slightly different scale. The have to be perfectly precise for it to work. Off by even a fraction of a millimeter and they won't work.

If anyone has thoughts I am all ears.

Hey Charles... my thoughts... best bet would be to do rubbings of each panel and then scan it in at 300dpi. Use vector graphics to fix the panels around the rubbings that way the parallaxing won't be affected. When saving, save at the same 300dpi and convert it to PDF format. That way it will print the same on all printers. Have thought about doing the same myself but have been too busy working on the DeAgo Falcon myself.
 
LrdSatyr I am curious where you get 98? Are you counting blisters? I only count 66 missing panels. 40 on the top and 26 on the bottom. You got me worried that I am missing something!

I am going to make a graphic soon to show the panels I have found missing. I will post it and we can discuss in more detail based on that.
 
I think 98 is a total number of all the stickers... is it not?

Sent from my SGH-I317M using Tapatalk
 
I think a few of the stickers span a couple of the panels that should actually be 2 panels instead of 1... but like I said it was off the top of my head... I could be wrong with the count.
 
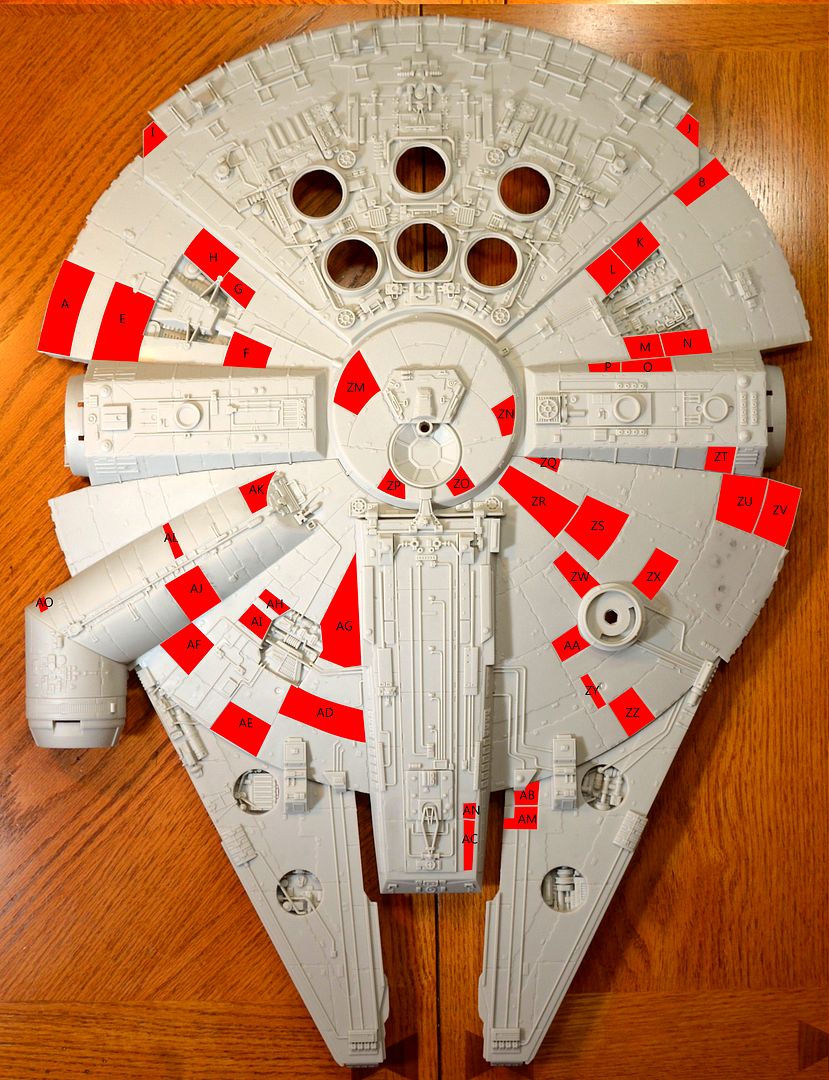
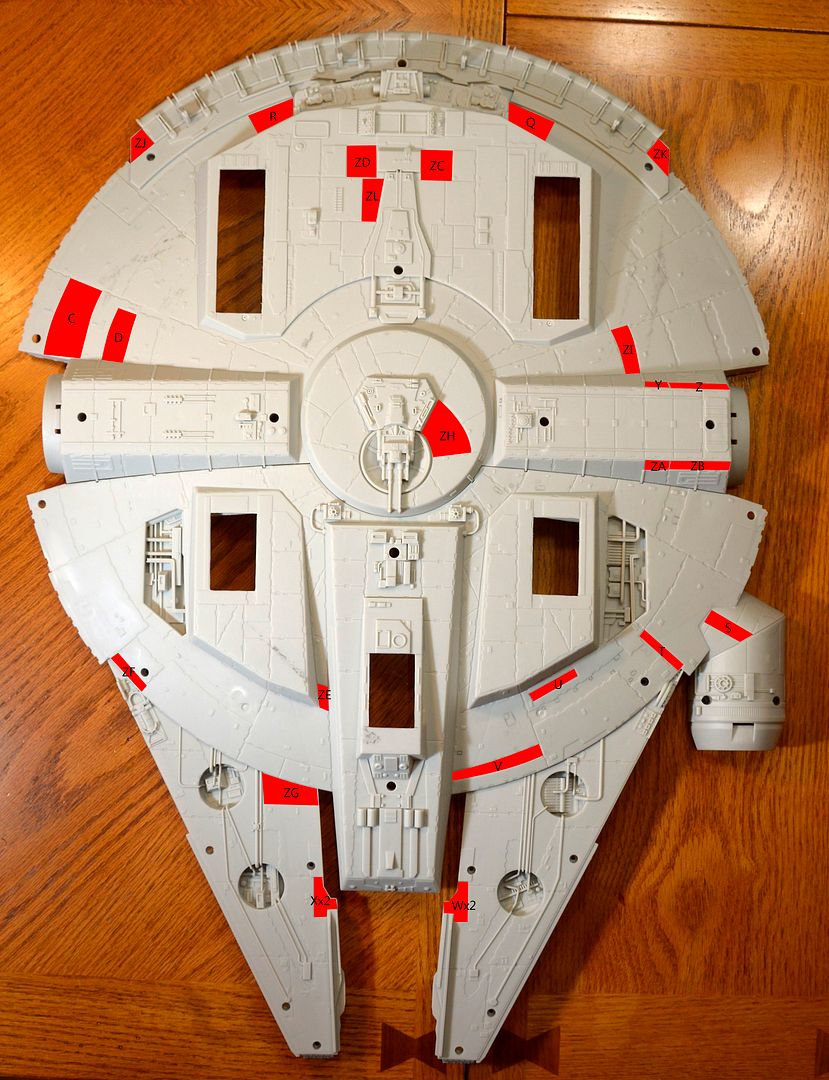
Here are the images I did for this. They are up on my build thread as well with more detail.

Let me know what you think! And by all means if you see any errors point them out.


You will notice that Xx2 and Wx2 means there I am making 2 of each of these and gluing them together to make the depth of the panel match.

Also ZT on the top is actually got a few extra parts to make the extra depth to the panel and the hold and lines on it.
 
Back
Top