New 10th Doctor Sonic Screwdriver Universal Remote

I got my battery in the mail yesterday and was finally able to swap out the old one. So happy that this thing is working again! Quick and easy swap too, I'll be sure to keep this one charged up more often.

PXL_20220621_003112624.MP.jpg

PXL_20220621_150331188.MP.jpg
 
Hi all, justb re-discovered RPF after being here years and years ago! However I tried replacing my battery before reading any of this using a battery from a BT Headset that fits perfectly but is 350830 60mAh 3.7v - and after repairing the IR does not work! I popped it back apart and examined all the wires and the 3 connectors to the IR blaster look intact, as do their soldering to the main board. The light and sounds work perfect and that at least is a joy to have working again. But I cannot control anything! The Learning Mode works great, but won’t control anything, even the Universal On/Off feature doesnt work.

Does anyone know if it could be the battery? Or is there anyway to figure out if the IR Blaster is working? If I soldered the wrong polarity would everything work okay except the IR (and I just soldered red to red, black to black on the battery)? I really love this device and when I lost my old one (or someone took it?) I was devastated so bought a pricey one from eBay that would only work for about 2 minutes. I can’t remember for sure but I *think* the IR was working prior to my battery swap, but this was one test plugged in when I first got it, if I’m even remembering properly. Can the IR go bad? Or could I damaged it replacing the battery (I was careful with the repair, and dont think I damged any connections or wires, but am worried it may be swapped polarity *if* it would still be working as it is with everything fine except the IR - which I vaguely think I may have read years ago).

Any suggestions greatly appreciated! I still have one other old broken on (broken on/off switch) as I think I bought 4 of these back in the day, seemed like I would eventually always drop it and break the delicate On/Off button. My last one that I had for years that was lost/stolen was someting I was truly attached to - call it my Linus Blanket <grin> - and was heartbroken when I found Wand Co no longer even makes them and would be a few hundred minimum to buy a broken one on eBay but of course I did. :)

Really really wish Wand Co would do another run…I wonder how many pre orders/deposits/guaranteed buyers they would have to have to do another run? Anyone here know anyone at Wand Co to see if this is even possible? And if so what sort of numbers they would need? Perhaps could do it on a sliding scale - if we get (and these are just rought examples) 1000 people then they would cost $300 for each unit (ie the min cost on eBay for a broken one!), 5,000 people then they would be $200, and so on…anyone think they would do it? How many would be interested?

But for now would also appreciate any suggestions on the IR issue (ie wrong polarity or would that fry the whole unit, wrong battery type, etc etc)?

Thanks in advance and so glad I re-discovered this site! :)
 
No, the unit would not work at all with the polarity reversed. Depending on the protection they have in place in the circuit, a temporary reverse polarity could damage something. So yes, you could have damaged something if the polarity was ever reversed (again, depending on the circuit topology), and also through static discharge while handling the circuit. Did you ground yourself while touching the electronics? You could have also damaged something physically (an IC, etc.), during disassembly/reassembly.
 
Just wanted to say thanks to this thread for finding a solution for getting my screwdriver working again! My battery was shot when I pulled it out of storage a few months ago, and this threat lead me to the tutorial that made battery replacement super easy! Especially for someone with very limited skill in actual functioning electronics, I mainly rip apart old circuit boards to scavenge them for greeblies.
 
Hi all, justb re-discovered RPF after being here years and years ago! However I tried replacing my battery before reading any of this using a battery from a BT Headset that fits perfectly but is 350830 60mAh 3.7v - and after repairing the IR does not work! I popped it back apart and examined all the wires and the 3 connectors to the IR blaster look intact, as do their soldering to the main board. The light and sounds work perfect and that at least is a joy to have working again. But I cannot control anything! The Learning Mode works great, but won’t control anything, even the Universal On/Off feature doesnt work.

Does anyone know if it could be the battery? Or is there anyway to figure out if the IR Blaster is working? If I soldered the wrong polarity would everything work okay except the IR (and I just soldered red to red, black to black on the battery)? I really love this device and when I lost my old one (or someone took it?) I was devastated so bought a pricey one from eBay that would only work for about 2 minutes. I can’t remember for sure but I *think* the IR was working prior to my battery swap, but this was one test plugged in when I first got it, if I’m even remembering properly. Can the IR go bad? Or could I damaged it replacing the battery (I was careful with the repair, and dont think I damged any connections or wires, but am worried it may be swapped polarity *if* it would still be working as it is with everything fine except the IR - which I vaguely think I may have read years ago).

Any suggestions greatly appreciated! I still have one other old broken on (broken on/off switch) as I think I bought 4 of these back in the day, seemed like I would eventually always drop it and break the delicate On/Off button. My last one that I had for years that was lost/stolen was someting I was truly attached to - call it my Linus Blanket <grin> - and was heartbroken when I found Wand Co no longer even makes them and would be a few hundred minimum to buy a broken one on eBay but of course I did. :)

Really really wish Wand Co would do another run…I wonder how many pre orders/deposits/guaranteed buyers they would have to have to do another run? Anyone here know anyone at Wand Co to see if this is even possible? And if so what sort of numbers they would need? Perhaps could do it on a sliding scale - if we get (and these are just rought examples) 1000 people then they would cost $300 for each unit (ie the min cost on eBay for a broken one!), 5,000 people then they would be $200, and so on…anyone think they would do it? How many would be interested?

But for now would also appreciate any suggestions on the IR issue (ie wrong polarity or would that fry the whole unit, wrong battery type, etc etc)?

Thanks in advance and so glad I re-discovered this site! :)
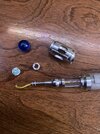
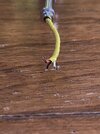
On one of my sonics the LED would stop working every so often. It turned out one of the wires to the LED board in the tip was broken. A little solder got it all fixed.

Although you said you tested the wiring I think one of those wires or solder is broken. Can you temporarily hook up a regular LED to the IR wires? You can then test the IR function and if the LED lights up you know the circuit board is still sending power to the IR.

You can first hook up the LED to the contacts on the circuit board to test there. If it doesn't work there then there is something wrong with the circuit board. If it works there you know the circuit board is sending power.

You can then test the LED at the tip. If it doesn't work then one of the wires is broken. If it does work then the IR emitter maybe broken and you will have to try and find a replacement.
 
I just recently found my screwdriver i was gifted in 2013 and remembered my little sister had broken it. Thought i’d give fixing it a go but i’m unsure which wires are connected where, and where the little white piece goes so any help would be appreciated! Thanks
 

Attachments

  • 291319DA-BECD-4C9E-84BA-41312F20E7F0.jpeg
    291319DA-BECD-4C9E-84BA-41312F20E7F0.jpeg
    1.4 MB · Views: 101
  • 4A06F440-1A90-4664-8DBE-A3ECE73FF8C3.jpeg
    4A06F440-1A90-4664-8DBE-A3ECE73FF8C3.jpeg
    1.1 MB · Views: 111
  • ABBC7812-0F87-451B-A8E4-3B3C28BB3973.jpeg
    ABBC7812-0F87-451B-A8E4-3B3C28BB3973.jpeg
    1.2 MB · Views: 120
  • EC048276-AC0F-4060-BAB1-FA9D226D6991.jpeg
    EC048276-AC0F-4060-BAB1-FA9D226D6991.jpeg
    2.2 MB · Views: 127
DSC04831.JPG
DSC04832.JPG
DSC04833.JPG

DSC04834.JPG


This is what the end of my unit looks like.
On the top side there are 3 "+" marks. The red wire goes there. Opposite to that on the bottom is the black wire. They seem to correspond to the Blue LED leads. To the right is the white wire.

HTH
 
Alternatively, if you would like to attempt to replace the battery yourself, then we can send you out a new battery free of charge. If you would like us to do this, we would advise that you read through our dismantling instructions first (please see below, as I have attached them to the end of this email) to make sure you are comfortable in carrying out the replacement process.
Could you please share the dismantling instructions they attached to the email?
 
Could you please share the dismantling instructions they attached to the email?

Dismantling the Tenth Doctor's Sonic Screwdriver

Disassembling the Sonic can be hard to do but is not impossible. The aluminium cylinder on the end of the Sonic can be unscrewed. On some Tenth Sonics it is glued in place and will need some effort to remove. We have done this on the more difficult ones by gripping the aluminium piece in the mouth of a pair of plumbers' mole grips with two halves of a plastic eraser held in the jaws to cushion them and prevent the jaws of the mole grips from marking the soft aluminium collar, which they might easily otherwise do. Other rings have just been easy to unscrew because either they are not glued or the glue is weak and easily broken.

The front end can be a little more tricky (depending of course on how difficult the back of the sonic was to remove). At the front, you have the top aluminium collar which is snap-fitted onto the plastic body by some rather strong clips which latch into a groove on the inside of the aluminium top collar. If you put the tip of a pair of long nosed pliers, or the edge of a strong, flat-blade screwdriver into the slider slot and exert a firm pressure on the collar you can start to pry it off. Be careful not to scuff or scratch the clear tube. Although if you do, once it is apart, you can always polish the clear tube to remove any small scratches. Also, try not to damage the PCB box inside the slot. Don't worry, it won't damage easily.

Once the collar starts to move a bit, then using the tip of a dinner knife or something similar that's strong thin and blunt, work around the top collar in the gap you are making between the body and the top collar and carefully pry it off. Once the top collar comes off, the body should just slide back from the top collar and it is free. As you slide the body off, be careful to keep track of the blue strip insert (noting that on some versions of the sonic there might be another similar one hidden inside that gives those Sonic Screwdrivers their open position detent). Not all Sonics have this extra piece as it was added after the first manufacturing run, but if yours does, this will need to go back in when you reassemble the Sonic.

The PCB box can now be separated quite easily. However be very careful not to lose the clear button as this will drop out once the two halves of the PCB box are separated. Getting this little button back in when you put the PCB box back together is not easy and you have to be careful not to damage the small tact switch on the circuit board.

The battery is stuck to the PCB by a layer of sticky foam. It is easy to slice through this was the blade of a scalpel or Xacto knife. The battery will also need to be desoldered from the PCB. Make a note of the polarity, so that the replacement battery is put back the right way round. Ideally, take photos of each part of the disassembly so that you can refer to them for the reassembly process. Specifically of the battery polarity, as connecting it the wrong way round will damage it and the circuit beyond repair.

If you have damaged the snap latch of the annular snap fit clip on the plastic body when removing the collar, then when you are ready to reassemble, a drop of super glue on the plastic part with some super glue accelerator on the inside of the Aluminium top collar should keep everything neatly in place. However be careful not to use too much so that it drips down inside and sticks the main housing to the PCB box, or blobs out on the visible face of the main housing.
 
WOW, I expected more than "jam a screwdriver or dinner knife in there".

I used a thin metal pry blade, and with patience and pressure managed to get the top collar off with barely a mark.

Thank you!
 
WOW, I expected more than "jam a screwdriver or dinner knife in there".

I used a thin metal pry blade, and with patience and pressure managed to get the top collar off with barely a mark.

Thank you!
Yes, that was the early instructions from the company when this issue started happening, but as posted by raptor0192, there have been better instructions from other people as they experience having to replace their batteries.
 
I'm on my second battery (360821) replacement and have a running issue after installing the battery each time.

When installed, i charge the battery and can use the "FX" mode freely for a long time. However, once in remote mode, the battery is depleted within a minute or less. Has anyone encounter this? I can't tell if it's a battery issue or just the remote itself becoming faulty. When original, remote mode worked perfectly without instant battery drainage.
 
So I have been using with my Sonic for at least 15 minutes in control mode. The at least 5 minutes was spent turning on and off my receiver and turning the volume up and down. After that I was walking around for at least 10 minutes activating the sonic.

I have no idea what the battery level is but it is still working.
 
I'm on my second battery (360821) replacement and have a running issue after installing the battery each time.

When installed, i charge the battery and can use the "FX" mode freely for a long time. However, once in remote mode, the battery is depleted within a minute or less. Has anyone encounter this? I can't tell if it's a battery issue or just the remote itself becoming faulty. When original, remote mode worked perfectly without instant battery drainage.
I just replaced mine and this is exactly what is happening to me. Anyone find a solution?

Also - the little plastic tab that holds the internal casing together (the one you release to get at the battery) snapped off when I opened it so now the case doesn't "shut". This makes it a tighter fit internally and therefore the slider struggles to move. Any ideas for a fix?
 
Last edited:

Your message may be considered spam for the following reasons:

If you wish to reply despite these issues, check the box below before replying.
Be aware that malicious compliance may result in more severe penalties.
Back
Top