Nautilus 2020

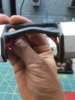
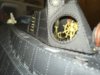
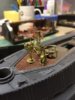
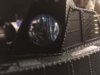
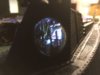
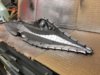
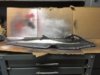
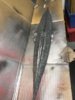
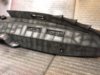
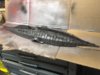
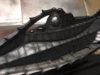
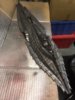
I tried aluminum foil, still not exactly what I wanted, but I think it's better than the sloppy cloth I had in there...it'll do
for the scale, I think the foil looks a little better and there is less restriction of the field of view that will be available through the iris port windows
 

Attachments

  • curtains4.jpeg
    curtains4.jpeg
    50.1 KB · Views: 196
  • curtains5.jpeg
    curtains5.jpeg
    59 KB · Views: 181
  • curtains6.jpeg
    curtains6.jpeg
    53.5 KB · Views: 186
We love your build and attention to detail.

We wish we could get a hold of the interior for our kit but it is no longer available.
So, we have almost everything that steam phoenix has available on shapeways. We also have the propeller and raised flaps from RCSubGuy's shapeways store. Ours will also be lit with led lights. Lastly, we got a small motor so the metal propeller will spin (slowly of course).

Our kit is next in line for our work bench once the other projects get finished.

Thanks for posting and can not wait to see more.
Well thank you, this is the second one of these I've done and there is a third waiting. This one is for a friend in CA. RCSubGuy, (Bob Martin) told me that the interior kit in being re-tooled and will be available in about a month. I would contact him and see when they're going to be ready. I still need one for my next build, which will be for me
 
The aluminum foil looks much better.

Never thought about using foil. My only concern about the foil would be the paint cracking/flaking off, especially if the paint layer is thick.

Although then again, I guess it should not be an issues since it will be locked up inside and protected so nothing should be disturbing it.
Well I roughed it a tad with fine emery and primed it with Citadel Chaos black before I applied 3 light shots of the red. Then once I had them stuck in place I touched up more of the red by brush. I think it'll stay...I hope
 
did some work on the wheel house today. I had to set the wheel slightly to the right and the dive levers left and back so the wheel house structure will fit down over them. Personally I think the 3D parts are a bit too large (a scale too big) but it's all in there. Also here's a shot of the one wall with the new foil curtains and couches set in place. I'm happy with the results
 

Attachments

  • whlhse1.jpeg
    whlhse1.jpeg
    104.6 KB · Views: 185
  • whlhse2.jpeg
    whlhse2.jpeg
    54.4 KB · Views: 197
  • whlhse3.jpeg
    whlhse3.jpeg
    60.5 KB · Views: 199
  • whlhse4.jpeg
    whlhse4.jpeg
    56.4 KB · Views: 206
  • curtains7.jpeg
    curtains7.jpeg
    64.7 KB · Views: 199
Another cool thing that happens with the dragon eye LED's is, that clear tube sits almost directly below the starboard LED and the residual light shines down through it
 
Ok. so...the dinner table end needs a couple more above the opposing book cases but the interior is all glued together. then today I tackled getting the chartroom installed and it's ambient lighting. Also did some lighting tests for the wheel house. It still needs a couple of chip LED's here and there to get it where I want it.
 

Attachments

  • sublite1.jpeg
    sublite1.jpeg
    55.6 KB · Views: 211
  • sublite2.jpeg
    sublite2.jpeg
    82.1 KB · Views: 209
  • sublite3.jpeg
    sublite3.jpeg
    78.9 KB · Views: 198
  • sublite4.jpeg
    sublite4.jpeg
    69.1 KB · Views: 206
  • sublite5.jpeg
    sublite5.jpeg
    83.7 KB · Views: 196
  • sublite6.jpeg
    sublite6.jpeg
    92.1 KB · Views: 195
  • whlhse5.jpeg
    whlhse5.jpeg
    76.8 KB · Views: 207
  • whlhse6.jpeg
    whlhse6.jpeg
    71 KB · Views: 200
gt350pony66 - Looking GREAT! I just re-watched the movie yesterday as a result of reading through your build thread, which gave me a renewed appreciation for it. I am really enjoying watching your progress - thanks for sharing.
 
gt350pony66 - Looking GREAT! I just re-watched the movie yesterday as a result of reading through your build thread, which gave me a renewed appreciation for it. I am really enjoying watching your progress - thanks for sharing.
Well thank you so much for the fine compliment and encouragement. This the second one I've done and it's far better, and a lot more work. this one is for a buddy in CA, but I have another one to do after that for myself. So a good bit of experimentation with this one
 
Ok, so...after getting the lighting squared away for the wheelhouse and the chart room I got the wiring situated in the upper hull and glued down the wheelhouse to the upper hull and masked off the windows and the stairwell. Using the method recommended by Bob Martin of Nautilus Drydocks I shot the upper and lower hull with the same stuff he uses which was the same as the one I did a few years ago. The next step is to airbrush some black on all the seams and rivet lines.
 

Attachments

  • paint1.jpeg
    paint1.jpeg
    53.7 KB · Views: 178
  • paint2.jpeg
    paint2.jpeg
    91.2 KB · Views: 174
  • paint3.jpeg
    paint3.jpeg
    104 KB · Views: 187
  • paint4.jpeg
    paint4.jpeg
    143.5 KB · Views: 185
  • paint5.jpeg
    paint5.jpeg
    107.3 KB · Views: 185
this step takes a while...airbrushing the seams and rivet lines, always have to back and see what you missed lol
 

Attachments

  • zebra1.jpeg
    zebra1.jpeg
    111 KB · Views: 176
  • zebra2.jpeg
    zebra2.jpeg
    81.7 KB · Views: 179
  • zebra3.jpeg
    zebra3.jpeg
    64.9 KB · Views: 187
Just be careful when you do the next step. When I did the metallic paint/vinegar thing I lost a lot of those dark airbrushed lines.
I hear ya on that, the first one I did a couple years ago, the first try it was way too rusty. So I got the oven cleaner and stripped it and started over. Lucky for me it was just the lower hull. the second attempt was more successful. Taking the same approach this time as I don't recall the exact mixture. I tried what Bob does in his video the first time but it did come out right
 
That first pics looks perfect! The other two, (maybe due to flash/lighting exposure), make the pre-shading/panel lines look just a bit on the dark side compared to the other spots? Hard to tell
 
Back
Top