You are using an out of date browser. It may not display this or other websites correctly.
You should upgrade or use an alternative browser.
You should upgrade or use an alternative browser.
My PKD Bladerunner pistol build.
- Thread starter B1RDY
- Start date
robotprops
Well-Known Member
I too am waiting on parts and we’ve had some record setting hot weather that has deterred me from wanting to work in the shop much. I finish a contract this week so I should get back to building by Friday.
Well, I received the bronzed-steel, 3D-printed cylinder swing arm. Tapping that steel for the M3 screws was a pain, but I succeeded. Had to Dremel out the recess in the resin frame which the swing arm seats into in order to loosen the fit and allow for a free range of motion. Still needs a bit of fine-tuning, and cleanup of the parts, but the cylinder assembly now correctly opens up and swings out when the cylinder switch is engaged. And the X/Y-axis combination of the steel M3 screw and the steel swing arm will ensure no more breakage of the moving parts. FINALLY!

One question, though—just how loose should the cylinder assembly be? Should it flop right open, or have more of a slight pressure-fit, opening only with a bit of finger manipulation? Which is more accurate to the real gun?
Meanwhile, I ordered some more slotted flathead screws in order to be able to screw the frame together, rather than using the resin pins which come in the kit. With the extra weight of the dummy rounds and other metal parts, there’s a bit of wiggle where the grip frame connects to the main Bulldog frame.
Also, I think I’m gonna remove the polish from the grip texturing and use a paint wash. After lots of handling, the polish in the grip-texture grooves is becoming very patchy, and I need a slightly more permanent solution. Any color suggestions?
I also need to find time to replace the micro-switch for the clip electronics with one of the replacements I received, and continue testing the LED assembly.
Hopefully, these will be the last few major hurdles of this build. Then, I can clean up and re-prime the parts, and start working on painting and detailing.
Last edited:
You should have a slight pressure to remove/put back the cylinder. As for the grips, a pic would be great...I don't understand the "patchy" effect you have on them")
Patchy!
Did you try to buff it with a buffing wheel and Turtle Wax?
Adding a sealer coat, you mean? No, I hadn’t.
joberg
Legendary Member
No sealer...just the buffing & the waxAdding a sealer coat, you mean? No, I hadn’t.
Been working on fine-tuning the action of the cylinder mechanism. Pretty much got it down, I think. Need to find some proper flathead screws for the top of the barrel (the ones I’ve gotten are either too big or too small) to replace the 3mm grub screws.
Then, once everything is locked down, I can disassemble the gun, clean up the parts, and re-prime.
Then, once everything is locked down, I can disassemble the gun, clean up the parts, and re-prime.
Ekfud
New Member
Did you end up making any progress with these?Anyone in Oz know where we can source the .44 rounds for this?
We do have access to snap caps but I’m after the brass.
I think I may end up getting some snap caps as not much else is looking promising for NSW.
OzDean
Well-Known Member
Nothing yet, I was going to ring a few gunshops and see if they could help. Can’t pick up anything though due to lockdown.Did you end up making any progress with these?
I think I may end up getting some snap caps as not much else is looking promising for NSW.
Ekfud
New Member
At the risk of pulling people back to earlier stages of their build - I'm starting to work through sanding, but keen to get some specifics on what levels people went through in the process? I started a few of the areas with goosebumps (from supports) with 240, but feels like that would be a very aggressive for other parts of the construction (particularly bits like the steyr logo on the receiver).
What sort of sanding grit steps have people been starting from/using?
Also several areas that feel very hard to get into... eg, the nooks around the led housings on the clip. Any thoughts on how to approach the many awkward spots?
What sort of sanding grit steps have people been starting from/using?
Also several areas that feel very hard to get into... eg, the nooks around the led housings on the clip. Any thoughts on how to approach the many awkward spots?
I had very little sanding to do. My kit was printed very cleanly in resin. Some basic cleanup of the parts by wet- sanding with 320, then a few light coats of automotive filler primer (with the engraved text and numbers masked off for most of them), then some more wet-sanding. Not too hard.
Filler primer makes things much easier. The trick is not overdoing it and losing details like the engraving.
Filler primer makes things much easier. The trick is not overdoing it and losing details like the engraving.
dirtyjawa
Active Member
I know this is kinda old but I had a thought.Stunt casting photos presented for comparison. That subtle doming of the screw’s head seems to be tricky to match.
View attachment 1468367View attachment 1468368View attachment 1468369
Screws that come with faceplates for wall switches and plugs are domed just like that. Paint one black and I think you'd have a match.
robotprops
Well-Known Member
I really should get back to finishing this build.
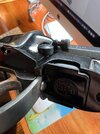
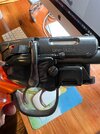
dirtyjawa-That screw looks good from above, but it's going to be a bit small in diameter and it doesn't have the depth in profile you'll want.
Here are pics from my Goldberg snub nose...
dirtyjawa-That screw looks good from above, but it's going to be a bit small in diameter and it doesn't have the depth in profile you'll want.
Here are pics from my Goldberg snub nose...
Attachments
Last edited:
dirtyjawa
Active Member
Oh, I see! I was looking at this photo so it stood out to me as looking just like switch plate screws. Damn. I tried, tho!I really should get back to finishing this build.
dirtyjawa-That screw looks good from above, but it's going to be a bit small in diameter and it doesn't have the depth in profile you'll want.
Here are pics from my Goldberg snub nose...
Attachments
Similar threads
- Replies
- 0
- Views
- 249
- Replies
- 2
- Views
- 375
- Replies
- 3
- Views
- 1,120