My Mal Reynolds (Firefly) costume

So after watching some videos on youtube last night ,I decided to jump right into this next step tonight and didn't plan it out so well. I'm making my own lasts ( shoe forms) for the boots. Basically I patterned the bottom of the last by averaging a trace of my foot and of the existing soles. Then I built a 7/8" tall toe box with duct tape, built up the toe shape with play-doh, put my foot in a plastic bag, and started wrapping it in duct tape, securing the bottom edge to the floor as I went. Aaaaaaaand then I ran out of duct tape. So I'm sitting here typing this up with my foot covered in play-doh and tape and cemented to the floor while my roommate runs to the store to buy more tape.


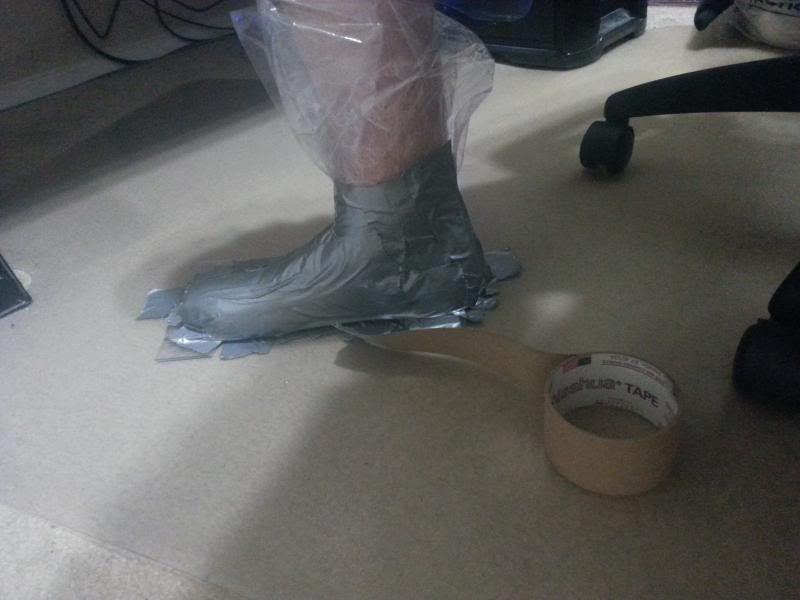
Once I put the second coat of tape on, it should be pretty rigid. Then I can carefully cut the tape free from the floor, wrap the bottom of the foot, cut myself out of it, remove the play-doh, tape it back up, and fill it with plaster. Then I get to do it all over again with the left foot.

In regard to the other machining project, it's most of the way done, just needs a little fine sanding and it's done. Also, does anybody know where to get a good brass blackening chemical? Brass Black by Birchwood Casey is absolute garbage, like their aluminum black. I've also tried Jax brand and I've made a half-assed atempt at ammonia and calcium carbonate. None of them create a good, durable black patina. There was some stuff I used to have access to at my old job years ago that was perfect, but we never knew the name of it or where it came from. It would turn brass parts completely black in seconds when submerged and the finish was durable and basically permanent.
 
The first last turned out pretty well. I'm going to peel all the duct tape off, sand the plaster cast smooth, fill any divots, and wrap a clean layer of tape around it. Overall pretty happy with the results so far.

I also did some work sanding the barrel smooth and drilling and tapping the front sight. Once I divot the inner barrel the set screws will sit flush.


I also laser cut a practice gun from acrylic to test fit the parts and the wood grips, make sure everything lined up.


Unfortunately, the water jet idea isn't panning out very well. I'm going to order the main frame of the gun laser cut from 1/2" steel, but I have to make all the brass parts from scratch. I'm not too worried though, drawing the parts in illustrator helped me wrap my head around how to machine each part, and it's definitely possible with enough hours on the mill, dremel, and sanding.

Also, I'm going to try to get that other machining project finished finally, possibly tomorrow. The sanding stage is taking a long time. It's pretty difficult to go from brass plate cut on a mill to something organic in shape.
 
I finished the project, it's an accurate Mal gun belt buckle machined from plate brass. The antiqued buckle next to it is a USMC garrison buckle, which matches the one posted on the FFP board in all details except belt size. I copied it as best as possible considering I wasn't able to sculpt a master from something soft like plastic and cast it.


Unfortunately, no. It took a LOT of work to do just the one. I might consider it if I found a good brass caster, but leather work doesn't sell well enough to justify the expense these days. That being said, I now have two spare German navy buckles that I can incorporate into gun belt commissions, should anybody be interested.
 
I was referring to just the buckle. I have a German buckle already but the back post that the belt loops around is back a lot further than Mals. Yes, I was thinking about casting it. If you do end up looking into that then I would be interested (in just the buckle) depending on price.
 
If I were to charge what an average machinist charges for their time, I'd have to ask $300-400 for just the buckle. Like i said, it took a long time.
 
I picked up a couple buckles in LA today and swapped out the prongs, so my buckle is completely finished.


And here it is on my German navy belt. I'll be making the one that fits me once I order some more leather.


And finally, here's the progress I've made on blackening the gun parts. I can't find anything that works nearly as well as the stuff I had when I first started doing leather work, but it'll work if I can't find anything better.

 
Thanks! I'm sending payment tonight for the frame of the gun water jet cut from steel. The back and forth with this company has been incredibly aggravating, but I'm almost at the finish line. After looking at some pictures of the original gun partly disassembled, I've got a better idea of how it all holds together. I'm pretty much ready to machine all the brass parts, but I'm going to hold off until I have the frame in hand and I've finished another project I've just started to practice my freehand skills on the mill. It would save me hours and hours of dremel and sanding work if I can get good enough to machine the complex curves on the mill.
 
I doubt Simon's costume will ever require enough work to warrant it's own thread, so I'm just posting this in here. I finally sat down and knocked this out today. Looking for input, but pretty sure I can't improve on it, at least not without ordering a swatch.

Firefly: Simon's vest - risu - Spoonflower

Now to find the buttons.

As for Mal, I've been taking a break from the heavy machining while I wait for the gun frame to come in, but I went ahead and cut the 5/8" thick x 3" x 14" piece of brass I bought a while back into 4 pieces for the 2 main side plates, the top slide, and the safety switch. I also ordered a couple new leather hides and I'll be making my belt in the next week or so.
 
I found some fabric to make my new Mal pants in LA today. I may or may not slightly darken it with tea or coffee, haven't decided yet. Here it is with my current pair of pants.


I'm planning to make new pants for a few reasons. The ones I've got are a little snug on me, I was never 100% happy with the dyed-ribbon-stripes solution (haven't figured out exactly what I'm going to do for that yet), and I just might have access to the exact buttons used on the original Mal pants.

I've also got a shirt on it's way to me that I won on ebay that has what looked like a more accurate weave and color than the one I currently use. I'll hopefully get that tomorrow or Thursday.
 
Gun progress. I got the frame in, so I tapped it and attached the grips. Then I machined the bottom fin.


And here it is with the barrel and the mocked up acrylic pieces.

 
The trigger came in earlier than expected, as did my slide springs, so here's some more progress.

The trigger assembly needs a very particular spring that will take me some time to find, but for now I've milled out the frame for the trigger and it has full range of movement.


I changed the slide design a little bit, an here's how it looks.


And finally, because I still don't think it's worth it's own thread, I got my test swatch for the Simon vest and it looks great.
 
I worked on the brass pieces a bit over the last few days, but only have this picture to show of them at the moment.


That is the overly complex safety switch piece during it's test spin on the lathe. Basically, to make it all one piece, I had to machine a piece of 5/8" brass into an L shape, round the end end with a bit called a plug cutter, and clamp it into the lathe. It's long enough the I can turn down the bar closest to the bottom to 1/4" diameter long enough to fit through the frame of the gun, but not so long that the piece wobbles in the lathe.

I also finished up the pocket for the trigger mechanism.


All I still need to do is machine the cover plate that will hold everything in place and make it all look clean. I'll probably do that tomorrow, and if I have time I'll also drill out the hole for the safety switch and drill and tap the two remaining holes through the gun for attaching the brass pieces. If all goes well, I can sand the frame smooth and blue it by the beginning of next week. Which is probably a really good thing, because it's starting to rust.
 
This thread is more than 6 years old.

Your message may be considered spam for the following reasons:

  1. This thread hasn't been active in some time. A new post in this thread might not contribute constructively to this discussion after so long.
If you wish to reply despite these issues, check the box below before replying.
Be aware that malicious compliance may result in more severe penalties.
Back
Top