First Doctor, Dalek Invasion Of Earth!! Excellent quote. To quote the sixth Doctor, "What's the point of a quote if you can't change it?" (The Two Doctors)

Great progress, by the way!!!
Lifelong whovian here! My other current project (if I can ever unbury the lathe from the garage) is an aluminum 9/10th era Sonic, which I hope to be posting about soon.
that was wicked close! lol
I left the printer running overnight, so that was certainly a nerve wracking thing to wake up to! If I hadn't lowered the number of bottom layers, it would have definitely failed
 
I hate leaving it run over night.. but it’s in my bed room under a smoke detector, I have 2 fire extinguishers with me just encase

I never leave the home with it running either, too paranoid
 
Oh hey, forgot to document this!
Before I printed any part of the pack, I printed the leg hose connector for the jumpsuit. I used darrellcalkjr's model on thingiverse, and I'm very happy with how it looks. Now unfortunately a bit of user error brought this down from good to serviceable, I sprayed it with a coat of black primer, then added grey on top of it. I got too hasty though, and added the grey before the black was completely dry, and it cracked and showed through in places, and it's too cold to recoat now. In all fairness though, I don't know what reason someone at a con would have to be staring that close at my thigh, so I'm happy enough-
IMG_20220111_012736991[1].jpgIMG_20220111_013113362[1].jpg
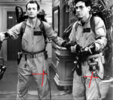
When it came to positioning, I looked at some reference photos and noticed that the bottom left corner and noticed it seemed to intersect both the crotch of the zipper, and the zipper of the left pocket. Sure enough, it matched up perfectly!
Leg hose placement.PNGIMG_20220111_013003481[1].jpgIMG_20220111_013025042[1].jpg
Very satisfied with this, as long as no one looks at the back of the stitching...

-Galifreyscall
 
locating the nipple is always difficult.. depending on what suit you own, what size you are.. some times if you try to line it up on a seam line because of your size it just doesn't look right.

not sayin my way is right, but ive always put the suit on my brother and with reference photo tried to locate it that way
 
Forgive the week long interruption, seeing as I'm on the other side of the country right now I've had very little to report.
I have however ordered some new patches from GBfans, and I've been working on modeling the last few oddjobs here and there (I dread making the bumper shudder)

Meanwhile I've been debating on how to make the EDA. Do I steer away from an all printed pack and scratch build it, or do I print a large, unwieldy rectangular filament dump? The answer might seem clear, but my scratch building skills are far less than admirable, and i find myself wondering if even a correctly proportioned box is beyond me. That being said, there is one part which I know I'll have to hand make, the cyclotron evades my skill level in Tinkercad, or maybe its just too simple to make a cylinder with rounded edges.

Either way, the thread's not dead yet, and neither am I, so progress I guess..?

-Galifreyscall
 
Only way to better your skill at scratch building is to build more things from scratch :lol: The proton pack is a fairly basic shape and with a month or two of dedicated time I'm sure you'd be able to knock out a serviceable pack!

During the 2020 Covid lock down I challenged myself with making a proton pack in less than 24 hours with items I had laying around the house. This was the result at the end of the day.
MVIMG_20200418_191019.jpg
 
Very very true Ned, I guess there's no reason to not improve a few skills here and there eh?
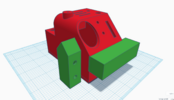
Since I have no access to my printer, I've been grinding away at some of the few models I haven't tackled yet, namely the proton/neutrino/particle wand/gun/thrower. (seriously, why cant we just pick one?) I started this a long while ago actually, but I hit a frustrating roadblock with Sean Bishop's incomplete plans and ended up putting it off for ages. Until I recently discovered the Ultimate Thrower plans from Ejgunth87 and I instantly got down to work.
Capture.PNG
Ive been cracking at this for the last few days now, and I've completed the body for the most part except for the bits in green which I'm not sure about dimensionally, seeing as I used Sean's plans in lieu of any dimensions in the UT plans. Nevertheless, I'm incredibly happy with the results, and I hop to get this printed whenever I can!
Here's to progress!

-Galifreyscall
 
Back home, safe and sound!

I've started using a new filament, Inland PLA from the local Micro Center. Prints like a charm, lovely range of colors, it even smells nice!
Currently reprinting the center cosmetic plate, as I messed up the alignment while gluing it, and I also made a discovery which annoys me quite a bit. When I measured the thickness of the aforementioned part it came out as 0.45" thick, where it should be 1/2". I believe this is because I've been using adaptive layers in Cura, and the thinner layers in places have added up to where its noticeably altering the dimensions of the print. Thankfully at a glance, everything looks right (who would really notice five hundredths of an inch? me, that's who) but the final nail in the coffin was the misalignment, so reprinting it is.
I'll have photos up whenever the parts finish, till then, to progress!

-Galifreyscall
 
no wonder you have be quiet lol im going to write that brand down, ive only used hatchbox, have had great success with it so i never changed
 
no wonder you have be quiet lol im going to write that brand down, ive only used hatchbox, have had great success with it so i never changed
If there's a Micro Center near you, they have it in stock for about $22. First print with it just came off the bed, and I'm seeing results on par with the white Hatchbox prints. My nearest MC is a bit over an hour round trip, so I'd say the price and quality justifies the commute
 
I'm not dead!
After a minor distraction involving the restoration of an antique rifle... ...or two, I'm back cracking at the whip again.
I've reprinted the center piece, and I'm much more happy with the results this time:
IMG_20220131_124000807[1].jpg
Mainly because this time I didn't screw up the alignment. The surface is admittedly a bit rough due to settings I haven't quite dialed in yet but I believe it can be sanded and filled out. I've also printed the injector tubes to great success:
IMG_20220131_124104515_HDR[1].jpg
I haven't had a print this smooth in ages! Overall I'm quite happy with this new Inland stuff, I think it'll do me well in the future. As I'm typing this, the first layer is going down for half of the EDA,and admittedly it's not looking good. I think I might have to fall into the life draining trap of constant printer maintenance again... That's all I have for now, I have a good feeling that I'll finish this on time. Now that I think about it, I've never actually mentioned what I'm making this for! I hope to be debuting this pack at this years FanExpo Dallas in June, I'm incredibly excited for it, and I hope to see some of you wonderful people there. Till the next update then, Happy making!

-Galifreyscall
 
I just finished the 21 hour process of printing the EDA, and I couldn't be more overjoyed-
IMG_20220201_151822656[1].jpg
This is the point in every projects where you can step back and see how everything is shaping up, and I'm over the moon. I mean come on, this is starting to look like a real proton pack!!
IMG_20220201_151428972_HDR[1].jpgIMG_20220201_151447471_HDR[1].jpg
It's gonna need a lot of sanding and filling to fit true, but this is honestly my favorite project so far. Now I just have to tackle the spacer, it's gonna be a task, but seeing how this turned out, I feel refreshed. Thank you all for the support so far, it's been what's keeping me going through this, and what's pushed me to work so hard. I hope to have more to show soon, but for now I'll leave you with those beauty shots. I say this with a capital P, Progress!

-Galifreyscall
 

Your message may be considered spam for the following reasons:

If you wish to reply despite these issues, check the box below before replying.
Be aware that malicious compliance may result in more severe penalties.
Back
Top