Mark VI Pepakura Iron Man Build

Gah damn that helmet is a beauty. Post a vid once you get it all wired up
Thanks. Will do. I got an order from SparkFun in my mailbox a few days ago, but am still waiting on my servos. And, I'm taking an Assembly Language class, Discrete Math class, and Technical Report Writing class this semester and am supposed to do an independent study with a prof in the robotics program so I don't have a whole lot of spare time:(
 
So, I'm getting ready to start my first attempt at a mark III helmet build & I'm searching for representative builds...& stumble upon your thread. Wound up reading all 14 pages. :D BEAUTIFUL work. I'm not planning on building the whole suit but there's plenty of helpful bits to use on my bucket build, based on the work you've done. Thanks for taking the time to document so much of your work & answering questions from folks along the way. I'll probably be stealthily visiting this thread often, as I stumble my way through my helmet build. :)
 
sanding ssoooo much sanding, Amazing work and also nice ring! can't wait to see more. :thumbsup

So, I'm getting ready to start my first attempt at a mark III helmet build & I'm searching for representative builds...& stumble upon your thread. Wound up reading all 14 pages. :D BEAUTIFUL work. I'm not planning on building the whole suit but there's plenty of helpful bits to use on my bucket build, based on the work you've done. Thanks for taking the time to document so much of your work & answering questions from folks along the way. I'll probably be stealthily visiting this thread often, as I stumble my way through my helmet build. :)

Thanks, guys. Yeah lots of sanding... so much so in fact, that my iPhone STILL doesn't recognize my thumbprint :lol. I'm done with all the fiberglass and bondo work now though so hopefully my prints will recover quickly. I clear coated the new lid, let it cure for a day, then sanded it with 1200 grit and clear coated again. Didn't do any clear coating with the first one and you can really see the difference it makes.
 
Hello! Your costume is awesome! You inspired me, I would like to do my own IM costume, I find some plans but I'm not satisfied with the hands… Could you tell me where you found the plans of your costume?
 
Re: Iron Man Build

Assembled the cod and ribs using tape. Hope it isn't too wide at the top. Had my kiddos help me hold everything together while I did a test fit.
I've been working on the ribs and abs. I am using the same files as you did. Did you use the supports that robo3687 made for these? I am trying to use them and they seem too small and end up kinking the ribs.
 
Re: Iron Man Build

I've been working on the ribs and abs. I am using the same files as you did. Did you use the supports that robo3687 made for these? I am trying to use them and they seem too small and end up kinking the ribs.

I'm not sure to what you are referring when you say "supports."
 
Here is what I am working from. The Triangle support pieces to hold the shape during the hardening stage. These were in a separate file (Supports) From Robo. Based on your response, I think you did not use these. Thanks...
 

Attachments

  • Supports for Ribs.JPG
    Supports for Ribs.JPG
    26.8 KB · Views: 141
Got new eye circuit wired up using a small reed switch. Will use the 12V A123 battery to power it...smaller than the 9V and more juice! Yeah. Also got the wiring all figured out for the repulsers thanks to Honus. He is a lifesaver. Still think I will add the Adafruit wave shield like Honus did, so am not hard wiring anything yet. Anyone know where Honus put the speakers for those? I assume somewhere in the arms and I probably need 2 shields/speakers...one for each arm??

http://youtu.be/x3ND5lTlEdw
Shows the eye light set up

Repulsor wiring protype - YouTube
Shows the repulser set up (just on the breadboard), still need to figure out how long my wires need to be:p
 

Attachments

  • DSC_8667.jpg
    DSC_8667.jpg
    96.5 KB · Views: 138
  • DSC_8666.jpg
    DSC_8666.jpg
    88.7 KB · Views: 130
  • DSC_8668.jpg
    DSC_8668.jpg
    88 KB · Views: 130
  • DSC_8660.jpg
    DSC_8660.jpg
    87.1 KB · Views: 119
  • DSC_8659.jpg
    DSC_8659.jpg
    83.8 KB · Views: 122
  • DSC_8658.jpg
    DSC_8658.jpg
    89.7 KB · Views: 132
  • DSC_8657.jpg
    DSC_8657.jpg
    82.3 KB · Views: 145
  • DSC_8656.jpg
    DSC_8656.jpg
    90.6 KB · Views: 131
  • DSC_8655.jpg
    DSC_8655.jpg
    84.2 KB · Views: 149
  • DSC_8654.jpg
    DSC_8654.jpg
    89.9 KB · Views: 122
Last edited:
Trying to get my repulsor wiring all together, but am wondering how other folks made it so the cables running from the glove into the arm pieces were easily connected/disconnected, yet stayed together while the suit is being worn? Anyone use connectors like these? Think they would work if I cut and soldered my wires onto these? My wiring is 22gauge and the wires on these connectors are 18 gauge. I don't know enough about electronics to know if having two diff gauges would affect performance. I cannibalized the connectors from some old computers. My fear is using something that will come disconnected while wearing the suit.

Still working on these babies. Uploaded another video with the light/flex sensor inside the glove (though all the other wiring and bread board and pro mini are all in my right hand...lol :$). Here is a link to the lights in action. Video is kind of dark since I wanted to be able to really see the light. And I still need to order those wave shields to add some sound.

https://www.youtube.com/watch?v=-qE3hzxG90E&index=21&list=PLjnxhotbeEgTZSetIpDJaPlaJ604-4YWn
 

Attachments

  • cordphoto.JPG
    cordphoto.JPG
    1.1 MB · Views: 246
  • cord2photo.JPG
    cord2photo.JPG
    1.5 MB · Views: 112
Molex connectors like that will work just fine- the difference in wire gauge won't matter. Make sure to leave your wires long enough so you can take the gloves off without disconnecting the cables since it's hard to unplug connectors while wearing the gloves. :)

For speakers I used two small rectangular speakers from an old monitor and mounted them in the back just under the arm opening. On Greg's suit the sound setup is a bit different since the WaveShield only outputs the walking sound and the hip pod flare sound. Greg already had a repulsor setup with a sound board that fit in the gauntlets and for those we mounted small speakers under the hand protector that sits on top of the glove on the MkIII suit.
 
Thanks for the input Honus. Greatly appreciate you sharing your knowledge. I would need a round speaker about 1" in diameter if was going to fit it under the front of the stationary part of the hand plate. Good idea as it keeps the sound where the action is. Hard to find a speaker that size though so I may end up doing what you did or put them in one of the arm sections, but that means more more wires to connect/disconnect each time the suit is put on.
 
This build is so good, the best I have seen so far! I'm currently building a resin MKIV. Are you able to tell me your process of bondo to priming on the outside? You are getting such a good finish and I would like to get the same! Lol.
Thanks!

Sent from my HTC_PN071 using Tapatalk
 
This build is so good, the best I have seen so far! I'm currently building a resin MKIV. Are you able to tell me your process of bondo to priming on the outside? You are getting such a good finish and I would like to get the same! Lol.
Thanks!

Sent from my HTC_PN071 using Tapatalk

Lots of sanding. I start with 150 grit using the mouse sander. When the general shape is good I start working by hand. I wrap my sandpaper around various sizes/thicknesses of wood as sanding blocks as a lot of the edges/corners are fairly sharp/detailed. Mr. Popsicle is great in tight spots. Don't be afraid to use your dremel on round spots. I used a barrel sander on my dremel in the ear pockets on the helmet to get rounder/smoother edges as it's practically impossible to do those by hand. Don't glob the bondo on either, and if it starts to go off, stop applying it. It gets really hard to get smooth when the bondo is clumpy. If you plan on cutting in details, add a bit of extra bondo so you can sand into the extra portion and not sand all the way through your fiberglass. I did a lot of backfilling with resin from the inside because I got a bit over enthusiastic about the sanding at times :facepalm. After I used the regular bondo and got the surface pretty smooth, I used the bondo glazing putty to fill in the tiny pinholes. This makes a huge difference in how smooth the final paintjob. looks. I used all duplicolor paints, including primer. Not sure if the primer I used was the best as it was a filler primer, and that meant sanding after each of those applications as well with somewhere around 1000 grit, otherwise the surface was rough. If you use too coarse a grit on the primer though, you just take it off even if you are hardly putting any pressure on the paper, and believe me, you can see the difference in color when it is painted. If I was going to do this over again. I would probably undercoat with silver instead of using just the flat gray primer. That way, any scrapes/damage would show the silver paint and not gray primer.

The silver/gold paints tend to run when other paints are put on with a brush to touch up where paint seeps under the tape, so be careful with that. I think a light clear coat would help prevent that. And when you tape off areas, do not leave the tape on any longer than you have to. The adhesive will stick to your paint. I have a couple of spots on the legs where that happened, and I didn't realize it until after I'd already painted over it. So after your final coat, give the paint enough time to dry and remove it asap. To really get that shiny look, use the clear coat. Stealth and BlackDynamo recommended rust-oleum acrylic enamel gloss crystal clear spray for this and it seems to work pretty well. Also, don't get in a rush to paint if the weather isn't dry or warm enough, it will cause your paint to have a dull finish. The gloss coat will help bring back some of the shine, but it doesn't look as good. After you get it all painted, give it a week or so to totally cure, otherwise you'll have paint sticking together where parts touch and pulling the paint off.

Hope this helps.
 
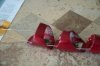
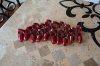
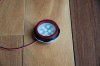
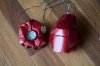
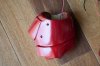
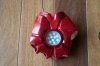
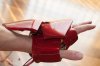
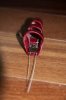
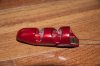
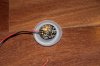
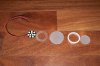
Been busy working on redoing the gloves, fingers and hand plates. Was having a hard time getting cloth gloves inside the gloves and fingers and since I resized the gloves, the hand plates an repulsers had to be redone. Yes those are milk jug caps on the back of the repulsers...gotta love recycling! I used Darkside's mods of Zabana's gloves so the repulser ring wasn't in the pep. I just used the thick walled PVC pipe and acrylic pieces cut with hole saws.

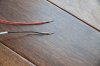
Worked and reworked the fingers to get them to align correctly. What a PITA. Used 90 pound test to keep my channels free as resined/bondoed/painted and that worked pretty well.

Also got my helmet working with the same sort of hinge set up Honus shared. The original hinges were too bulky and the action was a bit rough. Going to his set up made a huge difference. Honus has been a big help with schematics, and his Instructables tutorials have been a great resource (yes they are bookmarked).

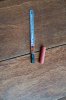
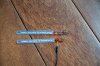
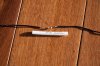
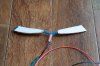
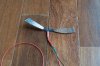
The original eye lights were too bulky to fit inside the helmet with the repositioned servo, so I redid them as well. Someone had asked about the Adafruit white backlit displays on another post and I decided to give them a shot. Only take 3v per "lens" so they take much less power than the LED strips I had cut out and are only $2.50 a piece. I just cut them to shape, soldered the leads together, used foil tape on the backside to block the light and hot glued them in. They are super thin (about 1/8") and plenty bright as you can see by the video. Only downside to them was the leads were kind of hard to solder to and I didn't like bending them like I had to.

Here is a link to the wireless helmet working.
http://youtu.be/4S9lVqZ7Tj8

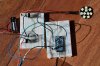
Been working on THAT for the past month. Situating my servo, reprogramming the speed and figuring out the code for using an RFID reader and XBee like Honus did. Getting into lots of stuff that really intimidated me when I started this project, but I figured if I can ace my college Assembly Language class, I can handle this stuff. Now to solder all my breadboarded circuits and on to getting my sound working for the gloves. Lights I have figured out, it's the sound with the spark fun microSD audio module and amp breakout that has me scratching my head as to how to get that all working together. I understand the sound format required for the module make it problematic, so I guess I get to do some more research...

Am posting some pics, then will up load the rest in a second post since we can only upload 10 at a time.
 

Attachments

  • 20140627-081314--DSC_9460.jpg
    20140627-081314--DSC_9460.jpg
    99.2 KB · Views: 103
  • 20140627-151014--DSC_9498.jpg
    20140627-151014--DSC_9498.jpg
    89.9 KB · Views: 101
  • 20140627-151140--DSC_9501.jpg
    20140627-151140--DSC_9501.jpg
    84.2 KB · Views: 110
  • 20140627-154112--DSC_9503.jpg
    20140627-154112--DSC_9503.jpg
    97.1 KB · Views: 98
  • 20140627-154311--DSC_9505.jpg
    20140627-154311--DSC_9505.jpg
    96.8 KB · Views: 99
  • 20140627-154326--DSC_9506.jpg
    20140627-154326--DSC_9506.jpg
    83.7 KB · Views: 94
  • 20140627-154333--DSC_9507.jpg
    20140627-154333--DSC_9507.jpg
    98.1 KB · Views: 107
  • 20140627-163042--DSC_9513.jpg
    20140627-163042--DSC_9513.jpg
    97.9 KB · Views: 96
  • 20140627-163054--DSC_9514.jpg
    20140627-163054--DSC_9514.jpg
    93.8 KB · Views: 128
  • 20140701-084724--DSC_9602.jpg
    20140701-084724--DSC_9602.jpg
    86.8 KB · Views: 93
More pics. Also got new white Thermasilk gloves and dyed them to match as best as I could, not perfect, but close enough to go inside the gloves.
 

Attachments

  • 20140710-170847--DSC_9638.jpg
    20140710-170847--DSC_9638.jpg
    93.3 KB · Views: 109
  • 20140702-160020--DSC_9628.jpg
    20140702-160020--DSC_9628.jpg
    76.8 KB · Views: 110
  • 20140702-155957--DSC_9627.jpg
    20140702-155957--DSC_9627.jpg
    90.6 KB · Views: 104
  • 20140702-155700--DSC_9625.jpg
    20140702-155700--DSC_9625.jpg
    80.6 KB · Views: 84
  • 20140701-131022--DSC_9615.jpg
    20140701-131022--DSC_9615.jpg
    80.2 KB · Views: 96
  • 20140701-131011--DSC_9614.jpg
    20140701-131011--DSC_9614.jpg
    99.4 KB · Views: 91
  • 20140701-103806--DSC_9606.jpg
    20140701-103806--DSC_9606.jpg
    85.1 KB · Views: 88
  • 20140701-103800--DSC_9605.jpg
    20140701-103800--DSC_9605.jpg
    87.2 KB · Views: 86
  • 20140701-103753--DSC_9604.jpg
    20140701-103753--DSC_9604.jpg
    98.7 KB · Views: 88
  • 20140619-062744--DSC_9426.jpg
    20140619-062744--DSC_9426.jpg
    84.9 KB · Views: 97
  • 20140619-062710--DSC_9425.jpg
    20140619-062710--DSC_9425.jpg
    99.6 KB · Views: 81
  • 20140619-062611--DSC_9422.jpg
    20140619-062611--DSC_9422.jpg
    87.6 KB · Views: 80
This thread is more than 8 years old.

Your message may be considered spam for the following reasons:

  1. This thread hasn't been active in some time. A new post in this thread might not contribute constructively to this discussion after so long.
If you wish to reply despite these issues, check the box below before replying.
Be aware that malicious compliance may result in more severe penalties.
Back
Top