Mark VI Pepakura Iron Man Build

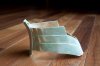
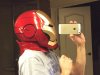
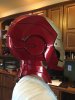
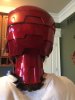
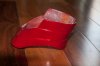
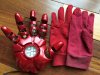
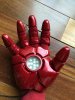
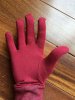
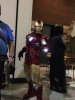
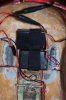
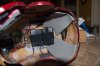
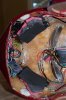
Neck seal is redone. Big difference in size. It's amazing how much better it fits after removing only an inch from each side. I had also curved the sides to make it fit better on my shoulders as before the bottom edge was pretty straight. The first 2 pics are prior to me shortening it an inch from front to back and prior to curving the bottom edge. The rest are the seal after making it smaller. The helmet is closer to my shoulders in the first pic because I added a fan cannibalized from a computer mounted in the top so my head is resting on the fan instead of the top of the lid. My pony is really showing on the last pic. LOL

Hopefully the gap in the front will be covered by the neck of my Zenti suit. I bought a red metallic one but need to go up a size as it was so tight the cod was being pulled down by the fabric in the crotch. Not sure if I want to go with a black one or a red metallic again. Suggestions?

- - - Updated - - -

Your painting method on the garage door vinyl definitely worked - in the thumbnails I thought it was part of the armour! This is turning out absolutely beautiful.
Thanks. Been working on this since Sep 2012 so it's taken a long time to get to this point. I think I'm now Con Ready. Need to suit up and get some pics.
 

Attachments

  • 20131023-164153--DSC_7420.jpg
    20131023-164153--DSC_7420.jpg
    83.5 KB · Views: 88
  • 20140115-173020--IMG_5699.jpg
    20140115-173020--IMG_5699.jpg
    96.6 KB · Views: 109
  • 20150507-162220--IMG_9285.jpg
    20150507-162220--IMG_9285.jpg
    81.5 KB · Views: 124
  • 20150507-162226--IMG_9286.jpg
    20150507-162226--IMG_9286.jpg
    84.4 KB · Views: 108
  • 20150507-162251--IMG_9288.jpg
    20150507-162251--IMG_9288.jpg
    93.2 KB · Views: 117
  • 20150507-135059--DSC_3547.jpg
    20150507-135059--DSC_3547.jpg
    98.8 KB · Views: 102
Bought another pair of the natural Terramar Thermasilk glove liners in a large. The medium was a bit snug and I was having problems getting my fingers all the way into the glove as the fingers were kind of short. Also I was worried I'd pull stuff off when I removed them since I'm thinking I may glue them into the glove (still deciding on that one) and it would make it harder to get the smaller size off. So I got the larger size and dyed them. The color match is better than the first pair so, yeah! Now to put the silicone wire insulation in the gaps to give it the detail.
 

Attachments

  • IMG_9319.jpg
    IMG_9319.jpg
    79.5 KB · Views: 127
  • IMG_9318.jpg
    IMG_9318.jpg
    88.8 KB · Views: 147
  • IMG_9320.jpg
    IMG_9320.jpg
    89 KB · Views: 92
  • IMG_9321.jpg
    IMG_9321.jpg
    87.2 KB · Views: 95
Once again great build so far! So much great information, just a quick question on the helmet parts that are hardboard. Have you got any tips for painting these or are they the same process as the bondo?
 
Once again great build so far! So much great information, just a quick question on the helmet parts that are hardboard. Have you got any tips for painting these or are they the same process as the bondo?
TBone2402 sorry I didn't respond on this. I've been busy with school and family life and didn't see your post here. I prepped the hardboard by coating it with a couple of coats of diluted Elmer's glue. Then just lightly sanded, primed and painted.
 
Well I debuted my suit at the Louisville Comic Con today and got an honorable mention. Frankly I’m surprised I was earned that since I had equipment malfunctions. That said, I learned a few important lessons about how to improve my experience at con in an Iron Man suit.

1. Create a checklist to make sure everything is packed up. I left part of the suit at the house.

2. Make sure your helpers stay close by. After helping me get my helmet turned on, my son went to watch the contest. After I left the stage and I was ready for my helmet and gloves to come off, and I could see him, but he couldn’t see me and I didn’t want to walk over to him since he was in the front row. Luckily someone asked to get my picture and afterwards I asked her if she would tell him I needed him to come over. He came over and took off the lid, then he returned to his seat. I ended up needing more assistance but had to endure without while standing through the remainder of the show (I was #4 in the lineup) with my gloves on, parts needing adjustment, and my hair in my face.

3. Ensure you’re mobile enough to get up stairs. I could barely make it up the steps to the stage and ended up partially dislodging the top of one of my gloves when I grabbed the railing for support. That loosened it just enough so it popped off on stage.

4. If you have long hair, don’t put it in a ponytail when you are going to wear a snug fitting lid. Having my hair pulled back forced my face to be too close to the front of the lid, and it wouldn’t descend all the way when the helmet shifted. A lightweight balaclava or zenti suit hood with an open face would have kept the stray hair under control and made it easier to get the bottom portion of the lid connected. I have one but didn’t bring it and I couldn’t figure why the lid wouldn’t close. I repositioned the batteries a number of times to no avail which ended up loosening one of the connectors enough so my helmet was non-functional. If I’d forgone the pony, I would have been fine.

5. Batteries to run lid eyes and servos are probably better off mounted in the chest or back with leads run into the helmet.

6. Bring a straw or two so it’s easy for your helper to keep you hydrated.

7. Use Loctite on any screws holding your suit together to make sure the screws don’t back out. I had 4 Chicago screws come loose. Not during the contest, but afterwards.

8. Pepakura Iron Man suits are heavy and uncomfortable when worn for 3 hours without a break and no ability to sit without removing the cod, legs, and boots. I also could have used more padding on the shoulders.

Good things I came away with. Pepakura shoes aren’t as bad to walk around in as I thought they’d be. People love Iron Man and asked lots of questions about the suit. Guys are surprised and impressed when chicks make costumes with electronics. My kids think I’m awesome for finally wearing this thing I worked so long and hard to make.

These are the only two pics I have from the Louisville Wizard World con since my kiddos were supposed to be taking pics.
 

Attachments

  • IMG_0205.jpg
    IMG_0205.jpg
    92.3 KB · Views: 162
  • IMG_4951.jpg
    IMG_4951.jpg
    81.9 KB · Views: 204
The Long journey has finally ended. Great work.

This was a hell of a ride.

Thanks Stealth. Means a lot coming from you. Yes. But I'm still tweaking it. Going to St Louis Comic Con in the spring and am trying to make wearing this easier. I pulled the soldered battery packs and the small CPU fan out of the helmet. Then I changed my battery connections to 2.1mm barrel jacks. This will hopefully prevent the connections from inadvertently disconnecting. It sill also make it easier to connect/disconnect. Instead of the soldered battery packs I'm using two 3-cell AA plastic battery housings which I daisy chained together to give me 7.2 v using rechargeable batts. The battery housings are mounted on the top of the lid using One-Wrap velcro which is hot glued to the top of the lid and seems to do a pretty good job of holding the housings in place. The batteries now sit where the fan was--on top of my head. This helps keep the helmet up high enough to allow me to easily see out of the eyes. It also allows me to easily swap out batteries when they are drained. Just disconnect the plugs, unvelcro the battery housings, swap out batteries and pop it back in the helmet. (Well, my family members can. I can't do anything with the IM gauntlets on. LOL.)

I also put more pieces of foam around the inside to help keep the helmet from moving side to side, and to prevent my face from being too close to the faceplate so it doesn't come down on my nose/forehead. Pic 1 show the battery housings mounted with velcro. Pic two shows the foam I added near the teeth to keep my face away from the front of the helmet, and the last pic shows some foam I added to keep my lid from slopping side to side. The larger grey pieces are only hot glued on the bottom edge so I can pull them back when removing the battery packs.View attachment 567070View attachment 567069View attachment 567068
 

Attachments

  • DSC_4366.jpg
    DSC_4366.jpg
    87.8 KB · Views: 76
  • DSC_4367.jpg
    DSC_4367.jpg
    85.5 KB · Views: 83
  • DSC_4368.jpg
    DSC_4368.jpg
    80.5 KB · Views: 74
Last edited:
This thread is more than 8 years old.

Your message may be considered spam for the following reasons:

  1. This thread hasn't been active in some time. A new post in this thread might not contribute constructively to this discussion after so long.
If you wish to reply despite these issues, check the box below before replying.
Be aware that malicious compliance may result in more severe penalties.
Back
Top