Mark VI Pepakura Iron Man Build

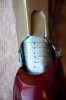
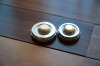
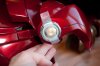
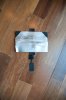
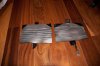
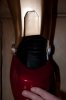
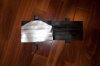
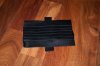
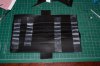
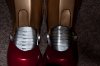
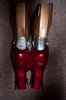
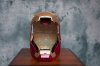
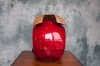
Feedback on back of knee gap fillers...The one on the left is the vinyl garage door seal I cut and glued, posting pictures previously. The one on the right is a vinyl runner another member, dfx13, was trying out. I used silver vinyl paint and used a black rub a dub sharpie marker to put on the detail. It needs to be aligned better, but what do you guys think? I didn't detail the one on the left, but it could be done with a sharpie or paint pen too.

Based on the images I've found online, the door seal has a more accurate look than the runner. I'm also worried that the runner looks too "busy", if that makes sense.

Honestly, though, I think either one would work, depending which one is easier for you to deal with, and holds up better.

Your build looks amazing, btw! :)

Yrien, thanks for the feedback. I agree with you that the one on the right looks too busy. My daughter said she liked the left one better too. I think it also has to do with the shape. The runner is too tube-like I think. And though with the garage door seal vinyl, I can't get the sharp angles like it is supposed to have, it looks more squared than the runner, so I think that will work for me. But there should be 6 sections with the cut-outs and I only have 4, so they are a bit too long. Will redo and post updates.
 
Reworked the back of knee joints so the strips are not as long. Didn't glue down all the edges, just the strip in the middle and the sides, and in a couple of other spots I thought could use it. Makes it look more like overlapping scale armor than when all the edges are glued down I think. Also spent about an hour in Lowes wandering around the plumbing section trying to find hardware to make the shoulder bells more interesting. I only had 4 dudes in Lowes aprons asking if I needed help. :roll eyes I found these items, and I know it's not screen accurate, but if I use the detail, it will cover up my Chicago Screw heads which are quite boring:lol I think I'll leave them bare metal like I found them. Still trying to decide if I want to go with the bigger or smaller, though leaning toward the smaller set... What do you guys think?
 

Attachments

  • 20140104-152138--DSC_8267.jpg
    20140104-152138--DSC_8267.jpg
    77 KB · Views: 160
  • 20140104-150751--DSC_8266.jpg
    20140104-150751--DSC_8266.jpg
    85.6 KB · Views: 149
  • 20140104-150749--DSC_8265.jpg
    20140104-150749--DSC_8265.jpg
    92.6 KB · Views: 142
  • 20140104-150446--DSC_8264.jpg
    20140104-150446--DSC_8264.jpg
    83.5 KB · Views: 154
  • 20140104-150328--DSC_8263.jpg
    20140104-150328--DSC_8263.jpg
    94.7 KB · Views: 154
  • 20140104-150314--DSC_8262.jpg
    20140104-150314--DSC_8262.jpg
    94.5 KB · Views: 159
  • 20140104-150157--DSC_8260.jpg
    20140104-150157--DSC_8260.jpg
    83.6 KB · Views: 134
  • 20140103-235531--DSC_8257.jpg
    20140103-235531--DSC_8257.jpg
    92.4 KB · Views: 130
  • 20140103-221956--DSC_8254.jpg
    20140103-221956--DSC_8254.jpg
    76.7 KB · Views: 134
  • 20140103-221901--DSC_8253.jpg
    20140103-221901--DSC_8253.jpg
    74.2 KB · Views: 144
  • 20140103-221827--DSC_8249.jpg
    20140103-221827--DSC_8249.jpg
    92.4 KB · Views: 125
  • 20140103-214214--DSC_8247.jpg
    20140103-214214--DSC_8247.jpg
    80.2 KB · Views: 161
This is what I used for the bolt details if anyone is interested. Still need to attach, so haven't done anything else but use JB weld to connect all the parts.

Also, I removed the two pins from the G4 LED discs and soldered on wires with a plug so I can connect to an A23 battery to give me 12 volts. I tried a 9volt battery...not enough juice. This works pretty well and the disc is just the right size for the hole in my glove.
 

Attachments

  • DSC_8274.jpg
    DSC_8274.jpg
    77.1 KB · Views: 135
  • DSC_8273.jpg
    DSC_8273.jpg
    89.2 KB · Views: 138
  • DSC_8272.jpg
    DSC_8272.jpg
    89.2 KB · Views: 136
  • 20140105-135311--DSC_8271.jpg
    20140105-135311--DSC_8271.jpg
    90.4 KB · Views: 147
  • 20140104-215255--DSC_8270.jpg
    20140104-215255--DSC_8270.jpg
    95.4 KB · Views: 119
  • 20140104-215024--DSC_8268.jpg
    20140104-215024--DSC_8268.jpg
    70.6 KB · Views: 160
  • Screen Shot 2014-01-05 at 7.46.55 PM.png
    Screen Shot 2014-01-05 at 7.46.55 PM.png
    216.8 KB · Views: 147
  • 51yyv3OZO4L._SL1500_.jpg
    51yyv3OZO4L._SL1500_.jpg
    45.2 KB · Views: 160
Other option I'm considering for shoulder bolt details...
 

Attachments

  • 20140106-115927--DSC_8288.jpg
    20140106-115927--DSC_8288.jpg
    80.1 KB · Views: 105
  • 20140106-115943--DSC_8290.jpg
    20140106-115943--DSC_8290.jpg
    97 KB · Views: 117
  • 20140106-120005--DSC_8291.jpg
    20140106-120005--DSC_8291.jpg
    84.7 KB · Views: 112
Trying out some gap fillers for inside elbows. Using gold marine vinyl that was sewn together and then a strip of elastic was sewn to each of the sections down the middle of the back side so it can't be seen from the front. Some superglue was used to tack down pieces to each other at a couple of points on each strip, but still allow for somewhat of an "articulation" look. I would have used the garage door seal vinyl, but am having a hard time finding gold vinyl paint:(

Tried silver marine vinyl on the back of the knees using the same technique as the garage door seal, and don't think it looks as good, though it is thinner than the garage door seal. The garage door seal is the leg on the right, marine vinyl on the left.

Also, testing silver auto trim to outline the triangular hole. The auto trim is the first pic of the chest, the aluminum I cut out is on the second pic. Auto trim is def shinier, but you can see the seams at the corners whereas the aluminum piece is kind of dull, but is all one piece...
 

Attachments

  • DSC_8294.jpg
    DSC_8294.jpg
    90.8 KB · Views: 275
  • DSC_8295.jpg
    DSC_8295.jpg
    93.6 KB · Views: 168
  • DSC_8296.jpg
    DSC_8296.jpg
    86.6 KB · Views: 206
  • DSC_8298.jpg
    DSC_8298.jpg
    93 KB · Views: 205
  • DSC_8306.jpg
    DSC_8306.jpg
    79.1 KB · Views: 244
  • DSC_8299.jpg
    DSC_8299.jpg
    61.1 KB · Views: 216
  • DSC_8307.jpg
    DSC_8307.jpg
    81.9 KB · Views: 203
  • DSC_8308.jpg
    DSC_8308.jpg
    79 KB · Views: 237
  • DSC_8297.jpg
    DSC_8297.jpg
    74 KB · Views: 254
  • DSC_8316.jpg
    DSC_8316.jpg
    78.6 KB · Views: 181
Nice ring! :D

I prefer the look of the garage door seal on the knees. It looks more like metal than the vinyl, I think. I'm not 100% sure I love it for the elbows either, because of the way the cut edges look (too much like vinyl), but I think it will definitely work unless you find something that's totally spectacular.

I'm not sure about the trim. I'm having a hard time finding a good reference online as to how it looked in the movie, so I'd say go with whichever one you prefer!

Totally agree. Gold vinyl paint...still searching...
 
Re: Iron Man Build

Wait I don't understand how the magnetic part works on the closing faceplate part...

You mean to turn the eyes on and off? If so, this is what I did. I attached a magnet to the underside of the lip on the main part of the helmet where, when the faceplate comes down, it would connect with a metal plate attached to the faceplate. The metal plate has 2 wires coming off of it. One wire is connected to a battery which is then connected to one of the leads on your eye lights. Another wire is connected to the other lead on your eye lights. When the faceplate comes down and the metal and magnet touch, it completes the circuit so the lights come on. When the faceplate opens, the circuit is broken and the lights go off. I used this miniature magnetic switch because the magnet has a 1/4" operational gap I believe. So the magnet and the metal don't actually have to be touching in order to complete the circuit...just close. I had issues using other methods without a magnetic switch, because I couldn't get solid contacts between the helmet and faceplate when the faceplate was down, leading to flickering eye lights as the circuit kept being broken. Still trying to find a way to get lights to come on where the battery is not actually on the faceplate, but in the main part of the helmet instead.
 

Attachments

  • Screen Shot 2014-01-12 at 10.35.51 AM.png
    Screen Shot 2014-01-12 at 10.35.51 AM.png
    132.7 KB · Views: 152
New lid at .925 scale is painted and clear coated, test hinges are on. I just taped on one ear pod to get the pics. Still need to be glued on, but will wait on that until servos are mounted, etc. Need to modify bottom hinges to take a clevis for the push pull arm/cable. whatever I decide to do. Still trying to figure out what is the smallest servo I can use that will still be able to lift the faceplate:unsure
 

Attachments

  • 20140113-101010--DSC_8401.jpg
    20140113-101010--DSC_8401.jpg
    92.8 KB · Views: 238
  • 20140113-101026--DSC_8402.jpg
    20140113-101026--DSC_8402.jpg
    87.8 KB · Views: 223
  • 20140113-101042--DSC_8403.jpg
    20140113-101042--DSC_8403.jpg
    79 KB · Views: 235
  • 20140113-101053--DSC_8404.jpg
    20140113-101053--DSC_8404.jpg
    90.4 KB · Views: 189
  • 20140113-101100--DSC_8405.jpg
    20140113-101100--DSC_8405.jpg
    87.7 KB · Views: 192
  • DSC_8407.jpg
    DSC_8407.jpg
    90.6 KB · Views: 247
  • 20140113-100956--DSC_8400.jpg
    20140113-100956--DSC_8400.jpg
    77.4 KB · Views: 282
Last edited:
How is comfort and mobility in the fiberglass suit? I'm working on my own build, but haven't gotten to the abs or codpiece yet and was debating the fiberglass route.
 
Mobility isn't bad, but certainly won't be doing jumping jacks or sitting down. Will have to take off the gloves to hold a drink or have a handler hold it and use a straw. I haven't had the suit on for more than about 30-40 min at a time at home since it isn't complete so I haven't worn it anywhere.


Sent from my iPhone using Tapatalk
 
This thread is more than 8 years old.

Your message may be considered spam for the following reasons:

  1. This thread hasn't been active in some time. A new post in this thread might not contribute constructively to this discussion after so long.
If you wish to reply despite these issues, check the box below before replying.
Be aware that malicious compliance may result in more severe penalties.
Back
Top