You are using an out of date browser. It may not display this or other websites correctly.
You should upgrade or use an alternative browser.
You should upgrade or use an alternative browser.
TryChick
Well-Known Member
Re: Iron Man Build
Thanks. The abs are separate pieces, I just placed them on top of each other to show how they fit. Elastic for the abs and ribs. Not sure if I should attach something like belt loops on the inside of the ribs and abs so the elastic can be run through those loops, or if I should just hot glue elastic to them on the inside. Probably more likely to fit together better if the elastic is hot glued so they shift some, but not too much...Or perhaps use snaps somehow...as for the flexibilty i dont think you will be able to flex if you didnt cut the front part apart ..
but for the rib the best way i think is to connect the rings with a strap or something flexible along the spine !
great progress as always !


TryChick
Well-Known Member
Re: Iron Man Build
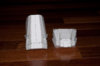
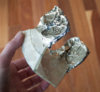
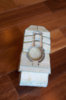
Abs are painted. Looks like two different sets of abs, but it's just the light. And one of Zabana's boots is glassed and ready for some sanding and assembling. Will have to surf the RPF to find out how folks assembled the abs and the boot! Just did one boot first to make sure it was sized fine. Kind of hard to tell how it will fit, even using the dimensions in the pepakura program...
Abs are painted. Looks like two different sets of abs, but it's just the light. And one of Zabana's boots is glassed and ready for some sanding and assembling. Will have to surf the RPF to find out how folks assembled the abs and the boot! Just did one boot first to make sure it was sized fine. Kind of hard to tell how it will fit, even using the dimensions in the pepakura program...
Attachments


TryChick
Well-Known Member
Re: Iron Man Build
Just an FYI: I used hot glue on my first helmet pep and did NOT like the mess it made or how it was so thick, that the cardstock didn't get pressed together nice and flat. Maybe I was going to heavy with the glue, I don't know, but wouldn't use hot glue again. Also, I was always burning my fingers. My next helmet pep, I used loctite gel super glue and had glue all over my fingernails and fingertips from holding the edges together while it cured. It also made the ink from the cardstock print bleed all over my fingers and stain them...and it smelled. And I had a heck of a time getting the glue and ink off my fingers/fingernails. I had read on someone else's thread that they used regular old Elmer's glue so I tried it. I like the way I had a little time where I could sort of slide the pieces into place if you don't get the edges right on at first. I have used Elmer's for all my other pieces and it works great for me, no smell, and washes off easily...
Just an FYI: I used hot glue on my first helmet pep and did NOT like the mess it made or how it was so thick, that the cardstock didn't get pressed together nice and flat. Maybe I was going to heavy with the glue, I don't know, but wouldn't use hot glue again. Also, I was always burning my fingers. My next helmet pep, I used loctite gel super glue and had glue all over my fingernails and fingertips from holding the edges together while it cured. It also made the ink from the cardstock print bleed all over my fingers and stain them...and it smelled. And I had a heck of a time getting the glue and ink off my fingers/fingernails. I had read on someone else's thread that they used regular old Elmer's glue so I tried it. I like the way I had a little time where I could sort of slide the pieces into place if you don't get the edges right on at first. I have used Elmer's for all my other pieces and it works great for me, no smell, and washes off easily...
Last edited:
TryChick
Well-Known Member
Re: Iron Man Build
I killed my hubby's dremel today.
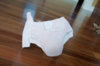
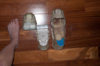
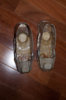
I cleaned up the one Zabana boot I did and drilled a hole in the circle for a Chicago screw. Want to make sure the toe will rotate like it should before I drill anything in the toe piece--not sure exactly where would be the best spot to drill the hole in the toe circles. I had put one layer of glass on the inside of the round section on the toe so it would be less likely to break, but ended up having to dremel it ALL off because the heel piece wouldn't fit inside the toe. Will have to reinforce from the outside I guess. I did back fill all around the edges of the circle to make it more sturdy. (You can see in the closeup). So, as I was using my hubby's dremel to cut away the excess on the shoe, I noticed it would slow down, then speed up intermittently so I figured the motor was going. If I can find the little buggers, I have some water shoes I'm planning on using for inside the boot after I use some scrap foam to fill in the bottom (I did pour about 5 oz of resin in the sole detail so they wouldn't get crushed). The boot seems long to me, but I have a fairly wide foot for my size and it had to be that long to get the width. I trolled the house looking for something that would cover the screw on the boots and discovered a Blistex lid fits perfectly, so I'm thinking I can epoxy and resin the Chicago screw in the inside of the Blistex lid, paint it and go. May sand the edges down a bit so it is flush instead of sticking out though...
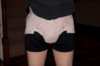
When I was ALMOST done performing the Codpiece Separation (sounds like a BBT episode :lol) ...black smoke started billowing out of the dremel... Yikes! Shut it off, said goodbye to the dremel and finished surgery with my hacksaw...
I looked and looked on the RPF and never could find a picture of where anyone had done their separation, so after much internal debate, I decided to cut the cod on one of the front detail lines, then detail in another line on the back to match where I cut it on the bum, so it would have symmetrical lines. Showed a close up of where I separated the cod in case anyone is interested. Am planning on using some mega magnets to keep it in place and have straps and buckles as a backup in case the magnets separate (would hate to have the cod crash to the floor and get damaged) Awaiting Apoxie Sculpt to reattach the two pieces...and finish it with glazing putty. Maybe my Apoxie will come in on Saturday (fingers crossed:eek).
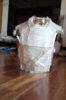
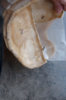
I also cut out, pepped, resined and glassed the neck brace today. The cardstock had been sitting on my coffee table for weeks, already scored, but not having any time, it sat and sat. Not sure how many layers of glass I should put on the brace since I'm planning on attaching cod, abs, ribs, and parts of the chest and back to it. Since the dremel is dead, I obviously haven't trimmed the excess yet. Am planning on getting a new dremel tomorrow to take care of that. Suggestions anyone? We already have a great case and a flexible attachment, but need to replace the main part.
I killed my hubby's dremel today.
I cleaned up the one Zabana boot I did and drilled a hole in the circle for a Chicago screw. Want to make sure the toe will rotate like it should before I drill anything in the toe piece--not sure exactly where would be the best spot to drill the hole in the toe circles. I had put one layer of glass on the inside of the round section on the toe so it would be less likely to break, but ended up having to dremel it ALL off because the heel piece wouldn't fit inside the toe. Will have to reinforce from the outside I guess. I did back fill all around the edges of the circle to make it more sturdy. (You can see in the closeup). So, as I was using my hubby's dremel to cut away the excess on the shoe, I noticed it would slow down, then speed up intermittently so I figured the motor was going. If I can find the little buggers, I have some water shoes I'm planning on using for inside the boot after I use some scrap foam to fill in the bottom (I did pour about 5 oz of resin in the sole detail so they wouldn't get crushed). The boot seems long to me, but I have a fairly wide foot for my size and it had to be that long to get the width. I trolled the house looking for something that would cover the screw on the boots and discovered a Blistex lid fits perfectly, so I'm thinking I can epoxy and resin the Chicago screw in the inside of the Blistex lid, paint it and go. May sand the edges down a bit so it is flush instead of sticking out though...
When I was ALMOST done performing the Codpiece Separation (sounds like a BBT episode :lol) ...black smoke started billowing out of the dremel... Yikes! Shut it off, said goodbye to the dremel and finished surgery with my hacksaw...
I looked and looked on the RPF and never could find a picture of where anyone had done their separation, so after much internal debate, I decided to cut the cod on one of the front detail lines, then detail in another line on the back to match where I cut it on the bum, so it would have symmetrical lines. Showed a close up of where I separated the cod in case anyone is interested. Am planning on using some mega magnets to keep it in place and have straps and buckles as a backup in case the magnets separate (would hate to have the cod crash to the floor and get damaged) Awaiting Apoxie Sculpt to reattach the two pieces...and finish it with glazing putty. Maybe my Apoxie will come in on Saturday (fingers crossed:eek).
I also cut out, pepped, resined and glassed the neck brace today. The cardstock had been sitting on my coffee table for weeks, already scored, but not having any time, it sat and sat. Not sure how many layers of glass I should put on the brace since I'm planning on attaching cod, abs, ribs, and parts of the chest and back to it. Since the dremel is dead, I obviously haven't trimmed the excess yet. Am planning on getting a new dremel tomorrow to take care of that. Suggestions anyone? We already have a great case and a flexible attachment, but need to replace the main part.
Attachments
-
 DSC_6623.jpg84.7 KB · Views: 246
 -
 DSC_6622.jpg90.2 KB · Views: 304
 -
 DSC_6632.jpg81.5 KB · Views: 177
 -
 DSC_6631.jpg74.5 KB · Views: 157
 -
 DSC_6630.jpg96.4 KB · Views: 168
 -
 DSC_6629.jpg78 KB · Views: 163
 -
 DSC_6618.jpg85 KB · Views: 153
 -
 DSC_6617.jpg86.5 KB · Views: 161
 -
 DSC_6616.jpg76 KB · Views: 152
 -
 DSC_6615.jpg78.4 KB · Views: 160
 -
 DSC_6639.jpg77.9 KB · Views: 164
 -
 DSC_6638.jpg84.4 KB · Views: 159
 -
 DSC_6637.jpg87.7 KB · Views: 168
 -
 DSC_6636.jpg79.9 KB · Views: 179
 -
 DSC_6640.jpg72.9 KB · Views: 165
TryChick
Well-Known Member
Re: Iron Man Build
Been busy the last couple of days. Made two upper foot flaps and resined and glassed them today. Glassed my shoulder bells as 4 separate pieces. I glassed the inside parts first (after covering the outsides with painter's tape to prevent resin drips, cleaned the edges up, then covered them with foil. As soon as I glassed the outside part, I placed it on top of the inside part and lightly clamped it into postion like the pep shows, so they would fit together like they should. Detached them easily after the first layer cured and put on another layer.
I also got two layers of glass on my hand plates. I taped the outside with painters tape and taped them together before I laid down two layers of fiberglass.
Then I decided it was time to glass the legs. I had to use the heat gun to shape the circle cutouts a bit and bend in some of the edges along the knee where the shin and thigh match up. Then I used painters tape to hold the two pieces in the right postion. Next I laid the legs on their sides and put two 1" strips of fiberglass on the inside of each so the two pieces would be connected at two points on that side (I didn't want to run glass all along those edges and have to cut through all that fiberglass at separation time...). When those two pieces cured, I flipped the leg assembly over and did the same on the other side so there are now 4 strips connecting each leg.
Then came the fun part...getting inside the legs to lay the fiberglass. The thigh wasn't too bad since its pretty wide, but the shin was a nightmare, especially since I had to work around the thigh piece! I did trim off some of the attached flaps because they make the ankle so narrow it's hard to get your foot in it. And after putting in fiberglass, it would be an even tighter squeeze.
Note to self, next time I resin the leg assembly (tomorrow :facepalm) wear a sweatshirt. Resin is nasty when it gets on your skin...
Would have trimmed up the rest of the shoulder bells, but my NEW dremel stopped working. It was working fine when I turned it off, but when I plugged it in again and turned it on...nothing :angry
Attachments


TryChick
Well-Known Member
Re: Iron Man Build
Second layer of fiberglass laid on the legs. Put a third layer on the left and right side of both shins since it's such a large flat area. It was still flexing a bit after 2 layers and I didn't want my bondo to crack. Also got the other arm done. I may have to redo the first one I did as it is so warped from trying to get the 3 pieces to go together with all three being able to rotate. This one I put foil on the elbow piece, assembled the arm, taped it and fiberglassed the pieces while they were taped together. I did not connect them with fiberglass (intentionally anyway), so I could pull them apart with a little cutting away after they cured. Hand plates are cleaned up. One went together really well, the other was a bit warped but the ol heat gun took care of that. Shoulder bells seem to fit together well too... Yeah!
My Apoxie Sculpt did come today so I cleaned up the inside of the cod and put two mongo magnets on the smaller piece and clamped them down. They have to sit for 24-72 hours until the glue cures...so I'm at a standstill with the cod.
I'm off to pep my second boot. Then all that is left to pep and glass are the lower foot flaps.
Attachments
-
 DSC_6662.jpg88.6 KB · Views: 152
 -
 DSC_6661.jpg77.5 KB · Views: 147
 -
 DSC_6660.jpg86.2 KB · Views: 152
 -
 DSC_6657.jpg75.7 KB · Views: 147
 -
 DSC_6656.jpg94.7 KB · Views: 136
 -
 DSC_6655.jpg77.1 KB · Views: 146
 -
 DSC_6654.jpg93.2 KB · Views: 184
 -
 DSC_6653.jpg84.4 KB · Views: 176
 -
 DSC_6651.jpg90.4 KB · Views: 158
 -
 DSC_6663.jpg91.8 KB · Views: 176
ModJob
New Member
Re: Iron Man Build
There's a Phineas and Ferb marvel episode, I....I mean my son will have to watch this!
Awesome build so far TryChick!
Just got done watching the Phineas and Ferb Marvel episode with Iron Man, the Hulk, Thor, and Spidey...Awesome!
There's a Phineas and Ferb marvel episode, I....I mean my son will have to watch this!
Awesome build so far TryChick!
TryChick
Well-Known Member
Re: Iron Man Build
Thanks! And my husband and I watch Phineas and Ferb with our kids...we enjoy it as much as they do and we find a ton of references that go over the kids' heads.:lol
And...Stan Lee was in it
There's a Phineas and Ferb marvel episode, I....I mean my son will have to watch this!
Awesome build so far TryChick!
Thanks! And my husband and I watch Phineas and Ferb with our kids...we enjoy it as much as they do and we find a ton of references that go over the kids' heads.:lol
And...Stan Lee was in it
Last edited:
Re: Iron Man Build
Very nice build !
Very nice build !
TryChick
Well-Known Member
Re: Iron Man Build
Apoxie Sculpt cured overnight and I backed the tabs I made on the cod with 2 layers of fiberglass. A big shout out to Bigturc for all the pictures he took of his build, they have been hugely helpful on my own. I used four 1" rare earth magnets to attach the two pieces of the cod and used waxpaper between the pieces to make sure the apoxie sculpt from one piece didn't stick to that on the other piece. The smaller piece sort of slides off the larger part of the cod, otherwise I'd never be able to separate the magnets if I had to pull them straight off. Also Got the new shoe pepped, can see the size dif. Already resined the pieces and am going to lay glass today to see how they fit afterwards.
Apoxie Sculpt cured overnight and I backed the tabs I made on the cod with 2 layers of fiberglass. A big shout out to Bigturc for all the pictures he took of his build, they have been hugely helpful on my own. I used four 1" rare earth magnets to attach the two pieces of the cod and used waxpaper between the pieces to make sure the apoxie sculpt from one piece didn't stick to that on the other piece. The smaller piece sort of slides off the larger part of the cod, otherwise I'd never be able to separate the magnets if I had to pull them straight off. Also Got the new shoe pepped, can see the size dif. Already resined the pieces and am going to lay glass today to see how they fit afterwards.
Attachments
-
 DSC_6668.jpg89 KB · Views: 120
 -
 DSC_6669.jpg97.2 KB · Views: 124
 -
 DSC_6671.jpg75.4 KB · Views: 129
 -
 DSC_6672.jpg92.5 KB · Views: 130
 -
 DSC_6673.jpg75.4 KB · Views: 127
 -
 DSC_6675.jpg65.2 KB · Views: 135
 -
 DSC_6680.jpg91.5 KB · Views: 124
 -
 DSC_6682.jpg84.8 KB · Views: 115
 -
 DSC_6683.jpg90.9 KB · Views: 131
 -
 DSC_6684.jpg93 KB · Views: 137
 -
 DSC_6685.jpg77.5 KB · Views: 134
 -
 DSC_6686.jpg76.7 KB · Views: 134
 -
 DSC_6687.jpg75 KB · Views: 163
 -
 DSC_6688.jpg89.4 KB · Views: 119
 -
 DSC_6691.jpg89.6 KB · Views: 129
 -
 DSC_6692.jpg88.9 KB · Views: 137
 -
 DSC_6704.jpg81.9 KB · Views: 127
 -
 DSC_6705.jpg89.3 KB · Views: 134
 -
 DSC_6706.jpg76.9 KB · Views: 131
 -
 DSC_6667.jpg90.2 KB · Views: 139
 -
 DSC_6666.jpg78.7 KB · Views: 156
 -
 DSC_6665.jpg81.2 KB · Views: 126
 -
 DSC_6664.jpg82.2 KB · Views: 141
TryChick
Well-Known Member
Re: Iron Man Build
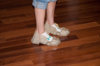
Shoulder bell Chicago screws are on...need to tweak this a bit so they move without scraping, but for the most part they are good. Got my second smaller boot glassed, now need to figure out where exactly to hinge them. Haven't been able to find images of where folks hinge these babies on the heel portion. I don't think it can just be a single hole, but needs to be a curved slit to allow the boot to articulate. Gaah! Need another foot flap set also. Here's a pic of all my parts so far...I'm sure my hubby is ready to get it OUT of the great room...:face palm
https://www.youtube.com/watch?v=Rga6damcW9I
Attachments
-
 DSC_6748.jpg75.3 KB · Views: 170
 -
 DSC_6747.jpg73.2 KB · Views: 161
 -
 DSC_6746.jpg76.5 KB · Views: 156
 -
 DSC_6745.jpg71.7 KB · Views: 124
 -
 DSC_6743.jpg91.6 KB · Views: 134
 -
 DSC_6737.jpg97.6 KB · Views: 130
 -
 DSC_6736.jpg84.5 KB · Views: 122
 -
 DSC_6735.jpg87 KB · Views: 126
 -
 DSC_6734.jpg97.4 KB · Views: 207
 -
 DSC_6733.jpg81.9 KB · Views: 113
 -
 DSC_6732.jpg89.6 KB · Views: 107
 -
 DSC_6731.jpg76.6 KB · Views: 133
 -
 DSC_6730.jpg93.6 KB · Views: 118
 -
 DSC_6729.jpg90.3 KB · Views: 139
 -
 DSC_6728.jpg80.2 KB · Views: 125
Last edited:
TheBlackPhantom
Well-Known Member
Re: Iron Man Build
Awesome work!
Awesome work!
Similar threads
- Replies
- 43
- Views
- 3,394
- Replies
- 1
- Views
- 550
- Replies
- 0
- Views
- 586
- Replies
- 20
- Views
- 2,127