You are using an out of date browser. It may not display this or other websites correctly.
You should upgrade or use an alternative browser.
You should upgrade or use an alternative browser.
TryChick
Well-Known Member
Re: Iron Man Build
Thanks. My progress will be slowing down as school starts up again in a few days...
Yes! It looks great!! keep posting! You can add some fur to your boots and make a nice Iron Sleepers")
Awesome work!
Thanks. My progress will be slowing down as school starts up again in a few days...
TheBlackPhantom
Well-Known Member
Re: Iron Man Build
I know the feeling lolThanks. My progress will be slowing down as school starts up again in a few days...
TryChick
Well-Known Member
Re: Iron Man Build
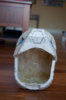
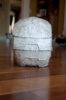
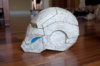
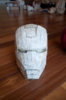
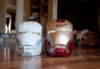
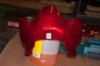
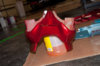
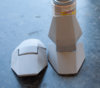
Finished glassing the 90% scale of the helmet. Looking at it, not sure it will be big enough...Put it next to my finished 100% lid which is too big, and it doesn't look THAT much smaller...but, still may have to do another at 95%. Will see how this one fits (or doesn't) after separation... Forgot what a PITA the eye sockets are!:eek
I taped up the outside to keep me from getting fiberglass and drips of resin on it while I glassed the inside. Makes for a much cleaner helmet I'll say!
Attachments
-
 DSC_6767.jpg83.6 KB · Views: 157
 -
 DSC_6765.jpg81.5 KB · Views: 156
 -
 DSC_6762.jpg91.9 KB · Views: 157
 -
 DSC_6761.jpg95.2 KB · Views: 136
 -
 DSC_6760.jpg90.1 KB · Views: 161
 -
 DSC_6759.jpg76.7 KB · Views: 172
 -
 DSC_6758.jpg84.7 KB · Views: 196
 -
 DSC_6757.jpg82.1 KB · Views: 216
 -
 DSC_6754.jpg91.9 KB · Views: 160
 -
 DSC_6753.jpg75.9 KB · Views: 176
 -
 DSC_6751.jpg74.6 KB · Views: 173
 -
 DSC_6750.jpg67.7 KB · Views: 274
 -
 DSC_6749.jpg89.2 KB · Views: 172
TryChick
Well-Known Member
Re: Iron Man Build
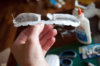
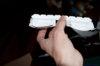
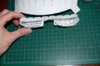
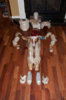
Spine is done with glass and extra resin dumped inside. Did the 4 pieces that attach to the back as one unit and did the other 3 as individual units since I will attach each piece to the corresponding "ribs" and the cod. Trimmed the back of the gloves so I could bend my wrist back. Before when I bent it back, the magnets would separate. This way, no separation... Also, the fingers are ready for assembly. That was painstaking work with the bondo and sanding on those teeny pieces...whew! Now I just need to figure out which ones go together:facepalm...my markings on the inside got painted over in everything but the fingertips:eek
Spine is done with glass and extra resin dumped inside. Did the 4 pieces that attach to the back as one unit and did the other 3 as individual units since I will attach each piece to the corresponding "ribs" and the cod. Trimmed the back of the gloves so I could bend my wrist back. Before when I bent it back, the magnets would separate. This way, no separation... Also, the fingers are ready for assembly. That was painstaking work with the bondo and sanding on those teeny pieces...whew! Now I just need to figure out which ones go together:facepalm...my markings on the inside got painted over in everything but the fingertips:eek
Attachments
-
 DSC_6800.jpg79.8 KB · Views: 175
 -
 DSC_6798.jpg72.9 KB · Views: 154
 -
 DSC_6797.jpg90.8 KB · Views: 141
 -
 DSC_6796.jpg71.4 KB · Views: 164
 -
 DSC_6787.jpg86.3 KB · Views: 168
 -
 DSC_6786.jpg78.8 KB · Views: 149
 -
 DSC_6785.jpg73.7 KB · Views: 154
 -
 DSC_6783.jpg83.2 KB · Views: 174
 -
 DSC_6782.jpg77.7 KB · Views: 154
 -
 DSC_6779.jpg88 KB · Views: 170
 -
 DSC_6774.jpg90.1 KB · Views: 171
 -
 DSC_6773.jpg73.3 KB · Views: 186
 -
 DSC_6768.jpg96.4 KB · Views: 224
TryChick
Well-Known Member
Re: Iron Man Build
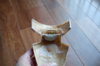
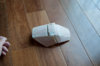
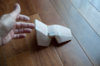
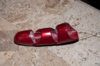
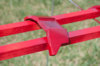
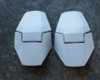
Got hand plate bondoed and connected with hinges. Had to get out the kids play dough to figure out where to set the second part of the hinge after attaching the hinge to the first part of the plate. Worked pretty well. Also had to use the Dremel to grind out an inset area where the hinge would be attached on one of the plates so it would allow them to connect more closely and make the hinge less visible. After doing some test fits, I also made the ground out area slanted so it was deeper where the hinge pin was. Drilled out the holes and put the screws in, then back filled with epoxy putty to make sure they stayed (also, when attaching the second part of the hinge, I couldn't get a screwdriver in due to the angle so this was the only way to make sure the hinge was snug on the second piece of the hand plate). Will possibly add magnets to make sure the plate stays together unless I flex my wrist back. I saw on another thread that the hand plate would flap open and magnets worked to keep it closed. Probably just two small earth magnets on each hand plate should do the trick...
Got the pieces of the fingers all figured out as to which part goes where and tried gluing those teeny WD-40 straws inside some extra finger pieces so I could run my guitar strings through the straws. Yeah...even though they are teeny, I still couldn't get my fingers inside them, so I am going to try just attaching the strings to the finger pieces with some more of that quick setting epoxy putty and see how that works...
Attachments
-
 20130830-084526--DSC_6816.jpg74.1 KB · Views: 200
 -
 20130830-084509--DSC_6815.jpg85.4 KB · Views: 151
 -
 20130830-084504--DSC_6814.jpg80 KB · Views: 180
 -
 20130829-200010--DSC_6813.jpg73.7 KB · Views: 167
 -
 20130829-200007--DSC_6812.jpg82 KB · Views: 198
 -
 20130829-200001--DSC_6811.jpg93.5 KB · Views: 186
 -
 20130829-175511--DSC_6807.jpg59.9 KB · Views: 171
 -
 20130829-174716--DSC_6806.jpg60.1 KB · Views: 188
 -
 20130829-172354--DSC_6803.jpg71.3 KB · Views: 159
 -
 20130829-124349--DSC_6802.jpg81 KB · Views: 159
TryChick
Well-Known Member
Re: Iron Man Build
Video of Hand Plate Articulation
https://www.youtube.com/watch?v=HY60QUA1w1Q
Video of Finger Articulation
https://www.youtube.com/watch?v=XsxdGK58NMM
Video of Hand Plate Articulation
https://www.youtube.com/watch?v=HY60QUA1w1Q
Video of Finger Articulation
https://www.youtube.com/watch?v=XsxdGK58NMM
TryChick
Well-Known Member
Re: Iron Man Build
Tee hee. Would be nice, then I wouldn't have to search for the remote when my kiddos misplace it!
hey! Nice Job. I thought you were going to change television with finger movement :eek
Tee hee. Would be nice, then I wouldn't have to search for the remote when my kiddos misplace it!
Lord Magneto
Sr Member
Re: Iron Man Build
Great work TryChick. What hand files did you end up using. Those cameout great
Great work TryChick. What hand files did you end up using. Those cameout great
TryChick
Well-Known Member
Re: Iron Man Build
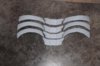
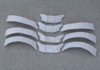
Zabana's finger and glove files. Tough to pep, but I wanted the detail. The resined fingers had been sitting in my garage for months as I was loath to tackle them w all the teeny pieces that needed sanding and bondo. Used the heat gun to get them into shape and went through lots of sandpaper to get them to match up (for the most part).
Got the guitar wire set into the fingertips w the epoxy putty and will have to sand inside a bit to get fingers in some of them... It was hard to get just enough putty on the wires to keep them in without using too much... :rolleyes. I did put fiberglass inside but ended up sanding the majority out. They seem to be pretty tough without all the glass since I put 4 layers of resin on total.
Great work TryChick. What hand files did you end up using. Those cameout great
Zabana's finger and glove files. Tough to pep, but I wanted the detail. The resined fingers had been sitting in my garage for months as I was loath to tackle them w all the teeny pieces that needed sanding and bondo. Used the heat gun to get them into shape and went through lots of sandpaper to get them to match up (for the most part).
Got the guitar wire set into the fingertips w the epoxy putty and will have to sand inside a bit to get fingers in some of them... It was hard to get just enough putty on the wires to keep them in without using too much... :rolleyes. I did put fiberglass inside but ended up sanding the majority out. They seem to be pretty tough without all the glass since I put 4 layers of resin on total.
Lord Magneto
Sr Member
Re: Iron Man Build
Nice. I used the same files and have made about 4 pair before I got the size right... Yea one big issue I didn't think about was leaving enough room for fiberglass. I've been too lazy to start it over again
Nice. I used the same files and have made about 4 pair before I got the size right... Yea one big issue I didn't think about was leaving enough room for fiberglass. I've been too lazy to start it over again
TryChick
Well-Known Member
Re: Iron Man Build
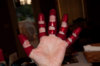
Gaahh! You may want to make them bigger before you go any further...I had to pry out the guitar wires from the fingertips and sand the inside down some more...they were just too tight. I also sanded down and rounded off the underhanging parts that tuck under the other pieces of each finger segment. They looked good and fit together well with all the sharp angles and all when my fingers were held straight, but those pieces that go under to hide your knuckles when you bend your fingers wouldn't allow me to bend my fingers very much because they rubbed the top and sides of the pieces they fit into. So I sanded those "underhanging" parts down, rounded off the corners and made sure I took off excess from the top of the pieces that they joined with. That meant sanding 18 of the 28 the pieces down on the outside, re-priming, painting, and clear coating... That's what I spent my day doing--in between working on my java assignment...
Nice. I used the same files and have made about 4 pair before I got the size right... Yea one big issue I didn't think about was leaving enough room for fiberglass. I've been too lazy to start it over again
Gaahh! You may want to make them bigger before you go any further...I had to pry out the guitar wires from the fingertips and sand the inside down some more...they were just too tight. I also sanded down and rounded off the underhanging parts that tuck under the other pieces of each finger segment. They looked good and fit together well with all the sharp angles and all when my fingers were held straight, but those pieces that go under to hide your knuckles when you bend your fingers wouldn't allow me to bend my fingers very much because they rubbed the top and sides of the pieces they fit into. So I sanded those "underhanging" parts down, rounded off the corners and made sure I took off excess from the top of the pieces that they joined with. That meant sanding 18 of the 28 the pieces down on the outside, re-priming, painting, and clear coating... That's what I spent my day doing--in between working on my java assignment...
GrimlockZA
New Member
Re: Iron Man Build
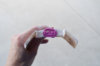
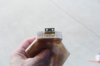
Very nice work, Trychick. One of the best builds I've seen so far. I'm busy with the pepping stage of my helmet...the eyes are a real pain to get right (my first pep project btw) I have a question for you. The Bondo that you are using.....could you maybe post a screenshot of the specific type you are using? I live in South Africa and there aren't a lot of places where I can buy it and I just want to make sure I get the right stuff.
Keep up the good work!
TryChick
Well-Known Member
Re: Iron Man Build
Keep at it, it gets easier to pep the more you do...
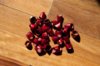
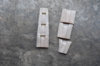
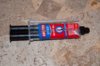
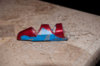
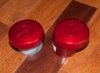
The stuff I have been using is in the picture on the left. The stuff I've started using is on the right. I had to buy that on line...couldn't find it anywhere locally. BigTurc recommended the stuff in his thread. I've found it takes less hardener and is easier to sand, though it seems to go off faster so you have to work even faster than you do when working with bond. It leaves fewer pinholes and it doesn't gum up your sandpaper like the Bondo does. But, it's also more expensive...The Bondo works fine though.
Very nice work, Trychick. One of the best builds I've seen so far. I'm busy with the pepping stage of my helmet...the eyes are a real pain to get right (my first pep project btw) I have a question for you. The Bondo that you are using.....could you maybe post a screenshot of the specific type you are using? I live in South Africa and there aren't a lot of places where I can buy it and I just want to make sure I get the right stuff.
Keep up the good work!
Keep at it, it gets easier to pep the more you do...
The stuff I have been using is in the picture on the left. The stuff I've started using is on the right. I had to buy that on line...couldn't find it anywhere locally. BigTurc recommended the stuff in his thread. I've found it takes less hardener and is easier to sand, though it seems to go off faster so you have to work even faster than you do when working with bond. It leaves fewer pinholes and it doesn't gum up your sandpaper like the Bondo does. But, it's also more expensive...The Bondo works fine though.
Attachments

TryChick
Well-Known Member
Re: Iron Man Build
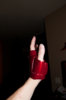
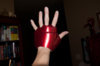
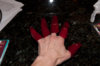
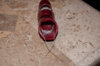
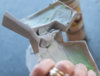
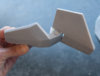
I decided to try a 2-part epoxy glue to attach the guitar wires because I figured it wouldn't take up as much space as the epoxy putty--I was right...plus the glue kind of leveled itself and spread a bit so I didn't have to do any sanding afterwards. You can see how much the epoxy putty was sticking out in the first picture...I
First I superglued the wires into the fingertips and let them sit for about 10 minutes, then glued in one side with the 2 part epoxy glue, let that sit for about 10 since it is kind of runny. Then I glued the other side and let it sit overnight to make sure they were fully cured and wouldn't pull out as I was gluing the other pieces together. The next day I taped all the pieces together and used the epoxy glue to attach the wires to all the other parts. I found if I bent the wire and ran it through the exit hole, the wires stayed in place really well and pressed against the sides so I didn't have to first superglue them or attempt to hold the wires while the glue cured...you can see what I mean from the first photo with the fully assembled finger. I will suggest you tape all three pieces together before you glue the second and third pieces to the finger tips to make sure the wire is aligned along the sides of the fingers. I'm glad I took the time to sand down the fingers AGAIN and repaint/clearcoat them as they articulate really well now. I'll post a video later. Now I have to figure out if I'm going to try to use the split loom tubing inside so I don't have to wear gloves underneath, though my fingers may not fit if I do. Also, the split loom tubing is pretty stiff though and it makes it hard to bend the fingers, so I'm going to test with my unpainted/unbondoed junk finger first! Not sure what other people have tried in order to cover up the bottom of the fingers.
Also, when I glued the wire to the piece that is closest to the glove, I glued it so the wire would exit the finger near the top so I can more easily glue the finger onto the top of the glove and the wire won't be too visible...
Attachments


Last edited:
Lord Magneto
Sr Member
Re: Iron Man Build
That is too damn cool. Ok you officially have me wanting to take another stab at those hands... I know what I will be doing all this week while on my conference calls.
That is too damn cool. Ok you officially have me wanting to take another stab at those hands... I know what I will be doing all this week while on my conference calls.
TryChick
Well-Known Member
Re: Iron Man Build
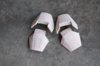
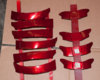
Handplates, hip pods, ribs and codpiece are painted.
Handplates, hip pods, ribs and codpiece are painted.
Attachments
-
 DSC_6852.jpg90.2 KB · Views: 135
 -
 DSC_6851.jpg91.9 KB · Views: 145
 -
 DSC_6850.jpg82.4 KB · Views: 237
 -
 DSC_6845.jpg92.1 KB · Views: 319
 -
 DSC_6844.jpg95.9 KB · Views: 150
 -
 DSC_6843.jpg96.2 KB · Views: 130
 -
 DSC_6842.jpg93.5 KB · Views: 123
 -
 DSC_6841.jpg88.9 KB · Views: 126
 -
 DSC_6840.jpg87.9 KB · Views: 131
 -
 DSC_6839.jpg81.6 KB · Views: 141
 -
 DSC_6837.jpg94 KB · Views: 130
 -
 DSC_6835.jpg87.7 KB · Views: 122
 -
 DSC_6832.jpg78.2 KB · Views: 133
 -
 DSC_6830.jpg94.4 KB · Views: 153
 -
 DSC_6829.jpg73.2 KB · Views: 171
 -
 DSC_6828.jpg75.6 KB · Views: 154
 -
 DSC_6827.jpg92.3 KB · Views: 146
Similar threads
- Replies
- 43
- Views
- 3,334
- Replies
- 1
- Views
- 533
- Replies
- 0
- Views
- 582
- Replies
- 20
- Views
- 2,079