CopperRevan
Master Member
on page 12...Dec.22 2020 to be precise...lol
Well if you have seen the images I have seen... It would be worthy of a discussion.To answer your question, it has been discussed. But as we all know, looks can be deceiving and i trust the experts involved made the right decisions with the Intel they had before venturing further with the project.
Not trying to be argumentative...just a question. have you gone through this thread at all and looked at the pictures and read the input? I may be wrong but i don't remember you posting pictures that "you have seen" on this thread. If so, i stand corrected. Feel free to post your pictures for everyone to see.Well if you have seen the images I have seen... It would be worthy of a discussion.
Not trying to be argumentative...just a question. have you gone through this thread at all and looked at the pictures and read the input? I may be wrong but i don't remember you posting pictures that "you have seen" on this thread. If so, i stand corrected. Feel free to post your pictures for everyone to see.
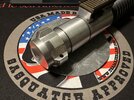
Regardless of whether a Rylo was or wasn't used on screen or as the inspiration for the screen used prop, I find it remarkable how similar the dimensions are between yours and the Rylo. It absolutely amazes me at what some of you guys are able to do with just a few pictures and your computer screen.Chris did a comparison of my new Rescuer kit set against a Rylo reveal in his collection.
Thought you guys might be interested in seeing how they stack up.
!!! To be clear. I don't own a Rylo. My measurements for this run were based on scaling from photos.
View attachment 1639014
He’s a wizard with this stuff, I wish I had the talent to do this digital stuffRegardless of whether a Rylo was or wasn't used on screen or as the inspiration for the screen used prop, I find it remarkable how similar the dimensions are between yours and the Rylo. It absolutely amazes me at what some of you guys are able to do with just a few pictures and your computer screen.
BRRogers, Who is this guy?!?Well I think we all agree the buttons are black coated aluminum.
No changes in material there since Yuma")
Miss this man so much… one of my all time favorite movies…View attachment 1639121Bangarang!!!
Are you trying to say that josh roth bought a rylo and put it on screen?100% the belt hanger in the costume test and on screen was a Rylo..
Those are legendary.. the first replicas to spin an keep FX capabilities.. Starkiller is a engineering geniusDang was hoping that the V2s were the finished ones lol. And had no idea if the spinning emitter could have electronics installed. Now its sold out. Oh well.
Mine came today, they are amazing. I just finished weathering one of mine, it looks great on the TXQ BOBF saber.The starkiller BoBF pommels are here! I got to examine them and install a few yesterday.
Totally blow away at the different it makes
Subscribe to my channel, new video coming out Friday, you don’t want to be late to this party!!
Mine came today, they are amazing. I just finished weathering one of mine, it looks great on the TXQ BOBF saber.
I understand your concern, here is how I did it. I started with the three pieces separate. I used a heavy duty scrub pad (SOS pad) on all of the exposed surfaces, not the threads or inside of the parts. I did it in a the direction I wanted the final “grain” to look. One it was good and scratched up, I lightly went over it with 0000 steel wool the exact same way. Next, I cleaned all of the threads with a brass brush, very well! Then I cleaned the part with 70% isopropyl alcohol. Once cleaned, I greased the threads, and assembled the parts.How did you go about weathering yours? Just curious on process that you used. I’m concerned with the acid eating through the threads.