Looper Blunderbuss - Pics of Painted Slushcast Kit on pg. 18

Re: Looper Blunderbuss Shotgun - WIP pics begin on Page 3

Man, thats coming along great! I signed up here just to post in this thread.
I fell in love with the gun after seeing Looper and i wanted to make my own.
Im not very handy so i wanted to make a really simplified version with some sections of PVC. I dont wanna distract you from your build, but got any tips for trying to get a 1/2" pipe fit snug inside a 2" pipe?
 
Re: Looper Blunderbuss Shotgun - WIP pics begin on Page 3

This exact blazer is available on eBay for $75. It's not D&G. It's a Korean brand.

KOREAN Mens Slim Fit Premium Button Jacket China Collar Long Blazer HDN06 - S/M | eBay

looper-picture_original.jpg
 
Last edited:
Re: Looper Blunderbuss Shotgun - WIP pics begin on Page 3

that is a snazy jacket... however my fat ass would look horrible in that haha
 
Re: Looper Blunderbuss Shotgun - WIP pics begin on Page 3

I dont wanna distract you from your build, but got any tips for trying to get a 1/2" pipe fit snug inside a 2" pipe?

No problems, friend! First off, I think you're better off using a 1 1/2" pipe and a 2" pipe...1/2" seems way too small for me (unless the 1/2" pipe is for the handle?). There's a couple ways to fill the gap. I used Apoxie Sculpt to fill gaps, but I only had a 1/8" gap to fill. For your gap I would go the same route I'm using for my rear endcap.

First, cut a couple basswood circles that match diameter of your larger pipe. Sand down the circles so they fit inside of the larger pipe easily. In the center of wood circles, cut a hole that fits your smaller pipe perfectly. With both wood rings placed onto the smaller pipe, place it next to the larger pipe. Slide the wood rings up and down the smaller pipe, one on either side. What you're doing is making a pair of anchor points, so make sure they're spaced out enough to keep your smaller pipe centered within the larger pipe.

When you think you have good spacing between the wood rings affix them to the smaller PVC with some sandpaper (to rough up the PVC) and super glue (you might even want to reinforce the bond with a bit of hot glue too). Remember, make sure you're still able to slid the ringed smaller pipe into the larger pipe.

Now it's time to mount the smaller pipe into the larger pipe. Slide the smaller pipe into position. While holding it in place, squeeze out a liberal amount of hotglue onto the top ring, effectively making a "plug" that holds one end of the smaller pipe in place. When the plug has cooled down, do the same thing with the opposite side. And there you have it. Everything should stay in place. For more support, you can drill several small holes in the larger pipe and use the holes to shoot in some expanding foam to fill the cavity and to give the small pipe some more support.

Good luck on your build!

This exact blazer is available on eBay for $75. It's not D&G. It's a Korean brand.

KOREAN Mens Slim Fit Premium Button Jacket China Collar Long Blazer HDN06 - S/M | eBay
THANKS, MAN!

In an effort to not clutter FBA's WIP thread I have made a dedicated Looper: Other Prop thread here http://www.therpf.com/f9/looper-other-props-162133/

Right on, sir! I'll head over there in a bit to help contribute to the hunt.
 
Re: Looper Blunderbuss Shotgun - WIP pics begin on Page 3

Good luck on your build!

Thanks! Looks like ive got a good shopping list now. I plan on making a couple. I have an old sword i dont use (pool noodle with PVC down the middle and a handle wrapped in hockey tape) so i cut the end off to shorten it down and im just planning on forming the shape of the handle out of more tape.. and as for the 2" pipe, its the barrel and you are correct in guessing the 1/2" pipe is the handle. I thought id tape the handle to the inside of the bigger pipe, and then put some screws through both pipes to keep it in place and then spraypaint the pipe haha
I just dont have the resources for anything major, i basically have PVC, a saw, some screws and tape at my disposal...
 
Re: Looper Blunderbuss Shotgun - WIP pics begin on Page 3

I just dont have the resources for anything major, i basically have PVC, a saw, some screws and tape at my disposal...

Your method should work fine, but if you wanted to try it my way, you don't need any tools other than a saw, a hot glue gun, and some sandpaper. If you don't have any think wood for the rings, you can use two pieces of cardboard laminated together with white glue (this would also be much easier to cut and shape). Expanding foam is about 5 bucks a can, and you'd only need one...but you can even save yourself the messiness by using crumpled up newspaper wrapped around the smaller pipe and skinned with a layer of tape to stabilize your handle pipe instead.

Can't wait to see what you pull off, Brick!
 
Re: Looper Blunderbuss Shotgun - WIP pics begin on Page 3

Quick update before I head back to my workshop. The first and third rings of the rear endcap are well on their way. I'm shuttling between those bits and the grips. The grips are just about finished, but I realized that on the prop, the left and right grips have a different texture so I've been sanding down the grooves on the left side to flatten them down a bit. No biggie.

Other than that, I think I'm capping the first run of blunderbuss casts at 10. That means there is still one more spot on the interest list if you want in. Check out the Junkyard for more details.

-Jonaas
 
Re: Looper Blunderbuss Shotgun - WIP pics begin on Page 3

Quick update before I head back to my workshop.

-Jonaas

Im almost done with my Babys First Blunderbuss. molded the handle solely out of tape and i only need a rail to throw on the top, flat black spraypaint for texture and to cover the duct tape/neon green pool noodle in the tip, and some hockey tape on the handle.
Then you can see how much better yours is compared to mine
 
Re: Looper Blunderbuss Shotgun - WIP pics begin on Page 3

Im almost done with my Babys First Blunderbuss. molded the handle solely out of tape and i only need a rail to throw on the top, flat black spraypaint for texture and to cover the duct tape/neon green pool noodle in the tip, and some hockey tape on the handle.

Hey, ANY work is good work. And I know the name Baby's First Blunderbuss was a joke, but that How-To PM I sent you actually inspired me. Yup...I'm going to make a miniature blunderbuss out of craft foam for my 3 week-old son, Jack. :love

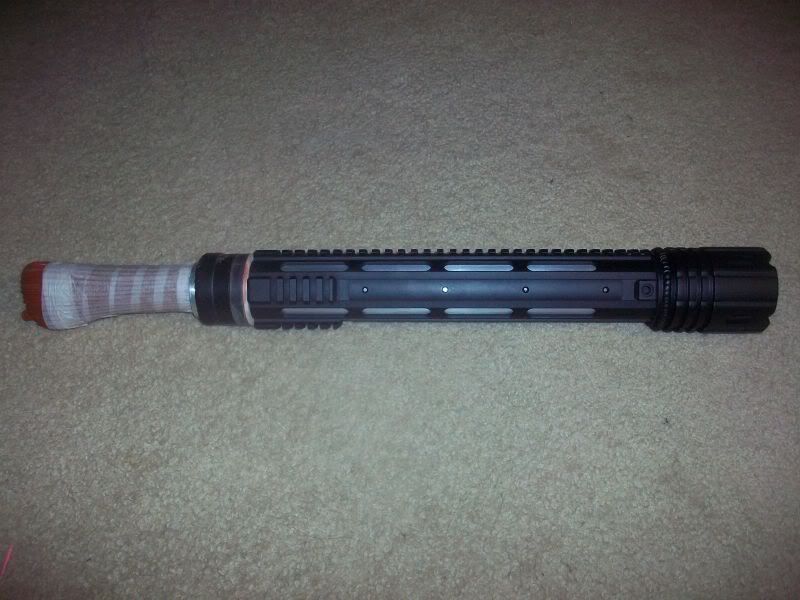
Aside from that, here's a huge pic update!

100_0484-1.jpg

The texture on the right grip is 100% done. The only detail left is that little button/screw on the side, and I'm waiting until I finish the left grip before I slap those on.

100_0485-1.jpg

Here's the left grip as it stands now. As I mentioned in my last post, I had to knock down the triangular grooves that the left side originally had by running some sandpaper on it. At first I wondered why the gun had two different grips, but then I read an interview with Looper's propmaster on the blunderbuss's design phase, which Rian Johnson kept telling the prop team "this was made in back rooms." I finally understand why the gun looks so shoddy and haphazardly put together. At the bottom of the grip, you'll see the lump of Apoxie Sculpt I used to fill a particularly big gap. It's now completely cured and I'll be Dremeling it to shape soon.

100_0489.jpg

100_0486.jpg

Just a couple of shots so you can compare the difference in grip textures.

100_0492.jpg

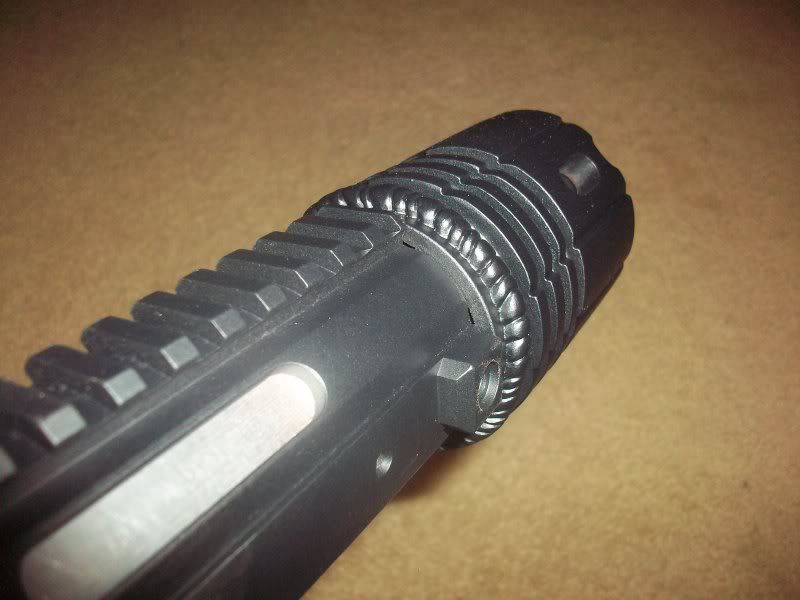
The third ring of the rear endcap is 98% complete. I noticed the weld line I sculpted was a bit built up in one area so I sanded that section down to make the line more symmetrical. I also hit it with some Satin Black I had on had just to visualize the final piece a bit more and see if the weld lines still held up. Just to be clear, the final gun will be painted Flat Black before weathering.

100_0498.jpg

A mocked-up rear endcap featuring the in-progress first ring, the untouched second ring, and the nearly finished third ring. The gap between the first and second rings is too deep so I'll most likely be filling it with Apoxie Sculpt to bring it up a bit. The first ring still needs a mounting hole carved into it and an Apoxie Sculpt weld line. The second ring needs a fake break-action mechanism placed on top (probably going to be a combination of wood scraps and Apoxie Sculpt. The third ring still needs a tab that slides into the fake break-action mechanism on the second ring (most likely thin plastic I scalp off an old document holder).

100_0478-1.jpg

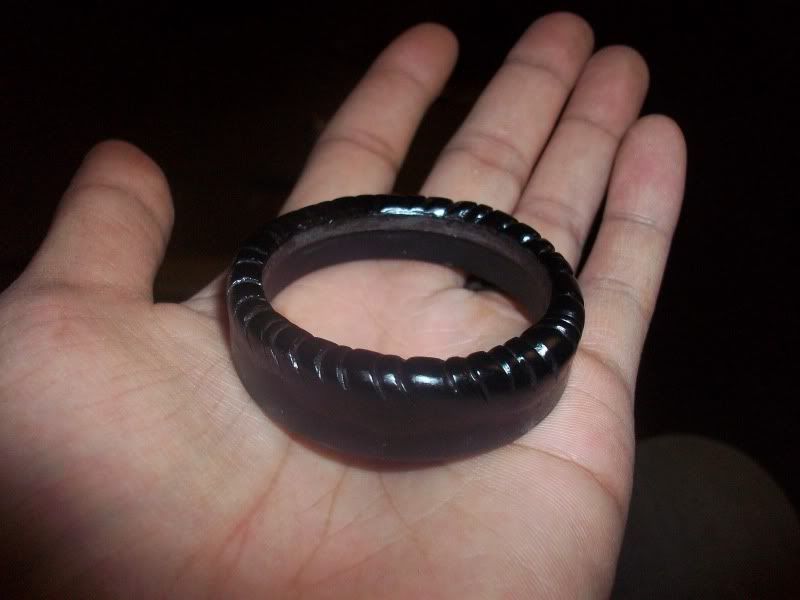
And last but not least, there's THIS little guy. Remember him? The front endcap? He is 100% DUNZO.

100_0479.jpg

Since this weld line is a bit different than the one I'd already sculpted on the rear endcap's third ring, I was worried it'd be much more difficult. It was trickier, but it was also a completely satisfying, very Zen-like experience. Plus, I got to sculpt in my cool, air-conditioned Man Cave instead of my humid and dusty workshop. All in all, I'm EXTREMELY happy with the finished front endcap, and now it doesn't feel like completing this gun will be difficult at all.

So there we have it for now. The only parts I haven't begun yet are the triggerguard, trigger (which also means altering the grip frame a bit), and the slide. I will, however, am going to need the help of a machinist around my way that has access to a drill press and a mill to help me create the holes in YHM-5005/aluminum tube where the slide will slot through and where the securing bolts will go. Are there any machinists out there in Southern California, the Corona/Ontario/Rancho Cucamonga area?

Thanks for looking, folks!

-Jonaas
 
Last edited:
Re: Looper Blunderbuss Shotgun - WIP pics begin on Page 3

I have been thinking about the slide, it looks like its from a small 125cc scooter or monkey bike! Looks like an exhaust part, maybe the exhaust cover or guard to stop yourself being burnt!
 
Re: Looper Blunderbuss Shotgun - WIP pics begin on Page 3

I have been thinking about the slide, it looks like its from a small 125cc scooter or monkey bike! Looks like an exhaust part, maybe the exhaust cover or guard to stop yourself being burnt!

Do you have any pics? I'm not familiar with scooters, so I don't have any frame of reference...but based on the measurements I've made using photos of the prop and my own YHM-5005, I've got the slide at a little under 3 1/2" long and about 1 1/2" inches wide. I've already mapped out a fabrication plan for the slide, but if you can find me the actual found part, you'd be saving me a lot of time and it would ensure absolute accuracy.

So here's a quick update before bedtime:

100_0519.jpg

With the front endcap being completely finished, I shot it with a coat of flat black and mounted it to see how it looked all together. I'm happy to report that it really works. There was always the fear that once I painted over that primer, I'd realize it was off in some way, but that hasn't happened. In fact, the dark colors have hidden the flaws that I was too lazy to fix (and no, I'll never tell :rolleyes)

100_0522.jpg

Most of the other work I did last night isn't really visible. I've drilled out the a mounting hole in the first ring of the rear endcap and sanded down a few millimeters off each of the rear endcap's rings to get their edges flush. I also carved out the lump of Apoxie Sculpt that I used to fill a deep gap on the left side grip. I'll give it a coat of primer tomorrow to see if any more work is needed as I ran out last night and wasn't able to pick up a fresh can.

100_0520.jpg

Right now, I'm happy as eff to see where the gun is right now. It actually looks like the real deal...I can stop right now and everyone who's seen the movie would know what I'd made. Of course, I could NEVER do that. Tomorrow's work will consist of sculpting in the weld line on the rear endcap's first ring, fabricating the second and third ring's break action mechanism, sculpting in the final button/screw detail on the grips, cutting out a cavity in the grip frame for the trigger, and hopefully getting my trigger and triggerguard started.

Also, I just wanted to give a couple quick shoutouts. First, to Brick Bronson, who's in the process of his own blunderbuss build. He mentioned he was using hockey tape for his handle. After doing a bit of research on Google Images, I decided that hockey tape IS the correct grip tape I should use (not medical tape nor masking tape as I'd previously thought).

Second, I wanna give a shout out to Sundowner (previously Dorian Gray) who's been following this build since day one and actually started another thread dealing with all the other props and costumes from the flick. You can check it out here and if you're a fan of the flick, I implore you to do it because THIS thread was meant to be an all-encompassing Looper info thread before I mutated it into a blunderbuss WIP.

That's it for now, folks! And for those of you who're on the Interest List for the blunderbuss, I'll be PMing you with more info.

-Jonaas
 
Last edited:
Re: Looper Blunderbuss Shotgun - WIP pics begin on Page 3

This turned out just top notch! The handle is fantastic!
 
Re: Looper Blunderbuss Shotgun - WIP pics begin on Page 3

Fantastic build! My endcaps are not going to look anywhere NEAR as good.
 
Re: Looper Blunderbuss Shotgun - WIP pics begin on Page 3

Splendid job Jonaas and thank you for detailing out your entire work in the last few weeks. It's been great to see the work in progress resulting in that final piece of art :thumbsup.

Besides the fact that I've wait to another two weeks till Oct 12 for the movie release in India, another thing that saddens me is that I know I can never think of getting this replica as the customs here would never allow it :(. (Despite not being a real firearm). Same reason I didn't get on the interest list for buying the gun.

I linked directly to Post #173. Here is someone else who saw your work now :).

looper_blunderbuss_tweet.png
 
Re: Looper Blunderbuss Shotgun - WIP pics begin on Page 3

Vivek, I did that a few days ago and got NOTHING!! :D
Yeah since last week he has been getting hundreds of messages, so he may not be able to catch up to the tweets all the time. I have been chatting with him on Twitter since last year long before the Looper buzz caught up, so thankfully he remembers me and replies whenever possible.
 
Back
Top