Looper Blunderbuss - Pics of Painted Slushcast Kit on pg. 18

Re: Looper Blunderbuss Shotgun - WIP pics begin on Page 3

Joined the forum specifically for this thread. The blunderbuss prop is looking great! I'm excited to see your updates.

On a side note, have you considered a chiappa rhino in place of the mateba? They are pretty similar, and I'm sure you can find a decently priced airsoft rhino.

I really want to build my own blunderbuss prop. Being only 30 days from Halloween and having minimal tools, I'm not sure I can pull it off. If you don't mind me asking, about how much have you spent on materials so far and could you give a generalized list of tools you use?

Thanks!
 
Re: Looper Blunderbuss Shotgun - WIP pics begin on Page 3

@brirye the only problem with getting the Rhino instead of the Unica 6 would be that it would be from a different film. (Total Recall - 2012)
 
Re: Looper Blunderbuss Shotgun - WIP pics begin on Page 3

Anywho I was wonder if these casts would be done by Halloween. I know its a month away, just curious.

I don't want to make any promises, but I CAN say that work on the gun is going faster than I'd anticipated. I should have all the components fabricated within a week, but the molding and casting process is all dependent on if the Interest List gets filled up and I get the deposits all in. After that, I have to place an order with Smooth-On, and I'm not sure how long shipping would take.

If you don't mind me asking, about how much have you spent on materials so far and could you give a generalized list of tools you use?

Thanks!

Not a problem. And if you need more reference, my WIP posts are pretty informative. Here's the breakdown so far.

YHM-5005 foregrip: $175
Aluminum tubing: $11
Apoxie Sculpt: $25
1 1/2" PVC pipe: $3
1 1/2" PVC coupling x 5: $4
1/2" pine board: $10
1/4" plywood sheet: $5
3/8" plywood sheet: $4
1/8" basswood sheet: $3
Bondo Spot Putty: $4
Wood Glue: $4
Super glue: $4
Krylon Primer x 3: $12
180 grit sanding block: $4
120 grit sanding block: $4
180 grit sandpaper: $5

So that's the jist of it...the stuff I didn't include in the list are my tools:

Dremel + various bits
Dremel Flex Shaft
Ryobi jigsaw
Ryobi palm sander
Boxcutter
Xacto knife
C-Clamps
Zipties

Feel free to PM me if you have any other questions!

-Jonaas
 
Re: Looper Blunderbuss Shotgun - WIP pics begin on Page 3

Damn, this gun is so cool, I need to see this movie already, jeez.
 
Re: Looper Blunderbuss Shotgun - WIP pics begin on Page 3

Thanks for putting that list up FakeBritishAccent! That will help me and many other people attempting the build :)
 
Re: Looper Blunderbuss Shotgun - WIP pics begin on Page 3

Damn, this gun is so cool, I need to see this movie already, jeez.

I'm telling you, squeeze in a showing. It's just an excellent film.

So you might've noticed that my posts on this thread and others have been more frequent today then they've been all week. While I can say it's because the number of posts to this thread has increased since the movie came out and I've been replying to all of them...that isn't entirely true. You see, I've been DREADING this part of the build...even more so than having to sculpt the weld lines. I knew carving the grips' texture would be a nerve-wracking process, and I've been holding it off all day. But finally, after running errands with the wife and cooking her and my mother-in-law a full dinner, I decided to bite the bullet and get started.

100_0399.jpg

Presenting...the most difficult thing I've ever done. And mind you, I've had to replace one of my patient's intestines after they broke through the sutures of a surgical abdominal incision!

100_0401.jpg

As youngpaddy1 mentioned earlier in this thread, the grooves of the grip were most likely the grain of the wood used after being hit with a sandblaster. Seeing as I wanted to replicate the look (and there was no way I'd be able to track down a piece of wood with the exact grain of the original prop's grip) I had no choice but to carve each groove individually. These 13 took about an hour and a half of Dremeling, and I'm still only about 60% finished with it...and the left side grip hasn't even been touched yet :cry

100_0403.jpg

Still, I'm making good progress. Earlier today, I devised a method to mount the rear endcap to the grip frame to make it one solid piece that slides into the aluminum tubing perfectly. Not only that, I already cut and smoothed out the main pieces of the rear endcap. After the grips are all done, I'll cut out a cavity for the trigger, fabricate the trigger, and then figure out a way to make it function.

Thanks for all your help, everyone! And don't forget to check out my Interest List in the Junkyard! Once it's filled up, I can start calculating the first run.

Time for sleep...maybe. Jack is probably gonna wake up any second now.

-Jonaas
 
Re: Looper Blunderbuss Shotgun - WIP pics begin on Page 3

I watched the film over the weekend, and yes agreed with jonaas it's a epic film!

Btw jonaas the blunderbuss is also looking epic!

I think the best thing about looper is that the idea it's self is left wide open to your own imagination, loopers can take any style and come from any walk of life! How long before we see a steampunk looper?
 
Re: Looper Blunderbuss Shotgun - WIP pics begin on Page 3

Amazing work Sir, carving out those grips would've tested my patience just too far, super steady hand needed.
 
Re: Looper Blunderbuss Shotgun - WIP pics begin on Page 3

That's some great work on the handle. You really nailed it :thumbsup
 
Re: Looper Blunderbuss Shotgun - WIP pics begin on Page 3

I think the best thing about looper is that the idea it's self is left wide open to your own imagination, loopers can take any style and come from any walk of life! How long before we see a steampunk looper?

The movie totally sets itself up for a sequel. Who knows if there were men like Abe setting up Looper franchises in the Old West or Feudal Japan, right?

Amazing work Sir, carving out those grips would've tested my patience just too far, super steady hand needed.

Believe me, I was as steady as could be but I STILL needed a fair amount of Spot putty to fill in the goofs. Hopefully, the left side will be a bit easier to texture since I sorta got a technique down with the right side.

Alright, folks, time to work! Updates tonight!

-Jonaas
 
Re: Looper Blunderbuss Shotgun - WIP pics begin on Page 3

The movie totally sets itself up for a sequel. Who knows if there were men like Abe setting up Looper franchises in the Old West or Feudal Japan, right?

-Jonaas

Wow. Never really thought about this. I'd love to see a comic book spinoff set in the "Looper Universe" where we see stuff like this. It could jump around to different time periods and characters. That'd be incredible.

And as always, awesome job so far. Excited to see the updates.
 
Re: Looper Blunderbuss Shotgun - WIP pics begin on Page 3

This post inspired me to come out of the shadows. Some of you have probably already seen this, but here's an interesting link I found a smidge under a month ago.
Product - Looper Movie Jacket/blazer. by Instant YouTube Views! · Storenvy

looper-picture_original.jpg

OoOooOh...that's a BINGO! That's about the closest we've seen to the movie blazer and it looks like it would only need minimal modifications...right down to the invisible button holes (we'd just need to pluck off the buttons). A good tailor should be able to replicate the cut of the waistline perfectly. Of course, if the jacket IS Dolce & Gabbana, I imagine it'd be pretty pricey. Do you have anymore info on the jacket? A name/model number?

Well, I just spent two sweaty hours in my workshop carving the grooves on the left grip. At first it seemed easier than the right grip and I thought all my cuts were pretty accurate. A coat of primer showed me how wrong I was. Because the left grip was repaired with a skin of Apoxie Sculpt (much softer and easier to sand than pine) there are tell-tale dips in the carved grooves where the pine ends and the Apoxie Sculpt begins. These spots will have to be filled with more Bondo Spot Putty. Other than that, there's a section near the bottom of the grip where the groove I carved was a bit too deep. This section will be filled with more Apoxie Sculpt and built back up before I carve it down again.

I can't believe I'm putting this much work into a section of the grip that NO ONE WILL BE ABLE TO SEE. I guess it's the curse of the obsessive-compulsive prop maker, huh?

At least the right grip is almost done...I just have to sculpt that screw/button that's on the original prop. I'm also 30% into the rear endcap. Pics to be posted later. For now, I'm gonna watch "The Dark Knight Returns" animated film with the wife. I couldn't wait and watched it last night, but she's a big fan as well. It's a great adaptation.

-Jonaas
 
Last edited:
Re: Looper Blunderbuss Shotgun - WIP pics begin on Page 3

Updates!

While both the right and left side grips are getting completely smoothed out, I started work on the rear endcap.

100_0450.jpg

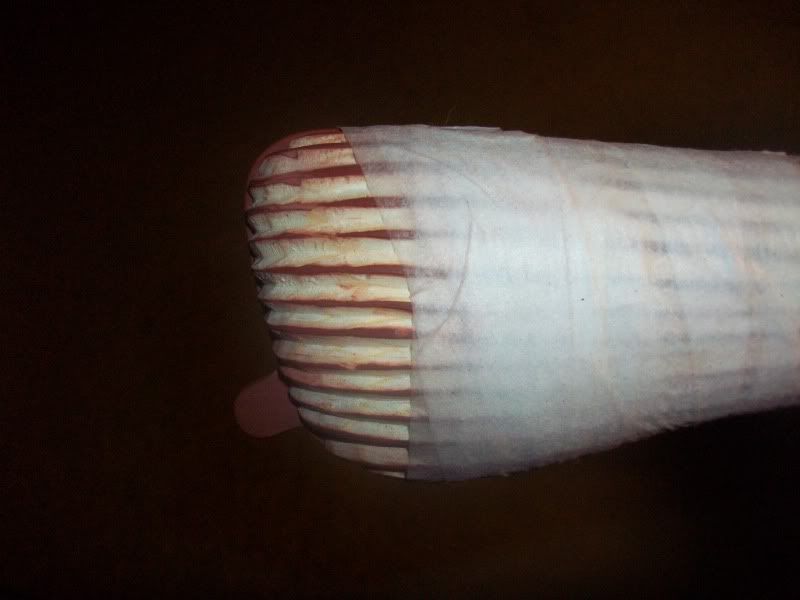
The rear endcap is made out of 4 components: First, a ring closest to the gun, which features a weld line. After a small inset gap, there's another ring with what looks to be the break-action mechanism on top. A third ring sits flush against the second ring. This third ring features a tab that slides into the break-action mechanism on the second ring and a weld line on it's outside edge, and it's where the grip frame meets the gun.

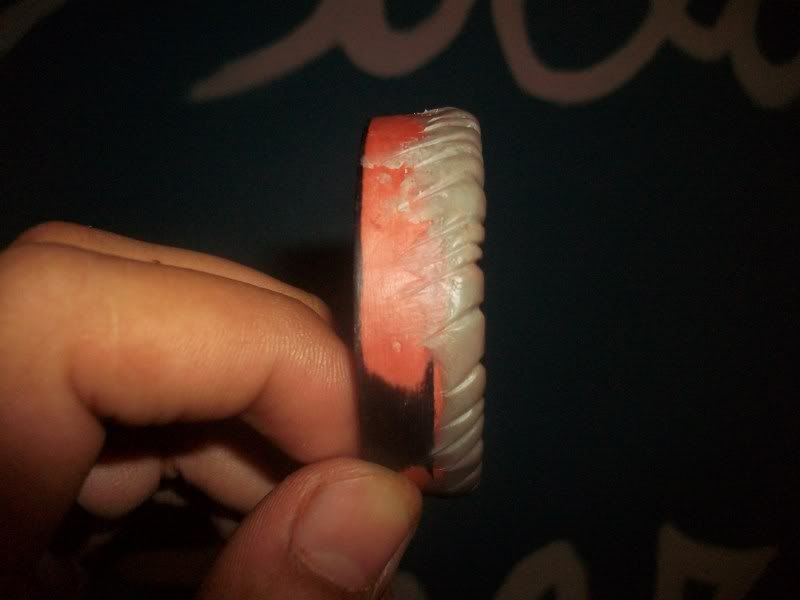
Since I was essentially working from the grip up at this point, I decided to start with the third ring. I started with 1 1/2" PVC coupling, cutting out 3 rings, 2 rings of identical thickness and a third ring that was about 3/8" thicker than the other two. On the prop, the three rings all have nearly identical thickness, but there's a reason why I made one larger.

100_0454.jpg

The rings, while close, still fit a bit loose on the aluminum tubing. The coupling I used to make the rings was the same coupling I used for the front endcap. With the front endcap, I dealt with the loose fit by sculpting a shim out of Apoxie Sculpt to take up the slack. I couldn't do the same with the rear endcap because I wanted to make sure I could still take the gun apart for upgrades and molding.

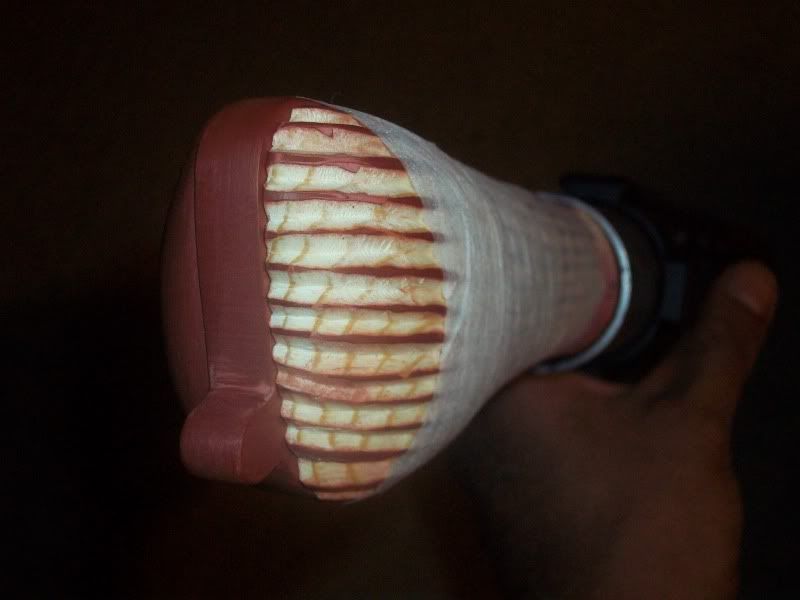
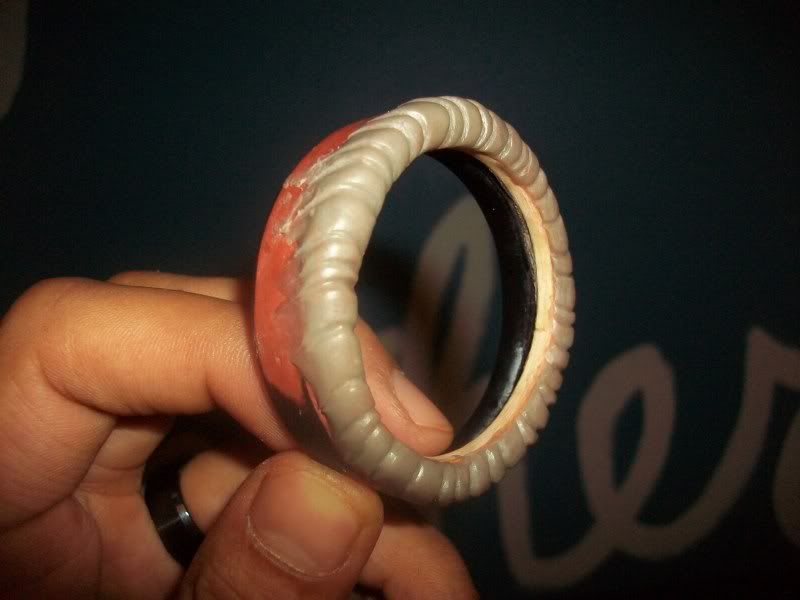
The plan I have is simple...I would make the endcap out of four separate pieces (3 rings and small gap), glue them together, and then mount the endcap onto the end of the aluminum tubing with two wood rings cut to the exact diameter of the aluminum tubing. These wood rings (cut out of basswood) when affixed to the first and third ring would account for the missing 3/8" of thickness. After Supergluing the wood rings to the PVC rings, the gap was filled with Bondo Spot Putty and sanded smooth.

100_0448.jpg

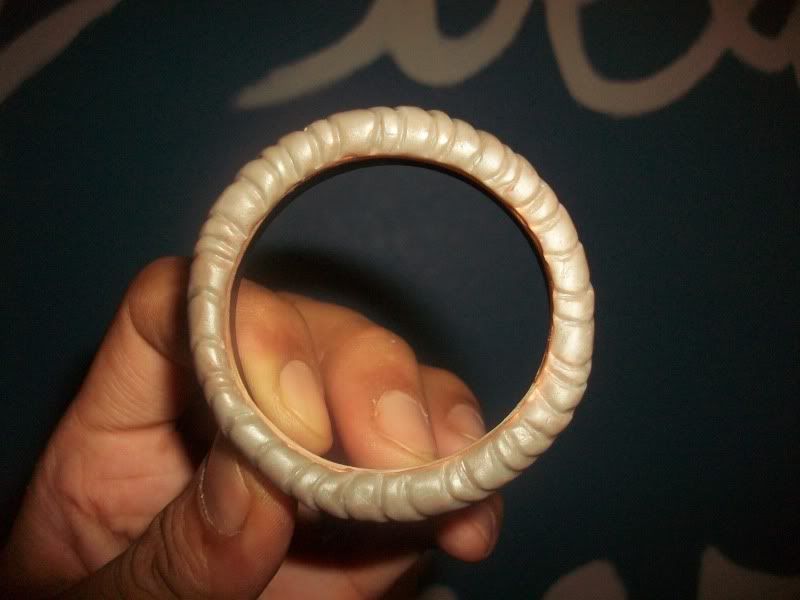
For the third ring, I sanded off a bit of the wood ring and replaced the gap with Apoxie Sculpt to sculpt the rear weld line. Y'know, for all my complaining about having to sculpt the weld lines, I gotta admit...it wasn't all that bad. It was a bit tricky, but it only took about 30 minutes to get it to a point I was happy with (or at least satisfied enough with, knowing that I could fix it up with Spot Putty and sandpaper after it cured). Let's just hope the other two weld lines are just as easy.

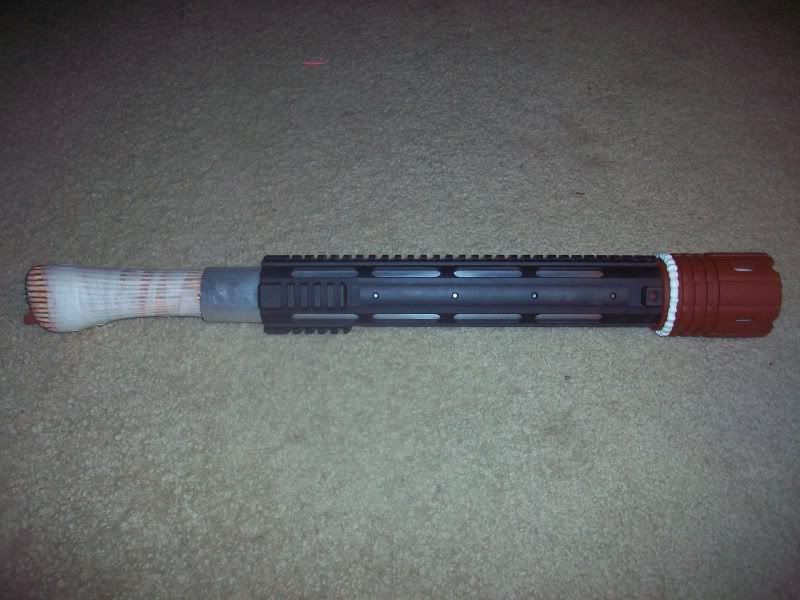
If all goes according to plan, the rear endcap will be joined to the grip frame and then the whole shebang will slide seamlessly into the aluminum tubing and affixed with bolts (that can be removed for future work). I know this all sounds a bit confusing, but trust me...if I do it right, it'll make sense.

So that's that for now. I'm off to the garage to finish up the grooves on the grips and possible get started on the second ring of the rear end cap. Have a good night, folks!

-Jonaas
 
Re: Looper Blunderbuss Shotgun - WIP pics begin on Page 3

Looking good jonaas, keep up the hard work! Looking forward to the finished pics!
 
Re: Looper Blunderbuss Shotgun - WIP pics begin on Page 3

Those gray jackets go on ebay for about $75. I was looking at them before the movie came out
 
This thread is more than 7 years old.

Your message may be considered spam for the following reasons:

  1. This thread hasn't been active in some time. A new post in this thread might not contribute constructively to this discussion after so long.
If you wish to reply despite these issues, check the box below before replying.
Be aware that malicious compliance may result in more severe penalties.
Back
Top