Looper Blunderbuss - Pics of Painted Slushcast Kit on pg. 18

Re: Looper Blunderbuss - WIP pics begin on Page 3

Only 3 guns left, everyone! If you've left a comment on this thread me saying you were interested in the gun, but did not state you want to be put on the Interest List, you are NOT on the list. Please visit the Interest Thread for details and then PM me regarding your decision. Once again, the blunderbuss will be limited to 30 individually numbered casts.

Also, just to clarify, the buyer is responsible for all shipping costs. Please keep this in mind when deciding to order, as I know many of you are from overseas.

-Jonaas
________
 
So, is this to be a thread specific to your build or a general blunderbuss thread? That's what I thought it was before the title change when I posted those reference pics from SDCC.

I want to be sure, as I just bought my YHM-5005 and am about to start machining the muzzle and I dont want to cramp anyone's thread if that's the case.
 
Re: Looper Blunderbuss - WIP pics begin on Page 3

So, is this to be a thread specific to your build or a general blunderbuss thread? That's what I thought it was before the title change when I posted those reference pics from SDCC.

I want to be sure, as I just bought my YHM-5005 and am about to start machining the muzzle and I dont want to cramp anyone's thread if that's the case.

When I started this thread in March, it was a general info thread asking for more info on the blunderbuss and the Mateba (and later, the grey jacket and the BFR). When it looked like no one was tackling a build, I retitled the thread and stated that it should stay a general info thread since there were no other Looper threads on the RPF. But since then, there are now a couple other Looper/Blunderbuss/Costume threads and to keep this thread more focused on my build, Sundowner created his "Looper: Other Props and Wardrobe" thread

Now that I have a run planned and 30 on my sell list, I'd really appreciate if this thread stayed exclusive to my build so they don't get mixed up as to what they're going to be receiving. As for your photos, I've always stated that they and Art's photos have provided the majority of reference for my build, but if you no longer want them on this thread, feel free to remove them.

Can't wait to see your thread, nickytea! And like sharpshooter55's blunderbuss and costume thread, I'll post a link to yours here when you get it started to help guide others with their personal builds.

-Jonaas
 
Last edited:
Re: Looper Blunderbuss - WIP pics begin on Page 3

Finally saw Looper, just got back. I really enjoyed it. Very refreshing science fiction story.
 
Re: Looper Blunderbuss - WIP pics begin on Page 3

Just wanted to say this build is extremely impressive! I haven't been as excited for a film like this in a long time. I've seen the film 4 times since it opened :lol and when I came across this build thread I was blown away. Wonderful work, can't wait to see what it looks like when it's done. :cool

Thanks for the kind words, friend! As for the movie, don't worry...I understand COMPLETELY how you feel about it! I watched it midnight opening day and then watched it again less than 12 hours later with my wife. I plan on watching it a third time, only with Rian Johnson's downloadable in-theater commentary on my iPod running alongside the flick!

It's time for invisible updates! I'm using the term "invisible" to describe updates that you will not notice when examining the final gun, even though it took a whole working day to complete these changes :lol

100_0674.jpg

First off, I began designing my trigger mechanism and made the very first cut in my gripframe to accommodate it. I've yet to make another cut in the gripframe to fit the spring that will give my trigger the correct tension as I haven't tracked an appropriately-sized spring yet.

100_0678.jpg

I drilled screwholes into either side of the grips to keep them in place...no more blue tape for me! Like the original prop, these screwholes are asymmetrical, but the same size. I've yet to sculpt the "plug" that covers these screws, but I'll probably won't tackle that until the rest of the gun is 100% and I know that the grip position isn't going anywhere.

100_0685.jpg

After comparing my grips' profile to the actual prop, I realized the shape was off. A few moments with my Dremel corrected this error.

100_0682.jpg

Though I was able to rattle off the triggerguard fairly quickly the other day, something about it didn't sit right with me: Because I used crude techniques to bend the aluminum bar to shape, the triggerguard seemed a bit too square for my liking. To fix this, I started over. This time, I used a shaped piece of wood to as a form to bend my aluminum bar to the correct shape. After that, I thinned the whole piece out about 1/4" in order for its edges to sit flush against the gripframe's edges. It's not exact, but it's a lot closer to the original prop's triggerguard that the one I'd made previously.

100_0677.jpg

I drilled the appropriate holes into my triggerguard using small carbide bits and my power drill INSTEAD of my Dremel. Installing a new microwave into the wall with my father-in-law taught me that my drill and the various bits I own pack more punch than I'd given them credit for. That being said, I feel I no longer have to send my blunderbuss to a professional machinist in order to drill the appropriate holes into the YHM-5005 to allow for mounting. I secured the triggerguard with a couple screws I had on hand, but the screw was too large for the front section of the triggerguard, splitting the wood and protruding into the recess I'd carved for the trigger mechanism. I'll need to repair the split with wood glue and a clamp and THEN find a smaller-length screw to secure the front of the triggerguard to replace the original.

100_0683.jpg

And here's were we stand now. Go ahead and compare this full shot to the full shot in my previous post...like I said before: Invisible.

Tomorrow's a busy day, but I hope to get some more work done before the end of the night. One thing I didn't mention is I tried to bend out the trigger from a thin rod of steel, but my tests brought no good results. I'll try again with a more malleable material, but if I fail then I may return to my original plan of making the trigger out of round styrene and a blowdryer. Other than that, I'll try to finish up the rear endcap and then go to Lowe's to pick out appropriate screws to secure everything together.

-Jonaas
 
Last edited:
Re: Looper Blunderbuss - WIP pics begin on Page 3

Thanks for the kind words, friend! As for the movie, don't worry...I understand COMPLETELY how you feel about it! I watched it midnight opening day and then watched it again less than 12 hours later with my wife. I plan on watching it a third time, only with Rian Johnson's downloadable in-theater commentary on my iPod running alongside the flick!
You're very welcome! And yes, that's exactly what I did with my afternoon. :) It's a wonderful commentary, and very funny.

And here's were we stand now. Go ahead and compare this full shot to the full shot in my previous post...like I said before: Invisible.
Effectively invisible perhaps, but amazing nonetheless. Fantastic work!
 
Re: Looper Blunderbuss - WIP pics begin on Page 3

I keep checking up every morning, and finding a new epic update! Keep up the good work jonaas, it looks fantastic and can't wait to see it finished
 
Re: Looper Blunderbuss - WIP pics begin on Page 3

I keep checking up every morning, and finding a new epic update! Keep up the good work jonaas, it looks fantastic and can't wait to see it finished

Thanks, dude. Oh, and it got past me when you first posted it, but after you mentioned that rail covers could be the slide I'm looking for, I went on a search. I found several that COULD work, but nothing 100% accurate (the main problem being that the smaller grooves were not inset into the covers. It's probably going to cost me a couple days, but I'm just going to scratchbuild the slide. At this point it the build, it's all I have left to do.

As of now, all I have left to do is unify the rear endcap rings into on piece, fabricate and mount the trigger, sculpt grip 'plugs', fabricate the slide and rig it to retract.

Don't quote me on this, but I think this puppy'll be done in one week.

-Jonaas
 
Re: Looper Blunderbuss - WIP pics begin on Page 3

Looking really great, it's come together so quickly. Once the trigger is on there it'll look fantastic :D
 
Re: Looper Blunderbuss - WIP pics begin on Page 3

Looking really great, it's come together so quickly. Once the trigger is on there it'll look fantastic :D

Sadly, the trigger is what's giving me the biggest headache right now. I'm using a 1/8" aluminum rod and bending it to shape...but because I don't have a proper vice, it's tricky getting my bends completely perfect. If all else fails, I may end up having to make the trigger buy fusing together cut sections of rod and then hiding the seam with Apoxie Sculpt...but I really wanted my trigger to have an extremely solid feel.

I started modifying the YHM-5005 this morning, including drilling all the mounting holes all the way through to the aluminum tubing. I originally thought I'd have to take it to a machine shop to do this properly, but my power drill and carbide bits made short work of the task. I still have to refine the holes to suit the bolts I need to use to secure everything together and finish up cutting the slot on the underside of the gun in which the slide will be attached.

Updates later!

-Jonaas
 
Re: Looper Blunderbuss - WIP pics begin on Page 3

Hi jonaas,

I was just wondering how your going to finish the gun (cast one) paint wise!
 
Re: Looper Blunderbuss - WIP pics begin on Page 3

Hi jonaas,

I was just wondering how your going to finish the gun (cast one) paint wise!

Actually, less than two hours ago, I posted my detailed paint plans in Sharpshooter55's Young Joe Costume and Blunderbuss build. To save some time, I'll copy and paste what I put there over here:

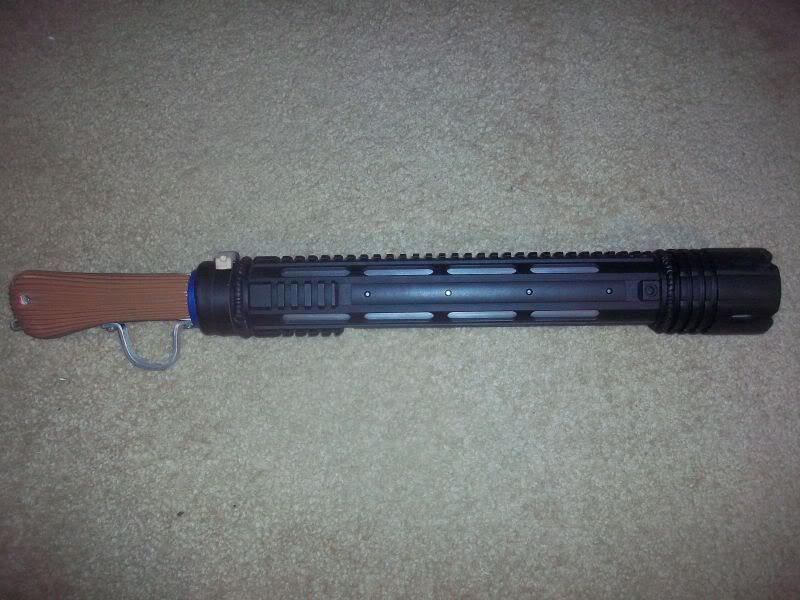
In order to get my blunderbuss' finish particularly grimy, I'm going start with a cheap grey primer by Colorplace, which I know can clump up if sprayed a certain way to copy the rather bumpy texture of the original prop. After that, I'm going to experiment with pencil lead dust and drybrushing a variety of acrylic blacks and dark greys in different finishes. And before clearcoating it, I'm going to brush on a bit of baby powder to give the whole piece a general haziness.

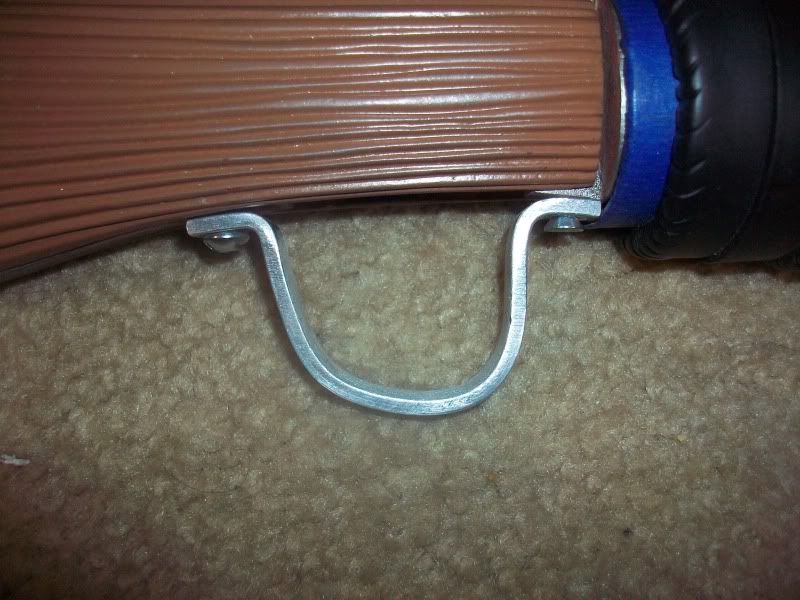
The gripframe, trigger, and triggerguard will be basecoated with a stainless steel spray and then given a few washes of acrylic charcoal to knock down the shine.

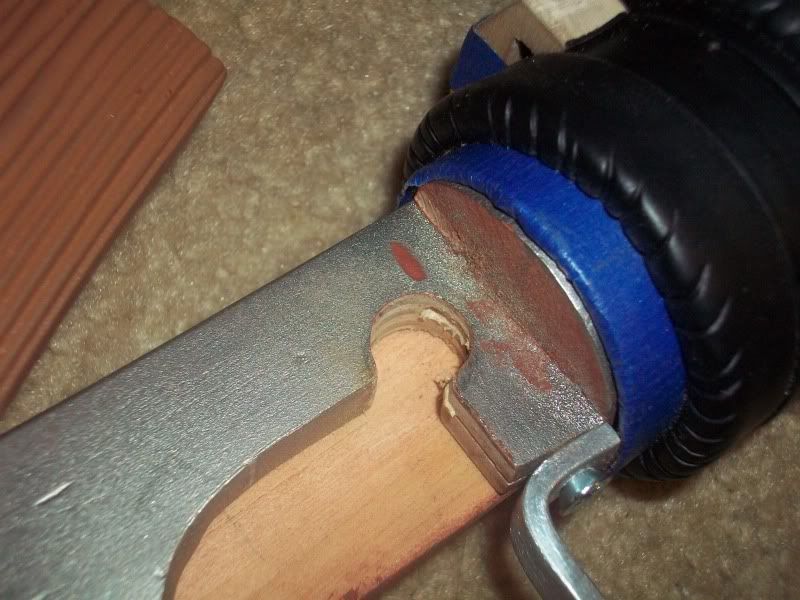
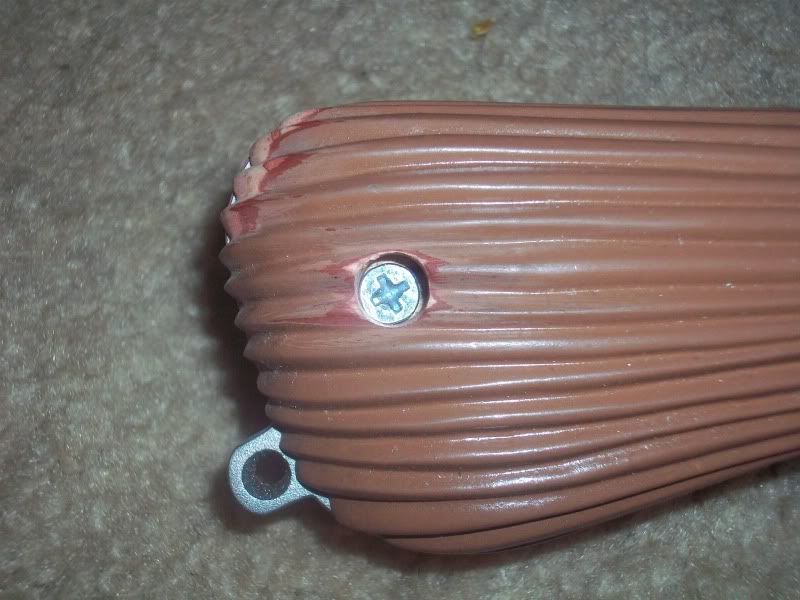
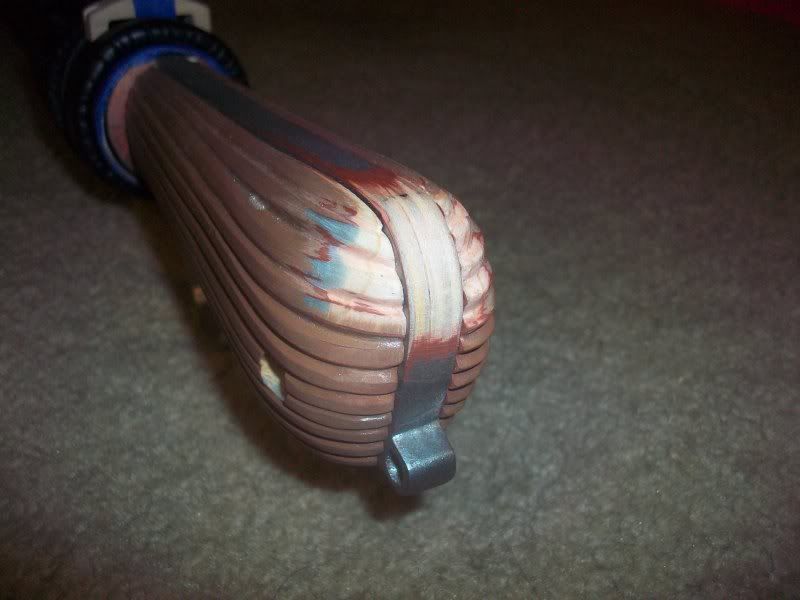
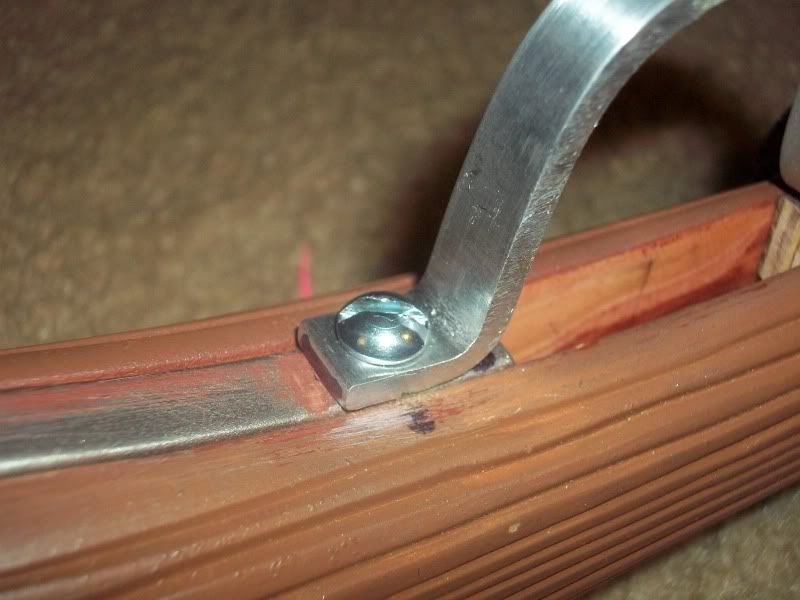
The grips will be clearcoated first, and while it's still wet, I'm going to sprinkle a bit of coarse sawdust on it to simulate the rather rough-looking texture of the original's grip. After that, it'll be a brown base coat, acrylic handpainted stripes to look like grain in different browns, an almost black dark brown acrylic wash, and then finally a light brown drybrushed along the ridges to look like wear. The grip screw will be handpainted gold and then given a charcoal wash.

Speaking of tape, I plan on using hockey tape applied very haphazardly on the grip. I'm using a watered-down acrylic pale brown as a base and then giving the whole grip a dark brown wash. After that, I'll use charcoal dust or something rubbed in with my fingers to really get in those cracks.

For metal weathering, I've used the same technique for 10 years: Drybrushed silver applied sparingly to edges and corners to simulate wear and tear. Also, I never add scratches any other place unless I use a Dremel or 60 grit sandpaper to make the section look like the results of a drop or bad scrape.

As for rust, I'm gonna try a new technique that I only recently read about: Volpin, in one of his Skyrim helmet builds, described applying iron powder mixed with dark purple acrylic paint to areas he wanted rust. After spraying the iron powder with a mixture of hydrogen peroxide and vinegar and leaving the helmet alone for a day, he was left with beautiful rust marks. Check out the process here.

Like I said before, this is just my plan (I won't be starting the painting process for another week or so), but I'm fairly confident it will work out. I've ALWAYS hated the painting process of any of my projects, but since the blunderbuss is such a mess finishwise, even if I screw up, no one will notice :lol

-Jonaas

What I didn't mention is the entire thing will then be clearcoated with Krylon Flat spray afterwards to protect it...but I found out a few weeks ago that Krylon Flat Clear got recalled for some reason. I hope they reformulate it and get it back out on the streets before I start the runs, because I really love how it sprays.

And also, even though I'll be following a general template for painting the blunderbusses, smaller details will vary from gun to gun (scratches, dings and rust marks, for example).

-Jonaas
 
Re: Looper Blunderbuss - WIP pics begin on Page 3

This is coming together so nicely, I'm happy I got my spot on the list when I did! That sucks about the Krylon Matte Clear Finish! That's always been my favorite, especially when painting Nerf guns! I checked Amazon, and they have one left in stock.

Amazon.com: Krylon 11-Ounce Low Odor Clear Matte Finish Aerosol Spray: Arts, Crafts & Sewing

Jerry's Artarama apparently still has it in stock, so I'd order it now while you can! There's no telling when this stuff will be available again!

Krylon Sprays - JerrysArtarama.com

There's also this, though I've never used the regular Krylon Clear Matte finish. Great price though! http://www.dickblick.com/products/krylon-1311-matte-finish/?wmcp=amazon&wmcid=feeds&wmckw=21703-1004
 
Re: Looper Blunderbuss - WIP pics begin on Page 3

This is coming together so nicely, I'm happy I got my spot on the list when I did! That sucks about the Krylon Matte Clear Finish! That's always been my favorite, especially when painting Nerf guns! I checked Amazon, and they have one left in stock.

Amazon.com: Krylon 11-Ounce Low Odor Clear Matte Finish Aerosol Spray: Arts, Crafts & Sewing

Jerry's Artarama apparently still has it in stock, so I'd order it now while you can! There's no telling when this stuff will be available again!

Krylon Sprays - JerrysArtarama.com

There's also this, though I've never used the regular Krylon Clear Matte finish. Great price though! Krylon #1311 Matte Finish - BLICK art materials

Actually, I'm talking about Krylon Clear Flat:

krylon_clear_flat_spray.JPG


It's a bit cheaper than the matte and I've always loved the finish...the matte always looked a little hazy for me after drying. Of course, with THIS build, hazy is actually good...maybe I WILL go with the matte this time!

Plan for today:

1. Grip screw plugs. I'll sculpt them out, but I won't affix them until it's time to mold.

2. Trigger. I'll give bending one more shot. After that, I'll just cut the steel rod into small sections, form the trigger shape, and then sculpt over the gaps.

3. Rear endcap: I'll finish detailing the second and third rings and possibly mount it to the grip plug so I could sculpt in the thin gap between the first and second rings.

4. YHM-5005 modification: I'll continue shaping the mounting holes I drilled so my Allen head screws fit correctly and then finish cutting the slot for the slide.

5. Slide: More measuring and planning to ensure it's the perfect size.

That's it for now, folks. Updates tonight, hopefully.

-Jonaas
 
Re: Looper Blunderbuss - WIP pics begin on Page 3

Do you have any good reference photos of the grip 'plugs'? I can't really tell where they're supposed to go. Thanks.
 
Re: Looper Blunderbuss - WIP pics begin on Page 3

Do you have any good reference photos of the grip 'plugs'? I can't really tell where they're supposed to go. Thanks.

I've been using this photo of the left side and this photo of the right side as reference. Because of the angle of the left side photo, it's difficult to orient, but I used the grooves in the grip and the position of the plug in relation to the lanyard loop as a guide. All I can really tell you is that the plug on the right side is slightly higher than the left side.

So no pic update tonight, but for good reason...my blunderbuss may be featured in a "Looper" short parody film. The shoot is on Monday, which means I gotta get in gear and finish it up as ASAP, so please excuse the lack of pic updates.

Back to the workshop!

-Jonaas
 
Last edited:
This thread is more than 7 years old.

Your message may be considered spam for the following reasons:

  1. This thread hasn't been active in some time. A new post in this thread might not contribute constructively to this discussion after so long.
If you wish to reply despite these issues, check the box below before replying.
Be aware that malicious compliance may result in more severe penalties.
Back
Top