I swear, this Skeleton Crew stuff is introducing me to some crazy talented makers. Welcome to the convo!!!!
You are using an out of date browser. It may not display this or other websites correctly.
You should upgrade or use an alternative browser.
You should upgrade or use an alternative browser.
Jod Na Nawood | Captain Silvo Costume - Skeleton Crew
- Thread starter Modery
- Start date
kalsonprops
New Member
Thank you bro. I'm trying to make coat, 70 percent completed i will try to upload pictures tomorrow.
kalsonprops
New Member
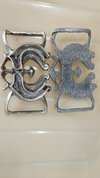
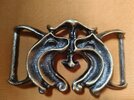
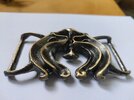
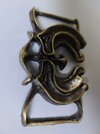
I made this belt my friend sent me this 3d buckle file . now i made this buckle in brass
Attachments
Last edited:
kalsonprops
New Member
first i will complete coat then i will let you knowLooks great! Do you have a tutorial/supply list for those?
Modery
Member
Well, sometimes you're so focused on things that you don't notice what's in front of you....A few more dark washes and you're there. The belt and sizing looks spot on
Was doing some testing with graphite powder on silver and gold paint today (black gloss based + graphite powder + clear coat = getting that perfect look for Din Djarin's Mando armour; I noticed that graphite powder on silver/chrome gives me a darker metallic look), to get some colour that is closer to Silvo's helmet on top (still not 100% sure which colour it actually is, as lighting in the scenes it appears in is always tricky).
And it still took me another 20 minutes to think of applying graphite powder to my belt buckle! So, 2mins of rubbing the graphite in with a cotton ball, and here's the effect:
So much better than what I had before - darker silver, more shading, but still shiny under a spotlight. Think I'm going to leave it now as it is
That is crazy cool. The weathering and random oxidation look it created is awesome. I have two cans in the cupboard but even if I didn't it would be worth making a batch.Well, sometimes you're so focused on things that you don't notice what's in front of you....
Was doing some testing with graphite powder on silver and gold paint today (black gloss based + graphite powder + clear coat = getting that perfect look for Din Djarin's Mando armour; I noticed that graphite powder on silver/chrome gives me a darker metallic look), to get some colour that is closer to Silvo's helmet on top (still not 100% sure which colour it actually is, as lighting in the scenes it appears in is always tricky).
And it still took me another 20 minutes to think of applying graphite powder to my belt buckle! So, 2mins of rubbing the graphite in with a cotton ball, and here's the effect:
View attachment 1909706
So much better than what I had before - darker silver, more shading, but still shiny under a spotlight. Think I'm going to leave it now as it is
I did a similar thing with charcoal powder in clear fingernail polish but I swear I can't even remember why....... ok, but yes, it was for the metal hat decoration for my Kid Rock cosplay. Clear polish, one drip of black polish and added charcoal powder, painted onto an aluminum medallion made from a soda can base. Looked just like the polished agate looking centerpiece that was on his Stetson.
I got one silver layer on but my silver is gem like, lot of blue, red, and sparkle.
I am very curious if I can purposely destroy the silver in the same way we all complain happens when you clear coat metallic paint before it has dried. It kills the shine and dulls it back to silver gray. 3AM and now my brain is engaged. I probably should wait til morning to read the progress posts.
kalsonprops
New Member
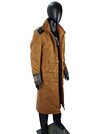
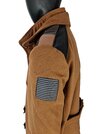
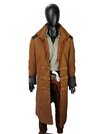
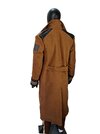
Will this be available as a limited run or is there opportunity for custom fit like measurements and the whole tailor's side of things? I mean, I am not rolling in cash but this would be a huge timesaver as I was focused more on the smaller props. As we all know, plenty of dirtying it up would happen soon after.... no one likes a clean pirate.....hehehe, but it is a great repro, either way.Made with wool with rubber cuff and shoulder badges
Speaking of, are you going to silver that central buckle or was the gold/copper on purpose to make it pop better in photos? (CORRECTION: just saw your message above that it is in brass.)
Wow too many questions today, sorry but who did you go with for the blaster file and did you like all the details when it printed? Holstered of course so I can't see all of it but curious if you liked it as I am still waffling on which file to go with. That project is just beyond my level of patience for designing myself.
I had tried to purchase the earlier scenes jail blaster but due to a huge hoohaw with the US customs it got rejected and caused it to roll all the way back to France. I am in process of printing that one, likely next week. But now that the pirate ones are available I want to see how they look painted up. Are you going to take yours any further with painting and weathering?
Keep up the good work, this is coming out awesome.
Last edited:
You really gotta throw up some photos of your brass process. Are we talking lost wax? We have been talking about doing brass on some other projects. Did you go through a lot of steps to get the wax ( if it was wax) or can you just print a wax positive?I made this belt my friend sent me this 3d buckle file . now i made this buckle in brass
How the heck did I miss all these posts? Half the convo above is new to me but I saw like one or two of them days ago?
kalsonprops
New Member
Yes, it’s available in all sizes. If you like, I can make your coat also, but I need your actual body measurements.Will this be available as a limited run or is there opportunity for custom fit like measurements and the whole tailor's side of things? I mean, I am not rolling in cash but this would be a huge timesaver as I was focused more on the smaller props. As we all know, plenty of dirtying it up would happen soon after.... no one likes a clean pirate.....hehehe, but it is a great repro, either way.
Speaking of, are you going to silver that central buckle or was the gold/copper on purpose to make it pop better in photos? (CORRECTION: just saw your message above that it is in brass.)
Wow too many questions today, sorry but who did you go with for the blaster file and did you like all the details when it printed? Holstered of course so I can't see all of it but curious if you liked it as I am still waffling on which file to go with. That project is just beyond my level of patience for designing myself.
I had tried to purchase the earlier scenes jail blaster but due to a huge hoohaw with the US customs it got rejected and caused it to roll all the way back to France. I am in process of printing that one, likely next week. But now that the pirate ones are available I want to see how they look painted up. Are you going to take yours any further with painting and weathering?
Keep up the good work, this is coming out awesome.
The buckle in this listing showing is a 3D-printed buckle, but I attached one picture we converted into brass; now the weight of the buckle is almost 250 g.
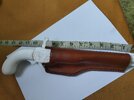
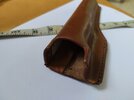
Blaster 3D-printed, we made this holster according to this 3D blaster file. Attached are the blaster pictures with a holster for your understanding.
Attachments
Trying to wrap my head around the holster process. Did you print the holster as a MOLD and then press fit the leather into the mold. It is leather, yes?Yes, it’s available in all sizes. If you like, I can make your coat also, but I need your actual body measurements.
The buckle in this listing showing is a 3D-printed buckle, but I attached one picture we converted into brass; now the weight of the buckle is almost 250 g.
Blaster 3D-printed, we made this holster according to this 3D blaster file. Attached are the blaster pictures with a holster for your understanding.
smithjohnj
Sr Member
You can form wet leather for a one-off by hand, the more complex the shape the more work it is. You can also do a form-and-frame. The form takes the place of the gun (in this case) and should be as accurate as you want the holster to imprint. Like any molding process you need to be aware of "undercuts" which would prevent you from withdrawing the weapon from the holster. This is like the buck in vacuum forming. With real weapons you can wrap it to both protect it and to provide the tolerance to allow the ease (of insertion and withdraw) you want. The frame then goes around the outside of the wet leather and form to stretch and hold the leather to the form. Again with complex shapes sandbags can be added to help press the leather to the form in areas away from the frame.
I had only ever done this with existing holsters that had shrunk. I hadn't thought about it being done from scratch.You can form wet leather for a one-off by hand, the more complex the shape the more work it is. You can also do a form-and-frame. The form takes the place of the gun (in this case) and should be as accurate as you want the holster to imprint. Like any molding process you need to be aware of "undercuts" which would prevent you from withdrawing the weapon from the holster. This is like the buck in vacuum forming. With real weapons you can wrap it to both protect it and to provide the tolerance to allow the ease (of insertion and withdraw) you want. The frame then goes around the outside of the wet leather and form to stretch and hold the leather to the form. Again with complex shapes sandbags can be added to help press the leather to the form in areas away from the frame.
I remember seeing a machine that was an encased air bag. It was for holding already sculpted wood pieces while the mount holes were placed. It allowed clamping without clamp marks. It sounds like this same process is a possible addition to the "frame" you are describing above? I will see if I can find a video. I know I could easily come up with the leg and calf medical versions very easily long enough for even short rifles.
kalsonprops
New Member
I will try to get more information and picture for you. attached is one link how this made .You really gotta throw up some photos of your brass process. Are we talking lost wax? We have been talking about doing brass on some other projects. Did you go through a lot of steps to get the wax ( if it was wax) or can you just print a wax positive?
kalsonprops
New Member
Yes, I made one plastic mold according to the blaster, then I pasted leather and stitched it together.Trying to wrap my head around the holster process. Did you print the holster as a MOLD and then press fit the leather into the mold. It is leather, yes?
It was funny to me because I only just started using 3d at all and that morning, before you posted the holster picture, I saw on my printer slicer software the "mold" option and was kind of dazzled that I could so easily make a mold. After smithjohnj described the leather molding process, it all fell into place.Yes, I made one plastic mold according to the blaster, then I pasted leather and stitched it together.
Modery
Member
The Gloves
the.rebel.agent has already identified the gloves as Cortech Heckler gloves (STAR WARS - Skeleton Crew props & costume)
View attachment 1900896
Sadly they seem to be no longer available anywhere, couldn't find them on ebay/amazon/etsy/other sites, even none on any smaller motorcycle clothing seller sites. However, I managed to find a company that manufactures apparal, among them motorbike gloves, and placed an order for a couple of pieces. Hopefully this works out well, I should know in 2-3 weeks
The gloves I had custom made arrived today. I ordered 3 different size (M, L, XL; couple each):
Here's the XL model worn by me (middle finger is around 9.2cm long, wrist to tip of middle finger is around 19.5cm):
Inside is lined with black polyester.
Overall very happy with it
Similar threads
- Replies
- 495
- Views
- 64,673
- Replies
- 4
- Views
- 914