This prop post is probably not for most members. It is about making Fern's “Wings” Badge. But maybe there are members with young associates that would like to be makers maybe even propmakers. Skeleton Crew had a number of excellent first-time props. Some even look like school arts and craft projects. I believe these can help encourage attention to detail and pride of accomplishment. I want to encourage the next generation because I want them to love these franchises so someday they will want to pay big bucks to buy all my collectibles. I have not provided these very basic instructions and observations to insult anyone intelligence, but to make them understandable to even the youngest reader. Emphasis on young. Some may use this information as a cookbook and just produce the final result. I hope others take it on themselves to do their own observations and calculations to see if they concur or dispute my findings. I have presented my approach and my conclusions, but I can be (and often am) wrong and there are other approaches and design choices. I would enjoy hearing about any amateur makers who take on this project and see their final results. Maybe other members would as well.
The first project I recommend is Fern's Speeder Wings. It is cheap and quick. The first goal is to identify the elements. In this project there are several common hardware items; corrugated joint fasteners, cotter pins, welded o-rings, flat washer, and (external) toothed lock washer. The background is less obvious but looking at the badge collection as a whole the answer for me was to use felt.
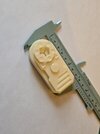
Like most recreations, the next question is dimensions. With “real world” environments it is always helpful to have a “standard reference” like a counter height or door frame or human hand for comparison. For any fabric projects with high-res images I use“ stitch length”. Sewing machines use a universal control to vary the length and width of stitches. The “standard” length is 2.5mm per stitch or 10 stitches per inch for most garment construction. Top-stitching can vary, but since one of it's goals is to draw attention - it uses a longer stitch length but that always varies in increments of .5 mm; 3.0, 3.5, 4.0, etc. The maximum length for reliable machine stitches is 6.0 mm or about 4 stitches per inch.
Another technique which I do not see mentioned much is using ratios and proportions. For example joint fasteners for “home use” in the U.S. come in common sizes with widths of 1/4”, 3/8”, 1/2”, and 5/8” (6, 9, 12, 15 mm). Therefore the ratio of width-to-length even in a slightly distorted image will help select the correct fastener and provide a “reference”. In the best image I had, the fastener ratio was .48. which closely matched the 1/2” real world sample. Using this reference it was easy to determine the sizes of the other components. The full list of materials is;
1/2” 5 gauge corrugated joint fasteners – qty 2
11/4” x 1/8” cotter pins – qty 2
1”x 3/32” cotter pins – qty 2
3/4”x 3/32” cotter pins – qty 2
Note: The first dimension is the length of the shorter leg of the pin. The second is the width of the loop at the end.
3/4”10 gauge welded o-ring – qty 1
1/2” 10 gauge welded o-ring – qty 1
Note: The first dimension is the “inside diameter” (ID). The second value is the cross section (CS) dimension. In this case the ring is made of 10 gauge steel. 10 gauge wire has a diameter of ~.1” or 2.6 mm. The outside diameter is given by ID + (2 x CS)
1/4”flat washer – qty 1
1/4”external tooth lock washer – qty 1
Note: Washers are dimensioned based on the size of the bolt which goes through the center
craft felt – gold
craft felt - light gray
metal adhesive
fabric adhesive (optional)
disposable razor (optional)
A cutting pattern for the felt with a layout diagram is attached. Gather all the hardware parts and use the layout diagram to test assemble your badge. For an accurate replica there are two important characteristics of the joint fasteners to aid in how they are oriented in the layout. First, one of the long edges is beveled the other is not. Second, when it is lying flat, you should see five clearly defined sections. Because it is corrugated you should see either five hills and four valleys, or five valleys and four hills. Flip the fastener over to examine the other side so you understand the different orientations. For cotter pins there is only one important characteristic, each pin has two legs and one is always longer than the other. In this prop sometimes the long leg is on the top and sometimes it is on the bottom. There is an important reason the legs are different lengths when the pins are used for their intended purpose; but those who are interested can do their own research. Check the orientation to make an more exact replica, or do it your own way. Personally I prefer symmetric and “well ordered” designs. The actual prop is “not the way I would do it”. Maybe it was made in a hurry, or it was just made to match someone else's definition of “well-ordered”. The person who studies a prop in order to recreate it is always more critical of the final product than the causal observer.
Make the subassemblies.
Cut the felt base pieces. Join them with fabric adhesive if you like, then sew them together along the light gray edge. The next step is optional. You can use a disposable razor to “shave” and defuzz the light gray felt. Military members who had to wear a beret might be familiar with shaving them to maintain a squared away appearance. Attach the cotter pins to the back of the joint fasteners with metal adhesive. NOTE: You attach to the BACK and then flip it over. DOUBLE CHECK the bevel-straight, hill-valley, long-short orientation of the fasteners and the pins. The diagram illustrates how the long and short legs of the pins should be placed to match the actual badge as viewed from the front – not the back. Here you can choose for screen accuracy or your own creativity.
Attach the tooth washer to the flat washer. Flat washers have an orientation which is a characteristic of how they are manufactured. It is impossible to tell from the images available and most people do not know or notice the two sides of a washer are different – so you can make your own design choice. Then attach the washers to the small o-ring. Note the flat washer is too big to fit inside the o-ring. It sits on the upper inside edge. This matches the images of the badge. To center and level the washers in the ring may require a temporary support or just a steady hand. Center the large o-ring on the felt base then add the other subassemblies. Sew the completed badge to your jacket or backpack along the gold edge of the badge. Post your Wings on therpf.com