Modery
Member
Oh, wonderful to see this all in action! Nice end result as well
Oh, wonderful to see this all in action! Nice end result as well
Hawk is a great friend of mine, his YouTube channel has lots of fantastic tutorials on all sorts of costumes and other builds. He made that buckle for me, he also helped me when I made my Mudtrooper jacket too….Oh, wonderful to see this all in action! Nice end result as well
Same same! Let's do a Silvo meetup at SWC! I'll be there all 3 days (first day in Mando armour)
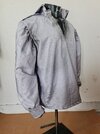
My current status:
View attachment 1917635
I didn't notice that so far Need to review all the scenes, again.
jenf0arc, it took me about one minute to find an image of Jod's coat pocket proving you were correct. But again I believe welted not flapped. It did not take any time just because I started with the last episode and there it was in the recaps. I have attached the screen capture which shows it is actually quite large. However, I spent about two hours reviewing the old Jyn Erso thread where we last collaborated. As always I look forward to your progress.
Just wondering, the stand up collar that’s underneath the front collar, does it look like it’s the same material as the rest of the coat, or something different?You're looking fantastic! Yes let me know when the meetup is, I'd love to see everyone else's Silvos, I have a 3 day badge as well!
SJJ I remember you fondly from our Jyn research days and am delighted you are working on this thread as well, your eye for detail is exceptional and your help is so valuable!
Been working on the coat and the puzzle pieces of the facing and in the scene where the barrier comes down, the brightness of the barrier dissolution reveals the coat actually has a different type of fabric edging the facing/lower collar. As if the main coat is wool and the edge is a type of leather
View attachment 1918992
I don't have the time to sort out this collar pattern for my current coat version and am keeping things much simpler to give the same shape effect but I found the detail really interesting. Will share some photos from my progress in a bit!
This is so cooooool!! I may have peed a little when he threw down and gave kudos to therpf. That is much appreciated and respected.
Progress pics with a. huge disclaimer: I decided to make this costume very late in my Star Wars Celebration Japan planning phase so I'm having to rush and cut corners and make things more imprecisely than the standards I normally try to aspire to but here's where I'm at in my "good enough" V1 of my Silvo build:
View attachment 1919115
View attachment 1919116
Shirt is done, I made the collar without looking frequently at the references and added a band that isn't there on the real thing but it lays correctly and fits correctly and it's fine enough for now. Fabric is a crepe shirting I bought from Mood Fabrics online
View attachment 1919117
View attachment 1919118View attachment 1919119
Coat is getting there. Sorry for all the threads everywhere it's been a lot of adjusting and seam-ripping and re-sewing. I ended up adding princess seams to the front because I just didn't have enough fabric to accommodate the spread a dart would require and 2 pieces fit on the fabric I had. I only bought 3 yards which I'm just *barely* making work! I broke 5 needles trying to sew both collars to the coat through all thicknesses before I realized (A) it's just impossible with the machine I own, and (B) it's not how the real coat was made, I can tell in the references after I looked again the inner collar is either congruous with the coat or sewn to it, and then the outer collar is sewn to the coat back right behind the inner collar I hope I'm describing that clearly. Fabric is an olive felted wool I also bought at Mood and all the pleather are just scraps from my stash. The puckering I'm going to try to fix before I finish putting the lining in. I'm saving using real leather for when I make a better version of this.
So still have tons of finishing to do and lining-sewing and edge topstiching and cuff-making, etc. Pants I'm probably going to quick modify some existing brown trousers because I'm so tight on time. Boot covers I'm working on, also going to make those out of pleather for now since the base boot I'm covering I chose from my closet due to its comfort rather than its accuracy. Then I imagine the pleather prototypes will serve as a pattern after Celebration for a leather version over a more accurate boot.
Diid you fully drape the shirt from scratch or did you use a base pattern? If so, can you throw up a pattern name? Even if you just used the base body portion or even just sleeves. I have been hoping to run across the old fashioned cracker jack shirt pattern but no luck
oh yes, my well loved 4923. I bought extras because I don't have room to store sturdier backup methodsI drafted the collar from scratch but I used some other base patterns to save time on the rest of the garment. I wear a ladies small/2-4 dress so I used McCalls 7360 for the front and back, removing the back yoke; then for the sleeves I wanted them fuller so I used the sleeve pattern from McCalls 6819. Cuff as I mentioned before I used the pattern smithjohnj shared but modified for my wrist circumference. I'm sure there are other patterns that would work but I was just using what I had in my stash
View attachment 1919432View attachment 1919433
If I was making this for someone of Jude Law's shape/build I would probably modify the shirt in Simplicity 4923, it seems to have a lot of details that would work for Jod's shirt like the neckline and the sleeve shape/volume
View attachment 1919434
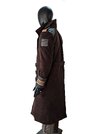
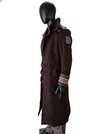
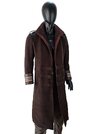
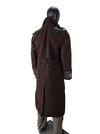
Made with dark brown Wool
The bottom toe section is holding its shape!!! That is cool. I am wondering if that is the reason for the original design having the seam, break the torque in the curve that usually leads to buckling and wave rolls.Here's my current version of the gaiters. "Completed" (smaller touchups still pending) the left side first
View attachment 1920349
View attachment 1920350
View attachment 1920351
Comparison pics:
View attachment 1920352
View attachment 1920353
View attachment 1920354
And the full set (showing roughly how the parts where shaped/constructed)
View attachment 1920355
I'll take a catwalk video at some pointLooks awesome, definitely waiting on finished pose.
If you didn't intentionally boobytrap that sentence to get me singing the catwalk song I would be greatly surprised. I will need to strike my head against something pretty solid to get this song stopped.I'll take a catwalk video at some point