Just the pants and shirt alone would be worth that price, add the two belts, OUR buckle, and the printed gun. This manny looks like the current collected work of one of the folks already in this thread. And because it is not wearing a brown jacket nor a helmet, that eliminates all but one. I would put serious money on that ad being fake and the pics being from someone elses current build.
You are using an out of date browser. It may not display this or other websites correctly.
You should upgrade or use an alternative browser.
You should upgrade or use an alternative browser.
Jod Na Nawood | Captain Silvo Costume - Skeleton Crew
- Thread starter Modery
- Start date
If that is a legit price at 135 for all that, it is tempting. The gloves, the two belts the leather holster, both the gun and a copy of the buckle..... I would do some color and weathering on the shirt and pants but at that price .... almost worthy of messaging and asking if they plan on offering the printed helmet soon. Or as soon as someone on therpf posts the files .... 
Oh now I can see it IS LEGIT as in 135 is just the gloves ..... the outfit is over 400.
Modery
Member
They don't do very well on their listing descriptions because it says "just belt" so just the leather? Not sure if the 3d prints come with "just the belt" or even if they come with the 400 full costume either. But I am that guy that pokes the bear so I will message them and ask the price of the 3d printed buckle oh and belt is 160
oh and belt is 160Did we reach a consensus on pants color?
I have black, gray, green and green-gray and am really hoping to get away with using a pair I already own and just add the stripe.
I have black, gray, green and green-gray and am really hoping to get away with using a pair I already own and just add the stripe.
Last edited:
Modery
Member
Dark brown. Here's a photo from Phil Szostak that he posted on Instagram. Can't see much of the pants, but confirms the colourDid we reach a consensus on pants color?
I have black, gray, green and green-gray and am really hoping to get away with using a pair I already own and just add the stripe.
smithjohnj
Sr Member
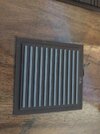
A lot of progress and details. Thanks to all. Also the pants pockets appear to be expandable, accordion style pockets with square corner flaps. Both go over the pant's stripe.. What about the stripe width? Civil War Calvary officers used 1 1/2". Han Solo used 1". These are pretty bold so I personally believe 1 1/2". I have always assumed the stripe was yellow but ...?
Ya the digital color grading is heavily used in the series so colors are very difficult.A lot of progress and details. Thanks to all. Also the pants pockets appear to be expandable, accordion style pockets with square corner flaps. Both go over the pant's stripe.. What about the stripe width? Civil War Calvary officers used 1 1/2". Han Solo used 1". These are pretty bold so I personally believe 1 1/2". I have always assumed the stripe was yellow but ...?
Dark brown. Here's a photo from Phil Szostak that he posted on Instagram. Can't see much of the pants, but confirms the colour
View attachment 1908402
Like in this display lighting, I see chocolate brown but weathered and aged so more along Mexican chocolate.
Note the belts are nearly the same color as the pants in this picture.
The pants are much lighter than in the show (I choose onscreen over prop display any day). The shirt is gray but when onscreen it is a mint or slate shade of gray. The belt is slightly more red brown just brown. I usually tip towards matching a poster or popular scene for color and use the real world lighting ONLY for shapes and sizes.
Last edited:
smithjohnj
Sr Member
Visual I believe you could get away with a simple Patch Pocket on Jod's Pants. However, for accuracy, I believe an Accordion Pocket was used
Based on Modery's estimate of Jod's pant pocket I created a pattern for an Accordion Style pocket. The Accordion, or Bellow Pocket is the type found on cargo pants and some military gear including jackets and rucksacks. I believe the "loose material at the bottom" is actually the bellow dropping below the front of the pocket. The pocket is so large my pattern only shows one-half and must be printed on legal-size paper. The Accordion Pocket is very common but is not one most people might draft or sew from scratch. I knew I did not want to try to explain the process but I found an excellent video on-line to which I would refer anyone who might be interested. Please see:
Accordion Pocket Tutorial {Also Known As A Bellows or Cargo Pocket}
The concept is simple and once understood I believe it would be straightforward for you to resize the pocket or the depth of the bellow (as my 1 cm was just based on the "loose material" size.)
Note: This style normally has the top outside corners of the pocket tacked down. That way the pocket expands but the top does not gap open.
Attachments
smithjohnj
Sr Member
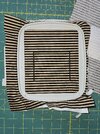
Just to finish up another small element - Jod's Shoulder Patch. I ended with a 80 x 100 mm border, 3 mm width (approximately the same width as each stripe in my fabric). Having striped fabric makes the preparation work of stabilizing, centering, and hooping much easier than most projects. I centered the design at the bottom edge of a dark stripe and hit the mark. It was so good I thought I missed the entire bottom edge of the design. However it is there and if you magnify the image you can see it. (Just because I am anal I will probably do another set 1 mm higher so the top and bottom show the tan against the brown. But I was trying to match the images I had where the bottom border is on the brown.) Since some asked about the fabric which I replied to in an earlier post; the thread I used which seems a perfect match is Gutermann #596.
I am not sure how helpful the next part is, but I am attaching the embroidery file in a zip file (not because it is large but just so I could upload it). Many people have embroidery machines (or access to one) but fewer digitize their own projects. This is about as simple as it gets, but if someone can use it they are welcome to.
I am not sure how helpful the next part is, but I am attaching the embroidery file in a zip file (not because it is large but just so I could upload it). Many people have embroidery machines (or access to one) but fewer digitize their own projects. This is about as simple as it gets, but if someone can use it they are welcome to.
Attachments
smithjohnj
Sr Member
My next small project is the shoulder's epaulette cover. This observation is a little more in the weeds so I am looking for better images, data or real world understanding from the more artistic members. Sometimes I get into the “numbers” and miss the obvious.
The cover is made up of 5 segments. Using the image I had available I guessimate that the ratios of each segment to the total length are(from outside to inside); .20, .13, .16, ,18, .33.
Again using the assumption that the fourth segment of the cover (counting from the outside) is the same striped fabric we find it's width is 11stripes or 35 mm. That would make the total cover length from collar to shoulder tip approximately 194 mm. (For my own overcoat that distance is 180 mm so that is in the ballpark.)
Using that guessimate then the length of each segment would; 39, 25, 31.35. 64 mm respectively. The width of the cover requires more guesswork. It appears wider than any of the smaller segments are long. That would make it more than 40 mm. My first guess is 65 mm, just because I like the proportions with that width.
Using my own cover length of 180 mm, and the ratios then my segments would be; 36, 23, 29, 32, 59 mm.
smithjohnj
Sr Member
I have a question for the group who are making the coat. I have revisited the cuffs with fresh eyes and now believe that each of the bands which go around the sleeve actually have two components. There is the band itself, but I now "see" where I thought the band overlapped itself at the three-quarter front of the sleeve, the overlap is actually an OVERLAY. The overlay is the part with the rounded/clipped corners and is only a few centimeters long. In some images the lighting gives it almost an "orange" hue. Again I think I "see" the other end of this tab but it may just be an artifact of the lighting. I will probably be re-watching some scenes to hope for better images, but if someone already has photos or better ideas I would appreciate their help.
Modery
Member
I have a question for the group who are making the coat. I have revisited the cuffs with fresh eyes and now believe that each of the bands which go around the sleeve actually have two components. There is the band itself, but I now "see" where I thought the band overlapped itself at the three-quarter front of the sleeve, the overlap is actually an OVERLAY. The overlay is the part with the rounded/clipped corners and is only a few centimeters long. In some images the lighting gives it almost an "orange" hue. Again I think I "see" the other end of this tab but it may just be an artifact of the lighting. I will probably be re-watching some scenes to hope for better images, but if someone already has photos or better ideas I would appreciate their help.
Not sure if I understood you correctly, but in this scene on the left it does look like an overlay to me.
Modery
Member
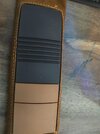
Got my silver buckle done. Printed in 0.12mm layer height (0.2mm might have been ok as well, but decided to get it as smooth as possible coming out of my printer) in PETG. Sanded (working myself up from 90 to 500), then coated with a thin layer of UV resin + baby powder mix (and of course hardened with a UV light), and sanded some more.
Applied some primer first:

Then used silver on top:

Finally added some satin vanish (so that it's not too glossy, but also not too matte), bit of blackwash (thinking of doing a bit more potentially, as it is still a bit too "bright and clean"), and some fuller's earth powder (for a slightly dusty and not so clean look).
Here it is with my belt and the 47mm roller buckle:

And testing it:

Need to punch a couple more holes into the belt, as we've seen the on-screen belt has holes going past the silver buckle

Applied some primer first:
Then used silver on top:
Finally added some satin vanish (so that it's not too glossy, but also not too matte), bit of blackwash (thinking of doing a bit more potentially, as it is still a bit too "bright and clean"), and some fuller's earth powder (for a slightly dusty and not so clean look).
Here it is with my belt and the 47mm roller buckle:
And testing it:
Need to punch a couple more holes into the belt, as we've seen the on-screen belt has holes going past the silver buckle
A few more dark washes and you're there. The belt and sizing looks spot onGot my silver buckle done. Printed in 0.12mm layer height (0.2mm might have been ok as well, but decided to get it as smooth as possible coming out of my printer) in PETG. Sanded (working myself up from 90 to 500), then coated with a thin layer of UV resin + baby powder mix (and of course hardened with a UV light), and sanded some more.
Applied some primer first:
View attachment 1909228
Then used silver on top:
View attachment 1909229
Finally added some satin vanish (so that it's not too glossy, but also not too matte), bit of blackwash (thinking of doing a bit more potentially, as it is still a bit too "bright and clean"), and some fuller's earth powder (for a slightly dusty and not so clean look).
Here it is with my belt and the 47mm roller buckle:
View attachment 1909230
And testing it:
View attachment 1909231
Need to punch a couple more holes into the belt, as we've seen the on-screen belt has holes going past the silver buckle
View attachment 1909232
kalsonprops
New Member
kalsonprops
New Member
Made coat cuff and shoulder badge with rubber
Darthikari
New Member
Looks great! Do you have a tutorial/supply list for those?Made coat cuff and shoulder badge with rubber
Similar threads
- Replies
- 495
- Views
- 64,560
- Replies
- 4
- Views
- 914