cavx
Master Member
It is probably already been discussed, but I have been playing with a 2 part epoxy resin of late and discovered this stuff is awesome for all sorts of stuff including the sealing up the foam. It has minimal odor when in liquid/gel state, and no smell once cured. I have also used this to smooth out the scan lines of 3D printed parts. Maybe this is the same stuff discussed in that forum, not sure.
I know the "norm" is PVA glue, but I live in a fairly humid place and wanted something "water proof".
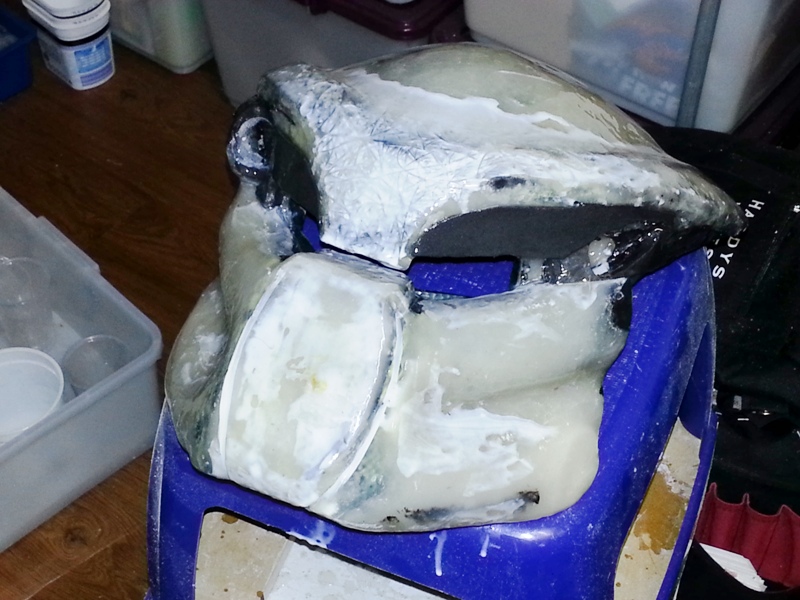
The stuff I am using is an epoxy also known as "Liquid Glass". It is mixed at 2:1 and is water clear, is self leveling and has a pot life of over 30 minutes at room temperature. You can add pigments to it if you wanted to colour it (means you don't have to paint later) and you can layer build it up as it seems to stick to EVERYTHING including fiberglass, Bondo, other types of resins and even Plasti-dip and of course, itself. It cures with a glassly finish if applied thick enough. It sands well and can be trimmed with a dremil. You will need to brush on a layer to seal that later.
Cure time is about 3 hours but thickness pending, it can take up to 3 days to reach full hardness.
What I found is that for the first day, it remains flexible enough to bend. So I am thinking this might be cool to coat the parts in whilst they are flat. Bend and glue. Then apply a 2nd coat to help make the structure rigid.
I have been pouring it on my project, but today, I decided to see how brushing goes. So far looking good and the brush marks are already gone and of course, this method uses far less resin or allows the same amount to be spread much farther.
So my project is this Pred Bio that started as foam.
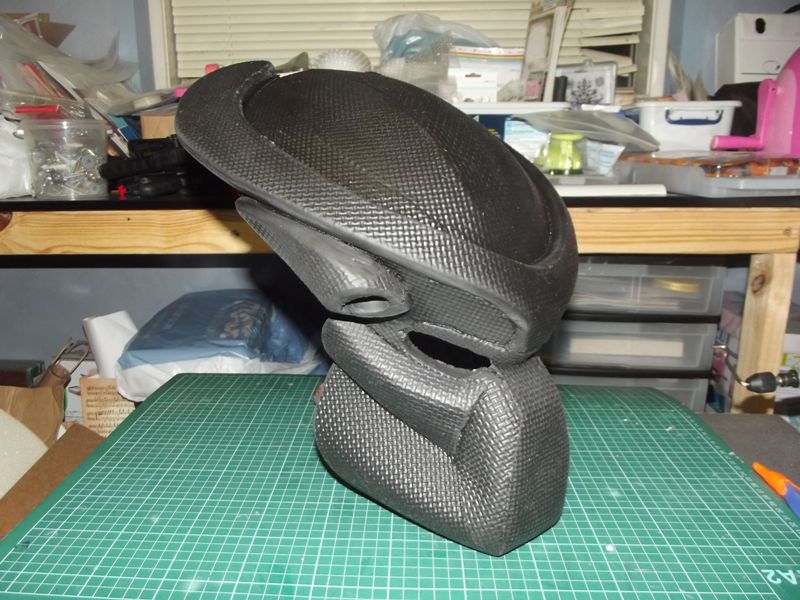
Then after several fails of testing various things to seam the foam, moved to fiberglass.
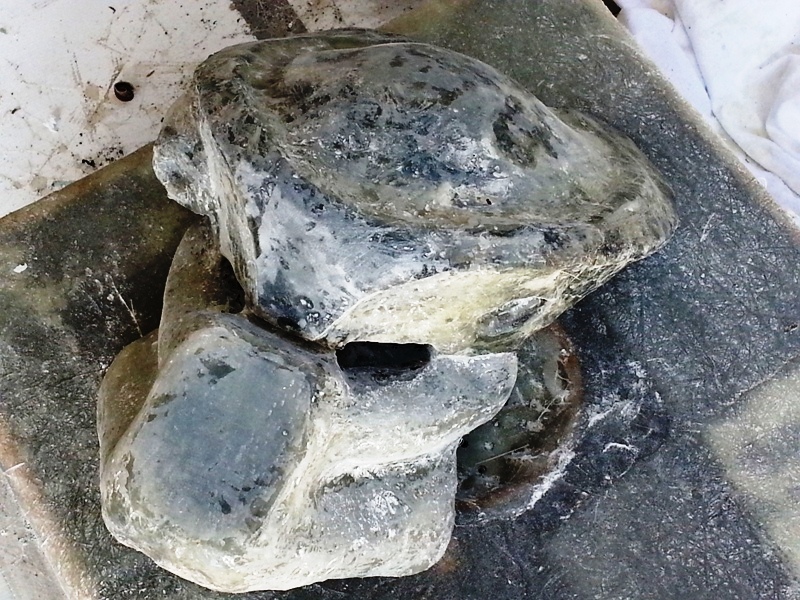
And now Epoxy (AKA liquid glass)
So even though you can see the matting from the fiberglass, you can't feel it because it is smooth like a polished piece and this has set hard now.
During the modding, I had cut the jaw completely off, widened it and pinned it with two long screws. I then bonded it back together with this epoxy. It has been dropped already and did not crack! If it did crack, it would very easy to repair.
My testing:
1. my first attempt to seal was Plasti-dip which soaked into the foam and never really sealed it. I probably should have used PVA first, but didn't.
2. I then melted a heap of hot glue sticks and applied that. It worked OK, but you could not really sand it to finish it without gumming up both sand paper or rotary tools.
3. I then used a Polyester Resin which worked in places but reacted with the previous coats causing the hot glue to bubble underneath. Polyester Resins get really hot as they cure and I guess it basically melted the hot glue. It also stinks for weeks and feel tacky for days. It also cracked when the foam flexed.
4. I then needed to teach myself to fiberglass, so old mate Pred Bio was once again the test bench. This stuff worked but fiberglass is itchy and the resin (being polyester) stinks for weeks.
5. Now I am using liquid glass and having a massive win here. It is cheap, easy to use and you don't even need to degas it. The bubbles will generally pop on their own.
Not on the Pred Bio, but though this is worth a share...
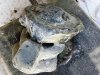
I have also used an expensive (almost 5x the cost of the expoy for the same amount of product) Polyurethane rubber which is awesome for sealing foam, but to get the best results, you DO NEED a vacuum chamber to degas this stuff. Potlife is only 15min, so you need to work fast. The really cool thing about this product is that it remains flexible, so if making wearable parts that need to bend, this is the stuff. Like the epoxy, it is water clear and you can add pigments to colour it.
Like the expoy, this stuff bites into the foam and if you were peel it up, it tears the top layer away with it.
If working on vertical surfaces, you can let this run into gel state and apply it as a thick goop. More difficult to work, but can be shaped as well as skinned on.
Just not for everyone.
My project is this foam Predator Bio from JF Customs that I was never 100% happy with. Nothing wrong with his un-fold, just I had issues putting it together and used it as my test subject for all sorts of weird ways to seal the foam.
I know the "norm" is PVA glue, but I live in a fairly humid place and wanted something "water proof".
The stuff I am using is an epoxy also known as "Liquid Glass". It is mixed at 2:1 and is water clear, is self leveling and has a pot life of over 30 minutes at room temperature. You can add pigments to it if you wanted to colour it (means you don't have to paint later) and you can layer build it up as it seems to stick to EVERYTHING including fiberglass, Bondo, other types of resins and even Plasti-dip and of course, itself. It cures with a glassly finish if applied thick enough. It sands well and can be trimmed with a dremil. You will need to brush on a layer to seal that later.
Cure time is about 3 hours but thickness pending, it can take up to 3 days to reach full hardness.
What I found is that for the first day, it remains flexible enough to bend. So I am thinking this might be cool to coat the parts in whilst they are flat. Bend and glue. Then apply a 2nd coat to help make the structure rigid.
I have been pouring it on my project, but today, I decided to see how brushing goes. So far looking good and the brush marks are already gone and of course, this method uses far less resin or allows the same amount to be spread much farther.
So my project is this Pred Bio that started as foam.
Then after several fails of testing various things to seam the foam, moved to fiberglass.
And now Epoxy (AKA liquid glass)
So even though you can see the matting from the fiberglass, you can't feel it because it is smooth like a polished piece and this has set hard now.
During the modding, I had cut the jaw completely off, widened it and pinned it with two long screws. I then bonded it back together with this epoxy. It has been dropped already and did not crack! If it did crack, it would very easy to repair.
My testing:
1. my first attempt to seal was Plasti-dip which soaked into the foam and never really sealed it. I probably should have used PVA first, but didn't.
2. I then melted a heap of hot glue sticks and applied that. It worked OK, but you could not really sand it to finish it without gumming up both sand paper or rotary tools.
3. I then used a Polyester Resin which worked in places but reacted with the previous coats causing the hot glue to bubble underneath. Polyester Resins get really hot as they cure and I guess it basically melted the hot glue. It also stinks for weeks and feel tacky for days. It also cracked when the foam flexed.
4. I then needed to teach myself to fiberglass, so old mate Pred Bio was once again the test bench. This stuff worked but fiberglass is itchy and the resin (being polyester) stinks for weeks.
5. Now I am using liquid glass and having a massive win here. It is cheap, easy to use and you don't even need to degas it. The bubbles will generally pop on their own.
Not on the Pred Bio, but though this is worth a share...
I have also used an expensive (almost 5x the cost of the expoy for the same amount of product) Polyurethane rubber which is awesome for sealing foam, but to get the best results, you DO NEED a vacuum chamber to degas this stuff. Potlife is only 15min, so you need to work fast. The really cool thing about this product is that it remains flexible, so if making wearable parts that need to bend, this is the stuff. Like the epoxy, it is water clear and you can add pigments to colour it.
Like the expoy, this stuff bites into the foam and if you were peel it up, it tears the top layer away with it.
If working on vertical surfaces, you can let this run into gel state and apply it as a thick goop. More difficult to work, but can be shaped as well as skinned on.
Just not for everyone.
My project is this foam Predator Bio from JF Customs that I was never 100% happy with. Nothing wrong with his un-fold, just I had issues putting it together and used it as my test subject for all sorts of weird ways to seal the foam.