dentingleopard
New Member
what is this for
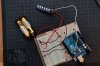
It is pretty simple to implement the RF control to the circuit, you just need to swap the push button for the RF module
There are several different modules, but the most common ones are those 4 channel modules.
http://i3.photobucket.com/albums/y87/oozi/20130721_0046101111_zps80810a36.jpg
The Arduino is linked to one of the channel pins (in our case, using the code of the 1st page, the Digital pin 2 of the Arduino will be linked to D0, D1, D2 or D3) in all cases you will still need a physical Pull-Down resistor or to use the built in Pull-UP activating it via code.
If you wanna see if the signal is being correctly received by the receiver, you can add a led on the VT pin, that will blink when the receiver is receiving any data.
http://i3.photobucket.com/albums/y87/oozi/20130721_005634_zpsf1831e86.jpg
as you guys can see, it is pretty simple.
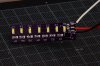
I keep saying/recommending +7.4v Li-Ion packs..
2 x cells (+3.7v) wired into a +7.4v battery pack.
yout not really going to get much smaller than that.... unless you go Li-Po (not sure how safe it is to have a Li-Po set-up by your head.. for these DIY type projects)..
you could wire your battery pack to be re-chargeable as well and never have to remove them from your bucket.
That flutter is a cool project.. not sure how much you'd get out of it for this though.. especially when a nano or pro-mini can be purchased for like under $5.00..
")
xl97 how could i incorporate bluetooth in to my suit what are some cool examples
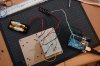
I can add to what XL97 said: if you don't want to solder, keep the cells separated and easily accessible, there's still the option of the battery holder.
Like this:
7.4V 2 x 18650 Battery Holder Case Box with Leads - Free Shipping - DealExtreme