Iron Man Mark III - First Build - Pic Heavy (UPDATE 05/05/2011 - Pg 4)

Re: Ironman Mk III - First Build - Pic Heavy (UPDATE 19/2/11)

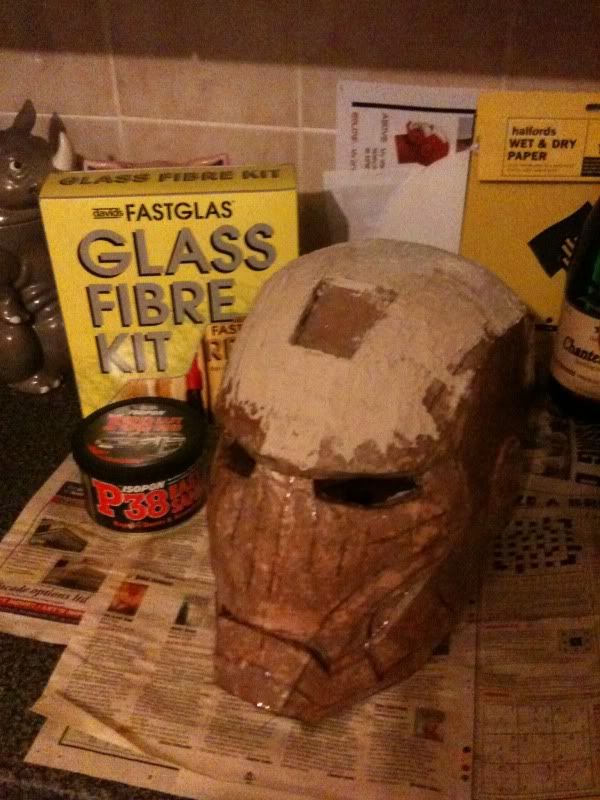
yep it should not require a lot of bondo to achieve the right surface if sanded properly ... patience and attention to detail is key to a successful bondo job ... I worked with that stuff for a while as an auto body tech and got great at applying it to vehicles now to see how well i can apply it to a prop ... lol
 
Re: Ironman Mk III - First Build - Pic Heavy (UPDATE 19/2/11)

Sweet input guys.
I got myself some filler today and some 120 sandpaper today. Now, just need to get to work. May take me a little while although, may get some started on some bodyfiller very soon. I'm going to do it a bit at a time and try and finish off the fibreglass very soon. I'm getting ever so close to starting the very hard work part :p
Another quick question (I'm starting to turn into a question bum :p)
Do you have to mix in the hardener as directed on the tin as confused as to whether you just apply it later after the application on the prop? Sounds very silly I know, I just do not want to mess this up.

Hope everyone is doing well with their own builds.
 
Re: Ironman Mk III - First Build - Pic Heavy (UPDATE 19/2/11)

you will want to mix the bondo and hardener on a hard flat surface and use the spreader to mix the hardener in by folding the two together over and over and over for a minute or so to make sure it is properly mixed together then spread it but you only have to spread it on the ares were you have low spots or imperfections you want to remove pretty much the rest of the surface you can spread a paper thin layer on so when you sand it you only have to smooth and not sand off three inches of it to make it look the way you want
 
Re: Ironman Mk III - First Build - Pic Heavy (UPDATE 19/2/11)

Cheers for the tips guys.
I'm hoping to get up early-ish tomorrow so I can apply a layer of fibreglass to the inside and then once that has cured somewhat then messing around with filler and start applying it. Will post some update pics before hand though so you can see the fully resined piece.
Got a long way to go but looking forward to doing it.
 
Re: Ironman Mk III - First Build - Pic Heavy (UPDATE 19/2/11)

Yeah, I'm taking it at my own pace. This is my first ever piece, also my first time ever using anything like Resin, Fibreglass or Filler. So taking every step as it happens.

I really am so greatful for all the help that everyone has given me so far. It keeps me going. Although, Kagn has been reborn? :p
 
Re: Ironman Mk III - First Build - Pic Heavy (UPDATE 19/2/11)

lol Me and a couple good friends have formed Surreal Studios, we tried to make a new account for it, but only allowed one account per user so we just changed my name and will post all of our creations through this account
 
Re: Ironman Mk III - First Build - Pic Heavy (UPDATE 19/2/11)

Sweet, Glad to see you doing that Kagn. No way for you to just get a new email account then do it that way?

Hows your IM build coming along? Not seen anything in a while.
 
Re: Ironman Mk III - First Build - Pic Heavy (UPDATE 19/2/11)

no they get a msg everytime you log on telling them it is your computer, so they know if you are trying to make another account, try it out lol
 
Re: Ironman Mk III - First Build - Pic Heavy (UPDATE 19/2/11)

Well, that is really gay! :p
Did another bit of fibreglassing today, the helmet has every side done now on the inside. Just need to do a few touch up bits so the whole helmet has fibreglass on it. Although, ran out of resin and hardener :( Need to get some more. Once I get it, just have a few more areas that need some touch ups then the whole fibreglass stage will be complete. Then, onto the filler stage, which is worrying me a little haha. I don't want to ruin it.

Also, my friend has decided he wants to have the Warmachine helmet on the handlebars on his Honda Shadow! So who currently has the best PEP file? I think I've got Bimmer's at the moment.
 
Re: Ironman Mk III - First Build - Pic Heavy (UPDATE 19/2/11)

Added a test area of filler today. It has dried relatively quickly and I sanded a tiny bit to see what it was like. Yes, may have been jumping the gun somewhat but really wanted to see the outcome. Looks good me thinks and when I eventually get the fibreglass finished inside, which should be this week if can get another fibreglass kit, I'll be on the road to the filler stage and the sanding etc.

Enjoying the build loads.
 
Re: Ironman Mk III - First Build - Pic Heavy (UPDATE 19/2/11)

Congrats!!! I am itching to get to that stage. How much fiberglass cloth and resin have you used so far? and show some pics please ... also keep updates going about the war machine head on the shadow ..
 
Re: Ironman Mk III - First Build - Pic Heavy (UPDATE 19/2/11)

Going to take some pics in about 3 minutes :p
 
Re: Ironman Mk III - First Build - Pic Heavy (UPDATE 19/2/11)

IMG_0491.jpg

IMG_0490.jpg

IMG_0489.jpg

IMG_0488.jpg

IMG_0487.jpg

IMG_0486.jpg

IMG_0485.jpg


So here are some update photos.
As stated before hand there are still quite a few tiny bits of fibreglass to do. So while I'm waiting to get some more resin I shall start on the filler. I am just getting used to using the filler as never used it before and always worry about using hardener in case I use too little or too much etc.
I'm also doing it small areas at a time so that I can get to grips of using it. Also, going to be able to keep track of areas that have details so I can score them properly until I get my hands on a working dremel.
Unorthodox ways of working I know but it helps me to work.

So far the amount of fibreglass I have used is about half a sheet. The amount of resin I've used is what is provided in the kit that is pictured with the helmet :p
 
re: Iron Man Mk III - First Build - Pic Heavy (UPDATE 14/3/11 - Pg 4)

Cheers, I'm taking it 'One step at a time'!
Just experimenting mostly right now which includes using sandpaper to get rid of the excess so I can build up the layers so it won't just go through to the resin once I start sanding properly.
I'm trying to sort out the MAJOR areas first where I know I'm going to have to sort it out like dents and some places where things didn't line up perfectly.

Thanks for the compliment though haha
 
re: Iron Man Mk III - First Build - Pic Heavy (UPDATE 14/3/11 - Pg 4)

work on one area at a time with the bondo ,ex: work on the forehead, then the front of the face, then move on to the edges of the face, then do the same with the rest of the head - top, sides, then back. this way you will have a good idea how to get your shape when sanding and be able to blend the face plate in the rest of the helmet so it matches up when removed, looks good so far Mikii
 
re: Iron Man Mk III - First Build - Pic Heavy (UPDATE 14/3/11 - Pg 4)

Thats the first area that I'm working on is the faceplate to helmet. I think I'm doing that because that is the area I want to sort out most. Then as you said, I'm moving down the front of the faceplate.
I appreciate all the help I am getting from you all. It is keeping this project alive.
 
Back
Top