Immortan Joe costume from Mad Max, Fury Road

For the shoulder, I'm using leather and painting it darker. The costume is going to pretty heavy as is with all the various costume pieces, I don't want to weight myself down too much.

For the bellows, I got a foam cylinder (think like a pool noodle, but smaller in diameter), my girlfriend cut it in half lengthwise so we had two 'c' shaped pieces. She then cut it widthwise into smaller pieces. Those smaller pieces were then tapered down to points at the end and had metal wire put through them so they could actually be bent. Additional wiring was used to provide both a brace on my neck, and better shape the lower half. We then put fabric over each section, sewed it together, and are in the process of covering it with latex.

And last night I got the leather for the shin guards looking how I'd like them to!

hbFr9ap.jpgyrY916u.jpgrSPv69x.jpg
 
Excellent on all counts! Just a suggestion: Aileen's flex fabric glue (Michaels's, AC Moore, etc) will last a lot longer than latex without cracking and getting brittle. I have a Leatherface mask I made using it in 1994 that is still completely flexible. Just paint it on like you would latex so that it saturates the fabric.


Sent from my iPhone using Tapatalk
 
For the shoulder, I'm using leather and painting it darker. The costume is going to pretty heavy as is with all the various costume pieces, I don't want to weight myself down too much.

For the bellows, I got a foam cylinder (think like a pool noodle, but smaller in diameter), my girlfriend cut it in half lengthwise so we had two 'c' shaped pieces. She then cut it widthwise into smaller pieces. Those smaller pieces were then tapered down to points at the end and had metal wire put through them so they could actually be bent. Additional wiring was used to provide both a brace on my neck, and better shape the lower half. We then put fabric over each section, sewed it together, and are in the process of covering it with latex.

And last night I got the leather for the shin guards looking how I'd like them to!

View attachment 519917View attachment 519919View attachment 519920

Wow, great approach to the bellow! I had been contemplating a lot of different possibilities as to how to tackle this, but I like your method the best. Pool noodles and hanger wire seems like a pretty manageable method, I'll likely be doing the same! Thanks for sharing!!!
 
I studied this at length and even bought a strip of aluminum to use before deciding that a piece of leather would work better and be easier. A piece of aluminum tape stuck to the top surface of the leather under the pauldron will simulate the aluminum nicely, I think. Otherwise you will have to shape the aluminum to the curve of the pauldron.


Sent from my iPhone using Tapatalk

Yup, this is what we're doing too! The leather fits the arm/bicep better. Also way easier to get snaps/clamps bolted in there if you have a good leather puncher and stamping tool (how I got the straps attached for the vambraces).
 
For the shoulder, I'm using leather and painting it darker. The costume is going to pretty heavy as is with all the various costume pieces, I don't want to weight myself down too much.

For the bellows, I got a foam cylinder (think like a pool noodle, but smaller in diameter), my girlfriend cut it in half lengthwise so we had two 'c' shaped pieces. She then cut it widthwise into smaller pieces. Those smaller pieces were then tapered down to points at the end and had metal wire put through them so they could actually be bent. Additional wiring was used to provide both a brace on my neck, and better shape the lower half. We then put fabric over each section, sewed it together, and are in the process of covering it with latex.

And last night I got the leather for the shin guards looking how I'd like them to!

View attachment 519917View attachment 519919View attachment 519920

This owns. I love the shape you got with the bellows.

If sewing isn't your thing, the seams and connections here could probably be glued or stapled! I have one "maintenance" panel in the 'front' of the bellows (hidden by my husband's neck and head and hair) that has a secret flap that was stapled instead of being sewn so I can open it up and fix the wiring if anything gets crushed or broken during transit.
 
Foam pipe insulation is the right scale relative to the pool noodles to make the smaller bottom folds in the back (the "cerebellum" part of the bellows!)


Sent from my iPhone using Tapatalk
 
$5 pair of boots at Goodwill cannibalized for the lacing on the sides of the torso armor:

ImageUploadedByTapatalk1440620741.803505.jpg


Sent from my iPhone using Tapatalk
 
What are you guys using to rivet the two parts of the front torso armor together? I have my doubts as to whether or not PETG, even at .060", would deform under the pressure from a standard rivet gun.
 
Chicago screws:


ImageUploadedByTapatalk1440622621.855548.jpg

They are available in several lengths.


Sent from my iPhone using Tapatalk
 
Chicago screws:


View attachment 520021

They are available in several lengths.


Sent from my iPhone using Tapatalk

Chicago Screws... now i need to order a bunch of those and replace all my rivets with them... haha (Those things are expensive.)

1458446_681287385339432_6729177932690483361_n.jpg

My progress. The bellows are very simliar to the ones above. Foam covered by canvas fabric then I painted it with acrylic paint to get that rubbery look.
 
Based on the fact that the back and front of the armour from the making of looks like two fronts cobbled together - who is going that route?


Sent from my iPhone using Tapatalk
 
Just seemed too dumb to me. Mine has a back and a front. Besides, the back was so much easier to form!


Sent from my iPhone using Tapatalk
 
For the bolts - I went to the local hardware store and found some short machine bolts. It came to around $8 for all the bolts/"rivets" needed for the costume.
For the back - I'm not shaping it yet. I'm making sure everything else is done first, and if I have a spare evening, I might.
 
Cool bellows aestheticus! nice and lightweight for sure.

The Chicago screws are also called "sex bolts" tee hee or binding screws.

I would think the strap from pauldron to shoulder would be leather, maybe they sprayed it silver? I doubt they would build a costume that puts bare metal against his skin, and a rigid joint over a rotating joint.

His back is sculpted to look like a muscular back, it just translates funny considering his width. I'd be interested to see the reference the sculptor was working from.

19.jpgback dressing2.jpgback.jpg

Mmm, kiiinda...
mmm kinda.jpg
 
Last edited:
Well, upper back, yes. But that one behind the scenes still sure looks like abs on the lower back. Very un-anatomic!


Sent from my iPhone using Tapatalk
 
More super useful tips and info from you all! As for the torso armor, I'm planning on doing a back and a front, instead of the whole two fronts thing. My roman armor arrived today, and I like the way the back looks, so yeah, I'm just gonna go with that.

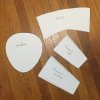
According to the tracking, my PETG should be here tomorrow, so I spent about an hour or so sketching / cutting out / tweaking some templates for the rest of the armor. It took a bit of trial and error but I've got everything fitted pretty well. I'm planning on trying to use the lady mannequin legs I split in half to form the forearm and bicep pieces, and I've got a bowling ball I'm going to try forming the pauldrons with. Excited to get started!

image.jpg
 
What are people edging the armor with? I suspect worbla's the right color and probably workable enough, but it doesn't have the right texture to me - it looks like the back of raw leather, or suede maybe? I have leather strips all over my workshop but I'll be damned if it isn't a difficult material to shape around some of the complex curves, which is why I'm looking for alternatives.
 
Back
Top