Hey all, I know I don't post here enough, and it's largely because making content for tested.com is all-encompassing. But I'm in a great mood today and thought I should show what I built this week.
Context:
I've been hand-machining Hellboy's Samaritan from scratch (see here) and it's already four videos (and 140 hours of my labor so far) and a few more steps and videos coming.
View attachment 1365936
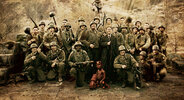
Building something like this means taking it apart constantly. I love the shots of it all separated.
View attachment 1365937
One of Norm Chan's beautiful photos.
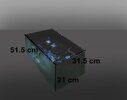
So the gun needs transport right? I needed a case. There's one in the film, and it's definitely got an "Army" kinda feel. Several people have made versions here on the RPF and I looked at all the threads.
A couple years ago i won an ebay auction on a metal box that was very close (perhaps a bit large) to the correct dimensions of the Samaritan case from Hellboy. I've never gotten around to painting it, but finally did a couple weeks ago. Here's the result:
View attachment 1365933
IN addition to the paint I added the clasp from an ammo box for the front closure (thanks to someone's research on the RPF) and also added a brass piano hinge across the back of the lid. I painted the interior black and added a bunch of dirt and rust.
I was really happy with this. BTW the olive drab color base was a Tamiya rattle can. I didn't overly prep the surface, so after my paint was dry I used masking tape randomly placed on the box and peeled off some spots of paint. It worked great! Then I clearcoated in a matte lacquer. I'd share my Samaritan lettering art, but I hand cut this from paper using some very rough reference material. I'll see if my stencil is scan-able.
Aaaanyway, I was super happy with how this turned out, but I had one issue: I have never loved the interior of this case as we see it in the film.
View attachment 1365934
It's just a little...anemic for my tastes. So I considered a redesign of the interior. I researched some old pistol presentation cases and got inspired. Using 1/4" plywood and my 23ga pin nailer and some glue and felt, over two days I completed a non-canon interior that I'm really happy with. It feels authentic, and it's actually filled with all the tools I need for assembly, disassembly, and maintenance. Funnily enough, it took a lot of weathering to get the aging I did to show up on camera. I airbrushed burnt umber liberally in the corners and all over and you couldn't see a LICK of it on camera. I eventually did a distant all-over spray with black primer just to kill the vibrance of the green.
This build will go up in a couple weeks or so but I wanted to share it with y'all, as I come here daily to get inspired and for research. I've gotten a lot from the RPF over the 20+ years I've been participating.
Without further ado, here's my hellboy pistola in it's new habitat.
View attachment 1365935
The brown ceramic bottle in center bottom is a salt-cured inkwell. These were common during the civil war and several of them are visible in Broom's Box, which I own one of. They're not hard to find for a few dollars on ebay. So I liked the idea of putting one here full of some lithium grease. The speed loaders are static props from a run here on the RPF, I may end up re-making the mechanics of these, we'll see.
Next steps are to rifle the barrel, and then to chemically blacken the aluminum. Once I've done that, I think it'll be finished. Just a HUGE amount of work.
Cheers all!
This case looks awesome. I had thought about making a similar type of case for my Han ANH blaster, but with flocked recesses cut in a high density foam. But the felt here looks really nice, I might consider that route instead.
")