JPCOdessa70
Active Member
Hi Timmy and Hi Jameth,
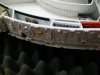
I'm also doing the same thing at the moment, I did try to glue them on the existing wall but find out the overhang plates was short. I re-did it and
cut out the existing wall, then place a replacement styrene wall much just at the back and make the resin wall sit in the place of the existing wall.
I can say what a difference it made, the overhang has the correct depth and the position looks exactly like it did on the studio model.
Hope this helps...will post some pics later..

")