MakerFiveSeven
New Member
This is part II and III of Halloween: Go For Launch.
Part I is at the following link: Halloween: Go For Launch
PART II: THE G5C GEMINI SUIT
1. Before
 2. After

Suit: To go with the outdoor display theme props of a Gemini launch run by skeletons (see link), a matching costume was created for me to wear while passing out candy. The costume would be patterned after a white Gemini era G5C space suit. Due to a lack of time, this would end up being an Adam Savage-style ‘one day build‘ that would consume 11 hours over a weekend. A suitable costume helmet was sold out on-line, so I did without that.
Candy Shooter: Later in Part III below, a necessary accessory this year of the pandemic was a socially distanced candy delivery system. This would be a white PVC pipe from Lowes big enough in diameter to pass a large size Hershey bar down it. This would be disguised as the JPL Explorer I satellite that preceded the Gemini era, but chosen simply on the fact that it was thin and cylindrical. And it would be mounted to the front porch railing. More on this later in this write-up.
Suit Ingredients;
-One costume jump suit white, NASA themed, from a Target store men's department (about US$29.00)
-25’ of Joanne Fabric 2” webbing strap (dark blue-gray)
-Two PVC Schedule 40 unions. Two different styles which when cut in half on a band saw and when the parts are mixed-and-matched supplies four unique connectors
3.

-One used white pillowcase of similar semi-gloss white fabric to the jump suit, for pocket material
-One pack double-fold black bias tape (Joanne Fabric) especially to stand in as the long zipper down the back of the suit
-Two 2” suspender adjuster buckle (Joanne Fabric) for parachute hooks
4.

-One manned spaceflight themed shoulder patch (NASA), a Gemini XII patch would be more fitting
-Two steel PVC pipe Hangers large enough to comfortably pass a fist through, for glove rings
5.

-Two large stainless steel adjustable clamps (about 8” diameter each?) when combined together make a large diameter ring enough to pass your head through and become a helmet ring
6.

-One small sheet of plastic modeler’s styrene (Evergreen), 1/16” thick for connector bases
-Silver red and blue rattle-can paint, preferably ‘candy’ type like used on model cars
-5/8” Velcro strips enough to go around the circumference of the neck ring
Easily located on the web are reference photos included an outstanding color front view publicity shot of the two crewmen Aldrin and Lovell standing behind a globe and next to a model of the Gemini/Titan.
7.

For a rear view a photo of them walking up to the elevator on launch day is useful for visualizing the webbing and zipper positions on the back.
8.

Work started with the purchase of a costume jumpsuit which was an unplanned find at a Target store men’s department. It was found amongst a couple seasonal adult costume jumpsuits. This one had a usable American flag shoulder patch and NASA swoop patch, plus an unusable space shuttle patch for my purpose. Otherwise it was blank white.
The rear view photo of the real suit showed a prominent black zipper on the back from the crotch to the neck. The black double fold bias tape unfolded and ironed out it was long enough and easily sewn on. It looked fine and I avoided dealing with a working zipper there. The costume jumpsuits real zipper was up the front was relatively inconspicuous.
9.

A JoAnne fabric store came up twenty-five feet of 2” dark blue-gray webbing strap from the clearance bin that pretty much matched the color reference. Luckily I pre-measured the amount of strap needed to fit before going to this store so I had gone in knowing the surprising long length. And I had less than two feet left over at the end of the build. All the webbing was put on before the other parts, so that those other parts could be spaced properly.
Importantly, the webbing was temporarily pinned in place first, then the suit was put on and exercised by standing, sitting, leaning and other movements that indicated where serious binds occurred and the webbing loosened or tightened and re-pinned more comfortably. Finally it was hand stitched into place in numerous locations except for the shoulders. The same fabric store visit supplied adjustable suspender hangers for the parachute clips on the webbing of the upper chest. I skipped the ones behind the shoulders as unnecessary. One working strap connector is necessary across the chest to take the suit on and off. For this an old sport bag connector sufficed.
10.

A stop at Home Depot netted two pipe clamps that would serve for glove/sleeve mounting rings. The ‘hanger’ part of the pipe hanger was cut off and discarded. The remaining ring was sized down to barely fit over my fist, drilled and riveted to add some visual interest. Buffed shiny and then masked painted half red (the other wrist half blue), the finished ring was contact-cemented to the fabric of the sleeve blue (left) and red (right hand). I made no gloves for this suit.
11.

A pair of large adjustable stainless steel pipe clamps that when connected back-to-back created a ring large enough to easily pass my head through provided the helmet ring. The only way to get in the front of the outfit was to have a removable neck ring and I wanted to avoid a break in it. Conveniently there is a hood on this jumpsuit with made for a suitable ‘pile’ of fabric under the helmet ring. “5/8” Velcro strip was split in half and the female strips were glued along the inner side of the stainless steel ring. The male strip was temporarily attached to the ring and the backing tape removed. With the adjuster screws to the left and right of the head (important later), the edge of the hood was pressed into the glue of the male Velcro. The Vecro then allowed the metal ring to be removed to get in and out of the suit.
12.

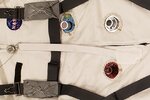
The four hose connectors, three on the torso and one on the arm were supplied by two Schedule 40 PVC ‘unions, both a slightly different style. A quick slice across their axis on a band saw created four equal size connector halves. The tightening rings could be swapped or left off entirely to mimic the differing style of connectors in the photos. These were then spray painted. Close examination of the connectors in photos showed a flat possibly rubber base that looked like it could be mimicked with thin styrene sheet, three disks, and one egg shaped base. The connectors were super-glued to these styrene bases, and a marker made a few rivets. The connector on the egg shaped base was observed to have pink pin connector inside it, so pink foam wall insulation was cut and inserted and a series of holes punched with a pen. Around each of the connectors there is some unusual stitching in the real suit. The fabric store had similar wedding gown adornment. This was super-glued around the periphery of the styrene connector disks, which also helped hide their edges.
13.

These assemblies were then contact cemented to the jumpsuit in the right locations.
Previously the two adjuster screws on the helmet mount were intentionally kept to the left and right sides of the head. Stainless steel picture hanger braided wire was run from one side to the other with enough play to hang to the center of the chest. This would be the wire cable for the pulley to pull down a real helmet if there was a loss of cabin pressure. A wooden disk was pinched in a lathe, grooved, and then painted to represent the plastic pulley. The steel pulley connector was made from scrap sheet steel bits and fitted to a wire fashioned to hold a length of thin white belt/webbing which you would pull down on in the emergency.
14.

The lower end of this doubled up strap are tucked in a small pocket made from a fragment of the pillow case sewn on below the hose connectors. It is tucked in loose as the neck ring, cable pulley and strap all have to be removable to get in and out of the suit.
At this point the outfit was beginning to look basically correct and work moved to adding highlights like the black band around the left wrist where the watch ought to be. This was just left over bias tape. The name badge on the upper right chest is also just bias tape ironed flat. The pillow case fabric made a right shoulder utility pocket that was sized large enough to cover up the inappropriate space shuttle patch. On the left shoulder was added a smaller pocket for a pair of pens. Finally and very important large fake cargo pockets at the front and very bottom of the legs, right at the ankles, and area that otherwise looks too plain. These pockets made the outfit look significantly better and more detailed. I did not bother with a modesty panel in front of the crotch.
15.

There are two silver pouches on the webbing mid-chest which I assume are emergency flotation devices for exiting the capsule after landing at sea? The remains of the pillow cases were origami folded into some semblance of those pouches. Stuffed with cotton, spray painted silver, then painted a number of times with gloss medium gave a waterproof shine to them. A series of grommet eyelets were punched into place and thick thread run through them in the style seen in the photos. These porches were sewn to the webbing and they added nice busy detail.
16.

I was going to finish with a hand painted Gemini XII shoulder patch but a friend and spaceflight fan seeing the display going up gave me a souvenir shoulder patch from an ISS launch he attended. I bent the continuity rules and sewed it on instead. No one seemed to notice and I enjoyed it. This quick build was a big hit and many a little astronaut got his picture taken with this big astronaut (socially distanced of course).
PART III: THE CANDY SHOOTER
Covid rules specified a candy shooter to maintain social distancing this year.
Ingredients List;
-One PVC thin-walled drain(?) pipe approximately 4.5” diameter and about 80”long. The drain(?) pipe has one slightly larger diameter flair at one end which will be important later
-One orange plastic traffic cone, medium sized, sliced, to be the nose and motor nozzle
-Four 1/2” long pieces of 5/8” wooden dowel rod for antenna bases
-Ten feet of 16 gauge copper electrical wire stripped of insulation for the four antennas
-2” blue painter tape for paint edging (which also happens to be the spacing between stripes)
17.

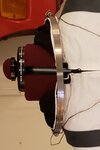
Sectioning the few inches of the flared end of the tube provides a few rings of the right diameter to slide down the rest of the tube. Two of them are drilled out.
18.

I downloaded the period JPL emblem, scaled it up, printed it and sealed it at FedEx office on a machine that makes ID tags. This keeps it safe from the weather. This was also a nod to an acquaintance of ours who works at JPL now. Various areas of the rocket were painted the appropriate colors and the ‘rings’, emblem and antenna mounts securely glued in place with the correct spacing. It was interesting to note that what looks like the black stripes are actually dark green on the real thing.
19.

20.

Three supports were fashioned from scrap pressboard and the shooter was mounted on the railing. The nosecone was removable on Halloween day to feed in the candy. We did find that one of the hard to see antennas had a habit of catching the mailman, so this was removed except for Halloween day.
21.

Finally on Halloween day a chain of orange Christmas tree lights were strung to block off the porch, and for late that night a picture of the Titusville highway exit sign was put on posterboard, with a big orange diagonal stripe across it with the word “CLOSED” like during road construction. That was put on the porch after candy hours had passed to signify the end of the evenings festivities.
22.

Part I is at the following link: Halloween: Go For Launch
PART II: THE G5C GEMINI SUIT
1. Before
Suit: To go with the outdoor display theme props of a Gemini launch run by skeletons (see link), a matching costume was created for me to wear while passing out candy. The costume would be patterned after a white Gemini era G5C space suit. Due to a lack of time, this would end up being an Adam Savage-style ‘one day build‘ that would consume 11 hours over a weekend. A suitable costume helmet was sold out on-line, so I did without that.
Candy Shooter: Later in Part III below, a necessary accessory this year of the pandemic was a socially distanced candy delivery system. This would be a white PVC pipe from Lowes big enough in diameter to pass a large size Hershey bar down it. This would be disguised as the JPL Explorer I satellite that preceded the Gemini era, but chosen simply on the fact that it was thin and cylindrical. And it would be mounted to the front porch railing. More on this later in this write-up.
Suit Ingredients;
-One costume jump suit white, NASA themed, from a Target store men's department (about US$29.00)
-25’ of Joanne Fabric 2” webbing strap (dark blue-gray)
-Two PVC Schedule 40 unions. Two different styles which when cut in half on a band saw and when the parts are mixed-and-matched supplies four unique connectors
3.
-One used white pillowcase of similar semi-gloss white fabric to the jump suit, for pocket material
-One pack double-fold black bias tape (Joanne Fabric) especially to stand in as the long zipper down the back of the suit
-Two 2” suspender adjuster buckle (Joanne Fabric) for parachute hooks
4.
-One manned spaceflight themed shoulder patch (NASA), a Gemini XII patch would be more fitting
-Two steel PVC pipe Hangers large enough to comfortably pass a fist through, for glove rings
5.
-Two large stainless steel adjustable clamps (about 8” diameter each?) when combined together make a large diameter ring enough to pass your head through and become a helmet ring
6.
-One small sheet of plastic modeler’s styrene (Evergreen), 1/16” thick for connector bases
-Silver red and blue rattle-can paint, preferably ‘candy’ type like used on model cars
-5/8” Velcro strips enough to go around the circumference of the neck ring
Easily located on the web are reference photos included an outstanding color front view publicity shot of the two crewmen Aldrin and Lovell standing behind a globe and next to a model of the Gemini/Titan.
7.
For a rear view a photo of them walking up to the elevator on launch day is useful for visualizing the webbing and zipper positions on the back.
8.
Work started with the purchase of a costume jumpsuit which was an unplanned find at a Target store men’s department. It was found amongst a couple seasonal adult costume jumpsuits. This one had a usable American flag shoulder patch and NASA swoop patch, plus an unusable space shuttle patch for my purpose. Otherwise it was blank white.
The rear view photo of the real suit showed a prominent black zipper on the back from the crotch to the neck. The black double fold bias tape unfolded and ironed out it was long enough and easily sewn on. It looked fine and I avoided dealing with a working zipper there. The costume jumpsuits real zipper was up the front was relatively inconspicuous.
9.
A JoAnne fabric store came up twenty-five feet of 2” dark blue-gray webbing strap from the clearance bin that pretty much matched the color reference. Luckily I pre-measured the amount of strap needed to fit before going to this store so I had gone in knowing the surprising long length. And I had less than two feet left over at the end of the build. All the webbing was put on before the other parts, so that those other parts could be spaced properly.
Importantly, the webbing was temporarily pinned in place first, then the suit was put on and exercised by standing, sitting, leaning and other movements that indicated where serious binds occurred and the webbing loosened or tightened and re-pinned more comfortably. Finally it was hand stitched into place in numerous locations except for the shoulders. The same fabric store visit supplied adjustable suspender hangers for the parachute clips on the webbing of the upper chest. I skipped the ones behind the shoulders as unnecessary. One working strap connector is necessary across the chest to take the suit on and off. For this an old sport bag connector sufficed.
10.
A stop at Home Depot netted two pipe clamps that would serve for glove/sleeve mounting rings. The ‘hanger’ part of the pipe hanger was cut off and discarded. The remaining ring was sized down to barely fit over my fist, drilled and riveted to add some visual interest. Buffed shiny and then masked painted half red (the other wrist half blue), the finished ring was contact-cemented to the fabric of the sleeve blue (left) and red (right hand). I made no gloves for this suit.
11.
A pair of large adjustable stainless steel pipe clamps that when connected back-to-back created a ring large enough to easily pass my head through provided the helmet ring. The only way to get in the front of the outfit was to have a removable neck ring and I wanted to avoid a break in it. Conveniently there is a hood on this jumpsuit with made for a suitable ‘pile’ of fabric under the helmet ring. “5/8” Velcro strip was split in half and the female strips were glued along the inner side of the stainless steel ring. The male strip was temporarily attached to the ring and the backing tape removed. With the adjuster screws to the left and right of the head (important later), the edge of the hood was pressed into the glue of the male Velcro. The Vecro then allowed the metal ring to be removed to get in and out of the suit.
12.
The four hose connectors, three on the torso and one on the arm were supplied by two Schedule 40 PVC ‘unions, both a slightly different style. A quick slice across their axis on a band saw created four equal size connector halves. The tightening rings could be swapped or left off entirely to mimic the differing style of connectors in the photos. These were then spray painted. Close examination of the connectors in photos showed a flat possibly rubber base that looked like it could be mimicked with thin styrene sheet, three disks, and one egg shaped base. The connectors were super-glued to these styrene bases, and a marker made a few rivets. The connector on the egg shaped base was observed to have pink pin connector inside it, so pink foam wall insulation was cut and inserted and a series of holes punched with a pen. Around each of the connectors there is some unusual stitching in the real suit. The fabric store had similar wedding gown adornment. This was super-glued around the periphery of the styrene connector disks, which also helped hide their edges.
13.
These assemblies were then contact cemented to the jumpsuit in the right locations.
Previously the two adjuster screws on the helmet mount were intentionally kept to the left and right sides of the head. Stainless steel picture hanger braided wire was run from one side to the other with enough play to hang to the center of the chest. This would be the wire cable for the pulley to pull down a real helmet if there was a loss of cabin pressure. A wooden disk was pinched in a lathe, grooved, and then painted to represent the plastic pulley. The steel pulley connector was made from scrap sheet steel bits and fitted to a wire fashioned to hold a length of thin white belt/webbing which you would pull down on in the emergency.
14.
The lower end of this doubled up strap are tucked in a small pocket made from a fragment of the pillow case sewn on below the hose connectors. It is tucked in loose as the neck ring, cable pulley and strap all have to be removable to get in and out of the suit.
At this point the outfit was beginning to look basically correct and work moved to adding highlights like the black band around the left wrist where the watch ought to be. This was just left over bias tape. The name badge on the upper right chest is also just bias tape ironed flat. The pillow case fabric made a right shoulder utility pocket that was sized large enough to cover up the inappropriate space shuttle patch. On the left shoulder was added a smaller pocket for a pair of pens. Finally and very important large fake cargo pockets at the front and very bottom of the legs, right at the ankles, and area that otherwise looks too plain. These pockets made the outfit look significantly better and more detailed. I did not bother with a modesty panel in front of the crotch.
15.
There are two silver pouches on the webbing mid-chest which I assume are emergency flotation devices for exiting the capsule after landing at sea? The remains of the pillow cases were origami folded into some semblance of those pouches. Stuffed with cotton, spray painted silver, then painted a number of times with gloss medium gave a waterproof shine to them. A series of grommet eyelets were punched into place and thick thread run through them in the style seen in the photos. These porches were sewn to the webbing and they added nice busy detail.
16.
I was going to finish with a hand painted Gemini XII shoulder patch but a friend and spaceflight fan seeing the display going up gave me a souvenir shoulder patch from an ISS launch he attended. I bent the continuity rules and sewed it on instead. No one seemed to notice and I enjoyed it. This quick build was a big hit and many a little astronaut got his picture taken with this big astronaut (socially distanced of course).
PART III: THE CANDY SHOOTER
Covid rules specified a candy shooter to maintain social distancing this year.
Ingredients List;
-One PVC thin-walled drain(?) pipe approximately 4.5” diameter and about 80”long. The drain(?) pipe has one slightly larger diameter flair at one end which will be important later
-One orange plastic traffic cone, medium sized, sliced, to be the nose and motor nozzle
-Four 1/2” long pieces of 5/8” wooden dowel rod for antenna bases
-Ten feet of 16 gauge copper electrical wire stripped of insulation for the four antennas
-2” blue painter tape for paint edging (which also happens to be the spacing between stripes)
17.
Sectioning the few inches of the flared end of the tube provides a few rings of the right diameter to slide down the rest of the tube. Two of them are drilled out.
18.
I downloaded the period JPL emblem, scaled it up, printed it and sealed it at FedEx office on a machine that makes ID tags. This keeps it safe from the weather. This was also a nod to an acquaintance of ours who works at JPL now. Various areas of the rocket were painted the appropriate colors and the ‘rings’, emblem and antenna mounts securely glued in place with the correct spacing. It was interesting to note that what looks like the black stripes are actually dark green on the real thing.
19.
20.
Three supports were fashioned from scrap pressboard and the shooter was mounted on the railing. The nosecone was removable on Halloween day to feed in the candy. We did find that one of the hard to see antennas had a habit of catching the mailman, so this was removed except for Halloween day.
21.
Finally on Halloween day a chain of orange Christmas tree lights were strung to block off the porch, and for late that night a picture of the Titusville highway exit sign was put on posterboard, with a big orange diagonal stripe across it with the word “CLOSED” like during road construction. That was put on the porch after candy hours had passed to signify the end of the evenings festivities.
22.
Attachments
Last edited: