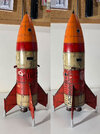
Tattered rocket made from scratch

Moska

Sr Member
Hello friends.

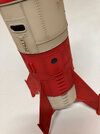
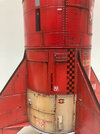
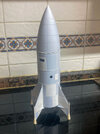
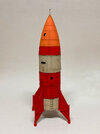
This is my penultimate project. A tattered, slightly steampunk rocket that I fell in love with after stumbling across an image on the internet. I haven't been able to find the origin or author of that illustration.

001-moska-tattered_rocket.jpg


I was very keen to do it because, this time, I didn't have to stick to reproducing as faithfully as possible an existing original. I was totally free to do whatever I wanted. And so I did.
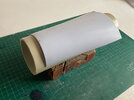
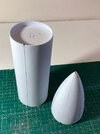
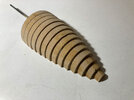
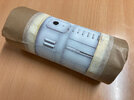
The basic construction is not very mysterious. A wooden master for the cone, a PVC pipe as a master for the cylinder, and ABS plastic heated in an oven in my kitchen.
002-moska-tattered_rocket.jpg 003-moska-tattered_rocket.jpg 004-moska-tattered_rocket.jpg 005-moska-tattered_rocket.jpg 006-moska-tattered_rocket.jpg


For the cylinder I was thinking of using a PVC pipe, but I made the mistake of assuming that Ø80mm was a standard size. And it turned out that it wasn't. But, by the time I realized my mistake, I had already made the cone with that size. So I used a Ø76mm PVC pipe as a master to make my own Ø80mm cylinder.
For both the cone and the cylinder, I used three sections of plastic to form them.

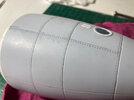
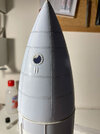
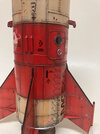
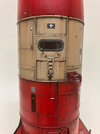
I then etched the paneling and glued on some extra styrene panels to give it more relief and increase its “unsophisticated” look.

007-moska-tattered_rocket.jpg


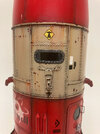
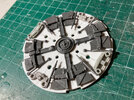
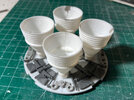
I also glued on several pieces from other kits to add detail. The nozzles are from the old 1/144 Apollo-Saturn V kit from Airfix. The steps of the ladder, which look like stapler pins… are stapler pins. And the metal ring at the bottom of the cylinder is actually an aluminium barbecue skewer.

008-moska-tattered_rocket.jpg 009-moska-tattered_rocket.jpg


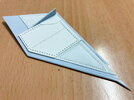
The most interesting part as a modeller was trying out a new technique to make the raised rivets. It is a technique I discovered on Youtube and it is neither as tedious nor as difficult as it may seem. To avoid going on about explanations, here is the link to that video where you can see how that technique works.


I don't know exactly what those little tin spheres are used for. It's something for soldering, but... I don't care too much.

I did it almost as shown in the video, with the only difference that I used the Intermediate Gauzy Agent product, from AK Interactive, to stick the rivets. One layer before putting the rivets and another after. I used a thin brush, moistened with this product, to pick up those spheres, one by one. They adhere to the tip of the brush by capillarity and it is easy to move them to their place fairly quickly.

With this product, the truth is that the fixation is not very strong. But by handling the model carefully and after adding the following layers of primer, paint, varnish, etc... it can be handled without problems.

In my rocket I used Ø0.3mm and Ø0.5mm rivets.

010-moska-tattered_rocket.jpg 011-moska-tattered_rocket.jpg 012-moska-tattered_rocket.jpg


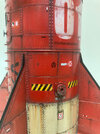
As for the painting, I used the same color scheme as that illustration on the internet. What I did freely was decorate the signs and numbers.

013-moska-tattered_rocket.jpg 014-moska-tattered_rocket.jpg 015-moska-tattered_rocket.jpg


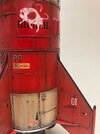
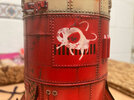
The larger white elements are painted using masking tape and airbrush. The rest are decals printed on virgin decal paper, some on transparent paper and others on white paper.

In those elements I included:

- My own logo (Moska)
- Star Wars
- Mandalorian
- Star Trek
- Battlestar Galactica
- Planet of the Apes
- 2001, a space odyssey
- Space 1999
- Several elements from Starshiptroopers
- Several signs from Alien
- Alien abduction danger
- The flag of my city
- The name of my wife
- And the logo of a cultural association from the small town where I usually spend my holidays.

It's a small tribute to the movies and TV series I grew up with. There are a few more but I decided I had enough.
I have done almost all the weathering using AK's Weathering pencils, and some chipping with a brush.

I hope you like my "whim".

016-moska-tattered_rocket.jpg

017-moska-tattered_rocket.jpg 018-moska-tattered_rocket.jpg 019-moska-tattered_rocket.jpg 020-moska-tattered_rocket.jpg 021-moska-tattered_rocket.jpg 022-moska-tattered_rocket.jpg 023-moska-tattered_rocket.jpg024-moska-tattered_rocket.jpg


Greetings.
Rafa
 
Last edited:
What a fantastic build. Nicely done!

When did you run across that illustration? It has the look of something that was AI generated, so no origin or author to find, unfortunately.
 
Now that is spectacular! A refreshing change from the most builds and it captures the look of the of the Analog SciFi Story Magazine covers I grew up with
 
Hello friends.

This is my penultimate project. A tattered, slightly steampunk rocket that I fell in love with after stumbling across an image on the internet. I haven't been able to find the origin or author of that illustration.

View attachment 1896517


I was very keen to do it because, this time, I didn't have to stick to reproducing as faithfully as possible an existing original. I was totally free to do whatever I wanted. And so I did.
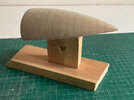
The basic construction is not very mysterious. A wooden master for the cone, a PVC pipe as a master for the cylinder, and ABS plastic heated in an oven in my kitchen.
View attachment 1896519 View attachment 1896520 View attachment 1896521 View attachment 1896522 View attachment 1896523


For the cylinder I was thinking of using a PVC pipe, but I made the mistake of assuming that Ø80mm was a standard size. And it turned out that it wasn't. But, by the time I realized my mistake, I had already made the cone with that size. So I used a Ø76mm PVC pipe as a master to make my own Ø80mm cylinder.
For both the cone and the cylinder, I used three sections of plastic to form them.

I then etched the paneling and glued on some extra styrene panels to give it more relief and increase its “unsophisticated” look.

View attachment 1896524


I also glued on several pieces from other kits to add detail. The nozzles are from the old 1/144 Apollo-Saturn V kit from Airfix. The steps of the ladder, which look like stapler pins… are stapler pins. And the metal ring at the bottom of the cylinder is actually an aluminium barbecue skewer.

View attachment 1896525 View attachment 1896526


The most interesting part as a modeller was trying out a new technique to make the raised rivets. It is a technique I discovered on Youtube and it is neither as tedious nor as difficult as it may seem. To avoid going on about explanations, here is the link to that video where you can see how that technique works.


I don't know exactly what those little tin spheres are used for. It's something for soldering, but... I don't care too much.

I did it almost as shown in the video, with the only difference that I used the Intermediate Gauzy Agent product, from AK Interactive, to stick the rivets. One layer before putting the rivets and another after. I used a thin brush, moistened with this product, to pick up those spheres, one by one. They adhere to the tip of the brush by capillarity and it is easy to move them to their place fairly quickly.

With this product, the truth is that the fixation is not very strong. But by handling the model carefully and after adding the following layers of primer, paint, varnish, etc... it can be handled without problems.

In my rocket I used Ø0.3mm and Ø0.5mm rivets.

View attachment 1896527 View attachment 1896528 View attachment 1896529


As for the painting, I used the same color scheme as that illustration on the internet. What I did freely was decorate the signs and numbers.

View attachment 1896531 View attachment 1896532 View attachment 1896533


The larger white elements are painted using masking tape and airbrush. The rest are decals printed on virgin decal paper, some on transparent paper and others on white paper.

In those elements I included:

- My own logo (Moska)
- Star Wars
- Mandalorian
- Star Trek
- Battlestar Galactica
- Planet of the Apes
- 2001, a space odyssey
- Space 1999
- Several elements from Starshiptroopers
- Several signs from Alien
- Alien abduction danger
- The flag of my city
- The name of my wife
- And the logo of a cultural association from the small town where I usually spend my holidays.

It's a small tribute to the movies and TV series I grew up with. There are a few more but I decided I had enough.
I have done almost all the weathering using AK's Weathering pencils, and some chipping with a brush.

I hope you like my "whim".

View attachment 1896535
View attachment 1896536 View attachment 1896537 View attachment 1896538 View attachment 1896540 View attachment 1896541 View attachment 1896542 View attachment 1896543View attachment 1896544


Greetings.
Rafa

You definitly accomplished your goal.

This would be GREAT for a Salvage 1 reboot.
 
Hello friends.

This is my penultimate project. A tattered, slightly steampunk rocket that I fell in love with after stumbling across an image on the internet. I haven't been able to find the origin or author of that illustration.

View attachment 1896517


I was very keen to do it because, this time, I didn't have to stick to reproducing as faithfully as possible an existing original. I was totally free to do whatever I wanted. And so I did.
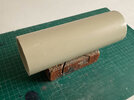
The basic construction is not very mysterious. A wooden master for the cone, a PVC pipe as a master for the cylinder, and ABS plastic heated in an oven in my kitchen.
View attachment 1896519 View attachment 1896520 View attachment 1896521 View attachment 1896522 View attachment 1896523


For the cylinder I was thinking of using a PVC pipe, but I made the mistake of assuming that Ø80mm was a standard size. And it turned out that it wasn't. But, by the time I realized my mistake, I had already made the cone with that size. So I used a Ø76mm PVC pipe as a master to make my own Ø80mm cylinder.
For both the cone and the cylinder, I used three sections of plastic to form them.

I then etched the paneling and glued on some extra styrene panels to give it more relief and increase its “unsophisticated” look.
View attachment 1896524


I also glued on several pieces from other kits to add detail. The nozzles are from the old 1/144 Apollo-Saturn V kit from Airfix. The steps of the ladder, which look like stapler pins… are stapler pins. And the metal ring at the bottom of the cylinder is actually an aluminium barbecue skewer.
View attachment 1896525 View attachment 1896526


The most interesting part as a modeller was trying out a new technique to make the raised rivets. It is a technique I discovered on Youtube and it is neither as tedious nor as difficult as it may seem. To avoid going on about explanations, here is the link to that video where you can see how that technique works.


I don't know exactly what those little tin spheres are used for. It's something for soldering, but... I don't care too much.

I did it almost as shown in the video, with the only difference that I used the Intermediate Gauzy Agent product, from AK Interactive, to stick the rivets. One layer before putting the rivets and another after. I used a thin brush, moistened with this product, to pick up those spheres, one by one. They adhere to the tip of the brush by capillarity and it is easy to move them to their place fairly quickly.

With this product, the truth is that the fixation is not very strong. But by handling the model carefully and after adding the following layers of primer, paint, varnish, etc... it can be handled without problems.

In my rocket I used Ø0.3mm and Ø0.5mm rivets.
View attachment 1896527 View attachment 1896528 View attachment 1896529


As for the painting, I used the same color scheme as that illustration on the internet. What I did freely was decorate the signs and numbers.
View attachment 1896531 View attachment 1896532 View attachment 1896533


The larger white elements are painted using masking tape and airbrush. The rest are decals printed on virgin decal paper, some on transparent paper and others on white paper.

In those elements I included:

- My own logo (Moska)
- Star Wars
- Mandalorian
- Star Trek
- Battlestar Galactica
- Planet of the Apes
- 2001, a space odyssey
- Space 1999
- Several elements from Starshiptroopers
- Several signs from Alien
- Alien abduction danger
- The flag of my city
- The name of my wife
- And the logo of a cultural association from the small town where I usually spend my holidays.

It's a small tribute to the movies and TV series I grew up with. There are a few more but I decided I had enough.
I have done almost all the weathering using AK's Weathering pencils, and some chipping with a brush.

I hope you like my "whim".

View attachment 1896535
View attachment 1896536 View attachment 1896537 View attachment 1896538 View attachment 1896540 View attachment 1896541 View attachment 1896542 View attachment 1896543View attachment 1896544


Greetings.
Rafa
That is really beautiful.
The rocket itself is phenomenal, and the paint job is stellar.

Well done.
 
That's a really cool model and a great paint job, but why is this your penultimate model? Are you not going to be making models any more? That seems a shame.

It's his penultimate model, that means that there's one more model, the ultimate model, to come.
Oops! I misspoke, sorry.
When I say this is my penultimate model, I mean I'm already working on the next one, which is the last one I'm making for the moment (AMT 1989 BATWING).
I hope to keep building models for a few more centuries :p.

Thank you very much for your kind comments. I'm glad you love my beat up space rocket.

When I can, I'll take it to my studio and take a good photo shoot with better quality. I'll post some of them in this thread.

Best regards.
Rafa
 
Very nice! Love the rivets.
When I was trying to teach myself how to use Fusion360, last decade, I started to design a rocket, it has a vague resemblance to your 'Tattered Rocket', never for a minute considered adding rivets. Might just get back to it one day.
1737157168206.png

It was a learning exercise, went a bit over the top, detachable boosters and minifig pilot included.
More engines than Elon's BFR.
1737157378456.png

Always thought it looked too smooth, tiny little rivets here I come ....

1737157541915.png

Apologies to the Mini-Fig designer, I don't recall where I got them model from.

1737157777874.png
 
That’s so beautiful! I love the rivets. Have you considered doing a steampunk version of the Bell X1 in this fashion?
Your building methods are awesome inspiring to say the least.
 
Back
Top