Giger Alien '79 head refurb

skint, i will be leaving the type on.

toothboy, i wouldnt have a problem making you a dome. i will already have the mould so whats one more :p I didn't see any threads on what your head looks like. would you mind sending some pics for ref.

I don't have a thread as it's sitting in my garage unfinished. I just can't get motivated to finish it due to the dome being so wonky!! It's a great piece, but the dome just really bothers me. :)

Here's a thread on a build of the same head as mine...

http://www.therpf.com/f9/giger-alien-79-head-progress-111333/?highlight=giger+alien

you'll see me griping about the ill fitting dome on the thread somewhere. Pics of what the fit issue is begin on page 3. It may not look like much (small space at the bottom of the dome around the skull) but it's those small details that really make the piece.

It actually looks to possibly be from the same lineage as yours...not 100% sure though. But it looks similar. That's why I hope you are kind enough to sell me a dome when you get yours finished! :)

Thanks for responding and I look forward to more progress on your build!

I'm using that thread for some reference actually, my one concern is i had to replace all the piping. i tried my best to line the new ones up with where i cut them off, i think this might cause some fitment issues with yours. From what i know my head is cast from the same moulds as yours i believe swampdonkey has made a mould from your run of heads and mine is cast from that.

have you tried to polish the edge and cut a strip of plastic to fill the gap if both edges are very tight and polished the glue used to bond them will make an invisible seem also if it is close to the edge most of that will be sprayed black too. Just a thought.

examples of flame polish and glueing
https://www.youtube.com/watch?v=WDEzj4rU5zg

https://www.youtube.com/watch?v=uaFHS4ESw7Y
 
Last edited:
you may want to watch this video if you are thinking of using silicone caulk to make your moulds. Just skip the first 8 min. i was thinking of using this to make a mold of my whole head if i decide to.

https://www.youtube.com/watch?v=vfH_HCI0G4I

Just brilliant! I just watched all 3 videos because he showed stuff that the product suppliers don't really want you to see :)
So for clarification, what exactly is Naptha? Google suggests Shellite in Australia.

That method would be far less costly than making a massive reverse vacform mold for a part like the Alien dome for a short run, Reverse vacuum forming is good if you intend to make many and sell them off.

There are water clear plastics that you could layer up to get the desired thickness and once cured, they should be almost as strong as a vac formed part.

As he says in the video, the A/B additive silicones are faster and it seemed his 3 videos covered 3 days work to make his silicone mold. With A/B, I could do that in a few hours. It just costs way more. At a rough estimation, A/B would cost almost a grand for the amount you would need Vs maybe $100 for Utra-cal + tubed cauking silicone.

Still worth some experimentation here though, even for a cheap reverse vacuum mold.
 
OK could not wait, had to run some tests. If this works, awesome!

Test 1 - to see how well the cauking silicone bites into cloth/foam etc. I want to rubber skin a "thing" I am working on and if this works, will be WAY more cost effective than using clear elastomer which also bites really nicely into foam.
Test 2 - colour changing. Typical cauking silicone is a translucent white and it does come in black and maybe brown. What about red? So I added some of my bright red silicone pigment to some and it took it and mixed to a solid red colour. Now just need to see how well it cures and how long.

I still need to find the solvent (or our equivalent), because out of the tube, it is way too hard to apply and mixing was not easy either.

Wow that was quick :p

From what i read online Shellite is the same thing as naptha and both are a type of white gas. one of the 2 should thin it out well enough to paint it on.
I do know there are a couple other colors like sand and such but it sounds like adding pigment is your best bet.

can you point me in the direction of these materials you talked about, only clear resin i'v seen was pretty cloudy?
"There are water clear plastics that you could layer up to get the desired thickness and once cured, they should be almost as strong as a vac formed part."
 
Last edited by a moderator:
can you point me in the direction of these materials you talked about, only clear resin i'v seen was pretty cloudy?

I will look for Shellite (or if I can find Naptha) tomorrow and do some more tests.

As for the clear for your dome, I use a two part (AB) water clear elastomer which is basically a clear rubber. The shore hardness is A65 which is about the same hardness as a low profile car tyre. You can get this stuff in shore hardness of A100 and some suppliers can do shores into D range.

attachment.jpg

attachment.jpg


I probably should have back lit this because this sample is almost 2" thick (you are only going to want 1/4" for the dome) and the camera flash is reflecting off the surface. Anyway, this stuff is water clear and UV stable. It has a few bubbles in it from when I was learning how to mix and pour about 8 months ago. I didn't know what to do with the excess so poured it into a cup. It was removed later. Now that I almost know what I am doing with this stuff, I can make 100% bubble free cups :)

I think a similar product (Smooth On?) would be fine and if slush cast (pot life is about 15min) could give a clear dome. You would need to be able to degas though.

You can watch a YouTube video I did on degassing this clear elastomer HERE.

20150324_232244.jpg


20150324_232435.jpg
 
Last edited by a moderator:
that is much clearer then i thought it would be, i have thought of going this route before but i'm not sure how i could get the same thickness on such a large piece.

i was looking into this product:
http://www.shop.brickintheyard.com/Poly-Optic-1411-Quart-Kit-38-Lbs-1411U38.htm

You would have to do it in stages and layer it up. It bonds to itself, so no issues there. The stuff I use has a 15min pot life at 25 degrees C. Slightly longer in colder temps and way shorter in warmer ones. When I did my MAG mid-soles (I added grey and aqua pigments) in the stuff, I actually let it go into a semi gel state so it would cling to vertical surfaces. Too runny and it just pools at the base. Too thick and you end up with lumps. It is an art for sure.

In the case of your dome, I'd slush cast it, slowly, so as not to produce bubbles. If you pour this stuff too fast, it traps air and you end up with bubbles, hence that block in last post. even though they are small, they are there and could have been avoided had I known what I was doing at the time.
 
Test 3 - dissolving silicone.

If this sets and cures, it might just be the Alien drool you've been looking for.

attachment.php


This was made by combining cheap caulking silicone and mineral turpentine. I could not find Naptha anywhere - apparently it is "listed substance" and guy at the hardware store said that mineral turps is used to clean up silicone all the time, so given the price ($3 for a litre and I had some at home anyway) why not experiment. 500 gram tubes of silicone start at just $4, so 2 x 4 + 3 makes a 1KG of silicone for just $11. At those volumes you might want a paint stirrer and a power drill. Pretty cheap if this sets. I am also curious to see if this can not be degassed due to all the bubbles from mixing.

attachment.php


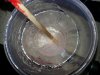
So for this test, I squirted a big dob of silicone into the cup, than added about what felt to be about the same weight in the mineral turps. I had gram scales on hand but didn't use them...go figure.

So initially the silicone went into clumps and as I mixed it, started to become a gel. After 5 minutes (and a heap of stirring) it had become quite a smooth mixture. It did not heat up or even feel warm. It does not seem to pour, rather is just a very workable version of itself and sticks to vertical surfaces. So here is hoping that the mineral turps evaporates enough to allow this to turn from a gel and back into a solid. Maybe I will test this with acetone which does evaporate fast. I will know tomorrow.

If this does work, then a really cheap way to make an easy to work silicone. If not, then it is a gooey mess that will need to be thrown out before the kids find it.

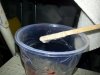
Notice the slight pink colour? Ok this is because used the same cup from last night and there was some red (cured) silicone left in the cup and it appears to have dissolved that back into the mix taking the red dye with it. Not a bad thing as this could mean minimizing waste.

Test 4 is applying it to cloth and is also curing. I didn't bother with a photo at this stage but was impressed with how easy it was to layer into the cloth. Something I forget to do last night was to apply a release and so the red silicone has bonded really well to the plastic. Tonight I remembered to prep the surface with good old Vaseline. It will be really cool if this sets and just peels off.

NOTE: This stuff STINKS REALLY REALLY BAD! So bad that I have taken it out of the workshop and left it under an eve to set (if it even does that) over night.
 

Attachments

  • 20150325_220946.jpg
    20150325_220946.jpg
    166 KB · Views: 520
  • 20150325_221034.jpg
    20150325_221034.jpg
    151.3 KB · Views: 537
Good news, it sets. Bad news, it still stinks!

The shore is really low (IE it is very soft). It would be great if layered up to about 1/8" of inch like in the video. It would make a really good seal on a vacuum system. I don't think it would be hard enough to make an entire reverse vacuum form mold from, even though it is cheap.

This might be awesome as the impact absorbent part in a pair of shoe inner soles.

So for the project I had in mind for this stuff, I am just going to be better off paying the $70/KG for good, non smelly stuff and know that that stuff works. Still fun to experiment though.
 
Last edited:
Test 5 mixing silicone with acetone. This was interesting as you don't need a 1:1 mix ratio. You can probably get away with 2 parts silicone to 1 part acetone.

Once it is mixed, it forms the same consistency as the mineral turps, but without the smell. It still has an odor, but not so bad that I could not work with it in my workshop. As you mix this, it gets cold (which is a good thing for condensation curing silicone) and as the acetone evaporates, it helps cure the silicone.

My test was cured in about an hour and a half and unlike the mineral turps, there was no residual smell or oily feel to the rubber.

I think it still too soft to make a reverse vacuum mold though it would be a more affordable solution.

Anyway back to making ALIENS.
 
wow cavx you have been busy :p
Thanks for doing all those tests, I was mostly thinking of using this method to make a mould of the head to use for casts. If i decide to do them.
How did it release from the form in test 4 once it cured?
 
wow cavx you have been busy :p
Thanks for doing all those tests, I was mostly thinking of using this method to make a mould of the head to use for casts. If i decide to do them.
How did it release from the form in test 4 once it cured?

The tests don't take long. Just interesting and answered some of my questions about this stuff.

Test 4 pulled up ok apart from the smell of the mineral turps. I'd think an acetone test would be good here. I was impressed with how well it bonded to the fabric. I was using some K12 light diffuser as the mold, gave that a quick rub down with Vaseline before painting my first layer of silicone in. Now technically, you are supposed to let that layer cure first, I didn't. Once all the little holes were full, I laid the cloth over the top and painted the back of the cloth with more silicone, pressing and dabbing to make sure it went through.

Then had to take it outside to set up due to the nasty fumes. And even after it cured, it stunk and had that nasty oily feel to it.

There is still shellite (a type of lighter fluid?) to test yet :)
 
@plastik46 This might be of use to you.

After nearly having a heart attack over how much silicone I would need for my Tube Bag project, I came up with this.

attachment.php


If you were to do this and use a hard medium like ultracal30, you might be able to make your dome mold as a negative right inside a box. You could line that with the softer silicone to prevent the clear done getting scratched.

My tube bag project actually needs two molds for the tube - one for the main body at one diameter and one for the lids, slightly larger with the handle recess. I think it is possible to make the mold box slightly over size and shim it with high impact rubber liners. One liner could have the handle recess as a positive part attached, The reverse vacuum form can only pull as far as the walls, so the more you shim, the smaller the end result. It should just form over the handle recess.

Doing it this way still requires at least one frame to attach the plastic directly to the lip of the box as well as seal under the plastic.

Again, this is about reducing the size of the platen and making the system manageable from a single operator or DIY perspective.
 

Attachments

  • NIKE FOOTWEAR Tube Bag V3 7.jpg
    NIKE FOOTWEAR Tube Bag V3 7.jpg
    216.3 KB · Views: 83
  • Reverse Vacuum Form Mold 1.jpg
    Reverse Vacuum Form Mold 1.jpg
    93.8 KB · Views: 92
  • Reverse Vacuum Form Mold 2.jpg
    Reverse Vacuum Form Mold 2.jpg
    53.5 KB · Views: 758
Last edited:
quick update: I had some time to add the sides of the spine, i still have some shaping to do but i'm generally happy with them. had a busy weekend again so not much time for this project lately :(

2015-03-30 00.39.13.jpg2015-03-30 00.39.05.jpg2015-03-30 00.38.54.jpg2015-03-30 00.38.48.jpg
 
Apoxie sculpt, it's very good stuff haven't found any negatives with it yet. I have to do a lot of sanding on the whole head yet, and after I will use some bondo to fill in any small imperfections.
 
Back
Top