Functional Pip-boy 3000 Mk IV from Fallout 4

Easiest way to make the padding would be to sew 3d-spacer mesh over foam, then either mechanically attach that to the hard inside part, or velcro it in place.

I agree with this. I suggest taking a look at how they make sock liners in your shoes. That is the padding that separates your foot from the upper material. I think it should be fairly game accurate in appearance as well if stitched properly. I don't recall the in-game model looking like it had a leather liner but I could be wrong about that.

Also, this project is amazing. It definitely ticks all the correct boxes for me.
 
barry99705, I agree that I want something breathable. The couple of times I have worn my Pip-Boy edition my arm got sweaty within a few minutes. They used a closed cell foam which acts as a total seal.
Ariannus, NinjaFlex may work well as a backing material, but I would rather have leather or cloth as a final surface. The SLS nylon I am using for the rest of the project is also highly flexible when printed in a lattice pattern.
Stags, They do make synthetic breathable leather, but a flexible tan cloth as you suggest is probably best in the end. (Easier to source also)

------------

No images yet as the model is still very rough, but this weekend I managed to hollow out the model to a thickness of 2mm on nearly ever surface. While many CAD packages including Solid Edge include a "Thin wall" feature meant for this task, this feature in Solid Edge can't handle lots of curves and intersecting faces very well. What I had to do for the most part was painstakingly cut away at the model using lots of small cuts until it was hollowed out completely. I selectively leave in thicker areas to keep the model stiff where needed. I also did an initial test placement of internal components, and the electronics will just barely fit into the new game-accurate model. Next I have to add back in all the mechanical mechanisms for the holotape deck.
 
Last edited by a moderator:
I'm still reading through all these posts, so please forgive me if I've missed something or if I'm being redundant. This is some TRULY IMPRESSIVE WORK!

My initial instinct was to give the retractable flashlight a USB connector for charging/data transfer. Does this mean sacrificing WiFi capabilities on the Beagle Bone Black? (You said it only has a single USB port, right?)

The holotape design is very elegant, but what are the dimensions? I still think you could cannibalize a cheap cell phone backup charger and use that in addition to your selectable optical ID circuit.

My main suggestion would be to substitute a joystick for the front knob (the one beneath the tuner). Perhaps you could use something like this:
joy.JPG
It's low profile and inexpensive and would allow you to play "Red Menace" and "Atomic Command". You could modify the existing knob, or over-mold it, or remove it and replace it with your printed one. I'm just unsure of how many pins you have left on the BBB.
 
@ Erebus:

The "sensor pod" is now going to be just USB. This is reflected in my later posts. However the Uddo Neo will still keep its WIFI and Bluetooth capabilities. At this time I am not using a BeagleBone Black, it was too slow running Android. The Udoo Neo Android release isn't out yet, so I still don't know for sure if it will run the companion app.

However, there are some enterprising programmers working on a stand-alone, Java based, Pip-Boy application. If their work pans out I may not have to use the companion application, and I could run Linux. I could also possible integrate the real-world functions into their application and provide a more seamless interface. In theory I could go back to the BeagleBone Black. There are a few advantages that the BeagleBone still has over the Udoo Neo. It is far easier to interface with the hardware, and it can run a LCD screen directly without a converter, and it can run off a 3.7V battery. Either way, all of the software is still very much up in the air.

The holotape is 59.4 x 48.6 x 9.3mm. This is the scale needed for the Holotape to match the game accurate model I am working on currently. There is simply no room for a cellphone backup charger inside. And I like that it now doesn't' require any physical electrical connection. An modulated optical connection will be far more robust and won't require exact alignment or pressure.

That knob you have linked to is about three times the size of the small knob near the radio. There also isn't any room behind the knob for the required circuitry attached to that knob.

------------------------------


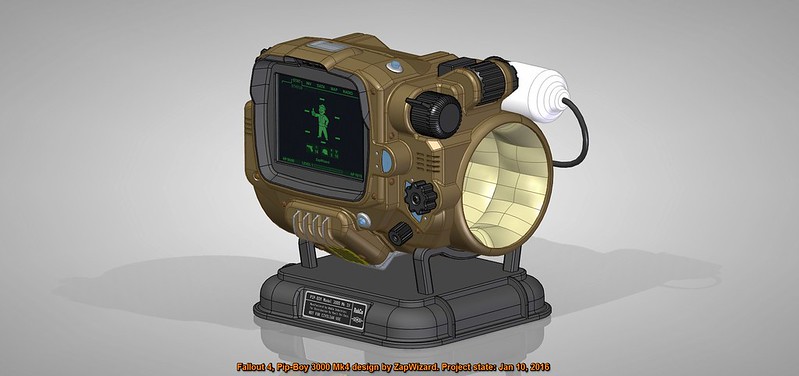
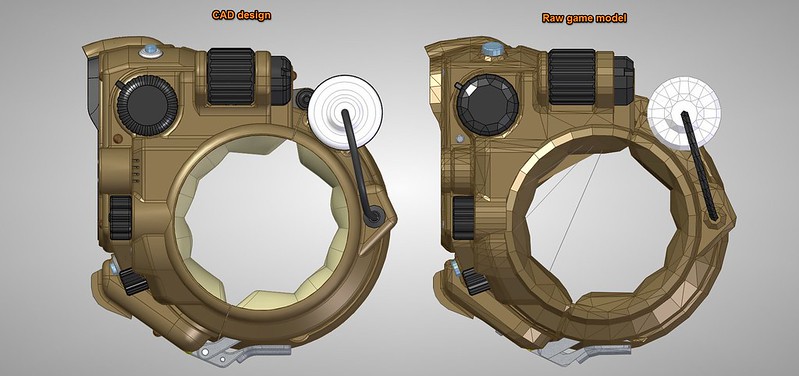
This weekend I finished up most of the major changes to make the game accurate model back into a functional design. Most of the hardware remains the same, but the entire CAD model was re-built from scratch.

------------------------------


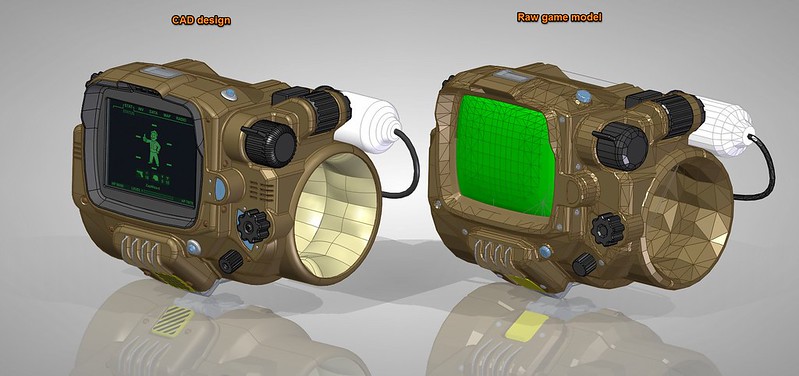
I am able to overlay the raw in-game model over my design to double check my work as I go. I also constantly refer to video and images from the game, since the textures add a lot of little details which are obscured in the raw model.

------------------------------


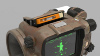
The holotape caddy, knobs, buttons, everything was made as close to the game model as possible. The only exceptions are the hinge (game model is actually impossible to open), the display screen, and the slightly smaller illuminated buttons.

------------------------------


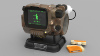
The end result is a design which is about as accurate to the game as you can get with today's technology.

------------------------------


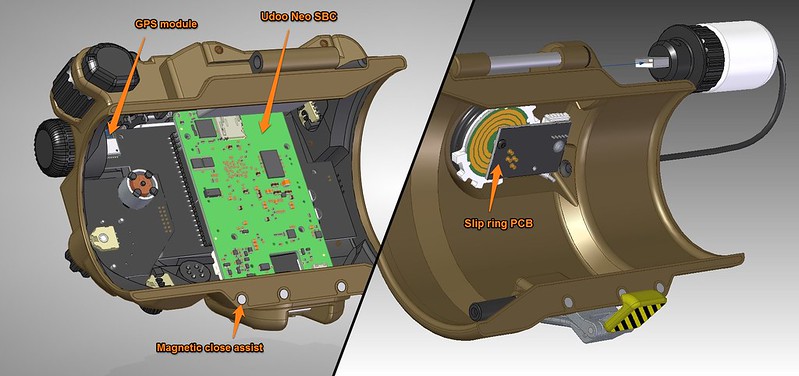
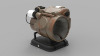
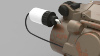
Inside there is still more work do to. I have to finish the holotape caddy mounting points, and figure out a way to squeeze cable connectors onto the Udoo Neo. It unfortunately uses a odd connector for the LCD screen interface. Also visible here is the USB module. It's placement affects the signal quality, any nearby metal can affect it.

------------------------------


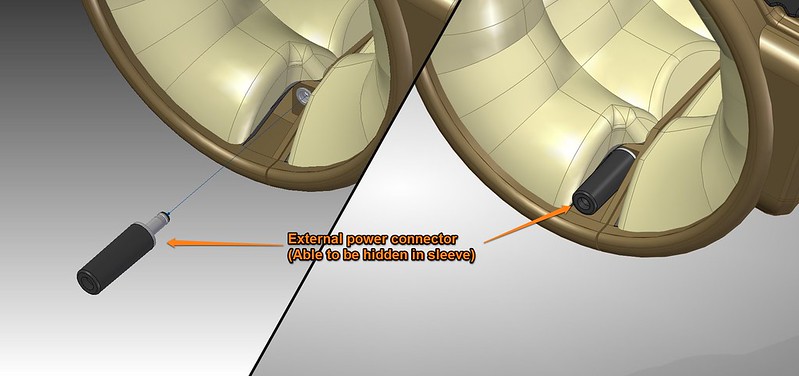
I have made room for a hidden external power cable. This is because the Udoo Neo is not as power efficient as the BeagleBone Black. In fact, as far as I can tell it can't run off of a 3.7V Lithium Polymer battery. I have to add a boost circuit in order to use a battery. So this external connection will probably be required for anyone wanting to run their Pip-Boy for an extended period of time.

------------------------------


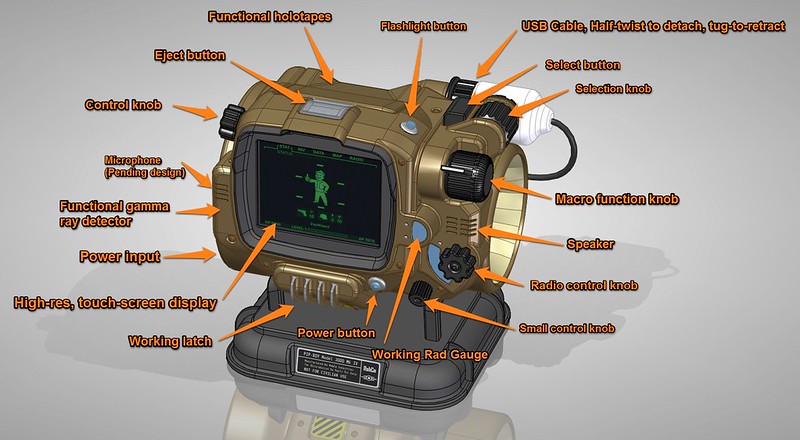
Here is my sort of marketing image, showing just how much stuff is crammed into the design. Now that all the external details are done, I will probably pop-out some more photo-real renderings.
 
zapwizard

Couple of questions, being that you're making functional knobs for everything, do you need to run a touch screen it is that just a preference?

I noticed in game after the Holotapes are inserted there is a guard that seems to pop up behind them, did you incorporate this as well?

My hats off to you on this build. The designs alone are stellar.
 
Last edited by a moderator:
Gixxerfool

The touch-screen is probably still needed for general android stuff. If the Pip-Boy java program can be adapted well enough, then the actual Pip-Boy app may not need the screen at all. Plus the two extra control knobs not used in game could always do some other function.

I tried to put in the cassette guard into the design. At one point I even had it geared to automatically open and close in sync with the pop-up holder. However, there simply no room left inside for the guard. In the game model there is also an actual caddy the tape is meant to go into, but if you look at the animation in slow motion, they didn't even make the caddy move along with the Holotape. In-game the tape is just jammed into the space above the caddy, and the tape clips through parts of the Pip-Boy as it closes. Since this is meant to become reality, I have to allow for space for the Holotape to fit loosely into the caddy, and close properly. RIght now the tolerances are tight. Between 0.3 to 0.5mm for most of the parts. This is very tight for 3D printed parts, and some sanding will probably be necessary to get everything to fit well. The good part is that SLS Polyamide (Nylon) is self-lubricating, so movement should only get smoother over time. I have successfully used these tight of tolerances for commercial designs I have done.

---------------

Other updates:

I also tweaked the stand design a bit, making it into three parts that screw together, hopefully this will lower the 3D printing cost a bit since it takes up less machine space.

Once I completed the internal mounting features, I will start working on the hardware BOM and 3D printing cost estimates. Thanks to donations, I was able to order the LCD screen. I have to build a LVDS to parallel convertor in order to use it with the Udoo Neo. I haven't been able to find a pre-made protoboard that will work yet. Udoo wasn't willing to share the LVDS converter circuit they use on their 7" LCD screen. Right now I am seriously split between trying to get the Java App to work on the BeagleBone, it is is far easier to add WIFI to the Beaglebone then it is to interface the Udoo Neo with the LCD. (The BeagleBone can drive a LCD without any convertor needed)
 
Last edited by a moderator:
I have been following this thread for a while now but have only just registered to these forums to post what I think you may find useful.

I managed to purchase a Pip-Boy edition of FO4 and noticed a diagram in the manual that describe what the certain knobs and buttons are "supposed' to do.
I am not sure if you have already seen this image or not but I will link it anyway.

aRJC9K5.jpg

I am sorry if the image is low-res, i only have a phone camera to use.

Good luck with the progress of your build, I look forward to seeing the complete unit!
 
EMEUTIER
Thanks for reminding me. I also have a Pip-Boy edition, but apparently never noticed this diagram. The #1 knob, "screen focus," has no use on a LCD screen, so it can be re-assigned to something else. For example there is no "Horizontal" scroll knob to change between the sub-menus. Having the #16 knob be a audio volume knob makes sense.
I think I may duplicate their diagram when I make my next set of renderings.
 
Last edited by a moderator:
I must have skimmed over the post where you switched to a design using the Udoo. I've been fighting off a flu the past few days; I think I'll need to re-read this entire thread.

I'm glad the sensor pod will be a data interface, it seems more game accurate.

Holy *****! I did not realize the holotapes were so small. I imagined something roughly the size of an Altoids tin - maybe 60x90x13mm. Of course you can't fit a secondary battery into that space!

And now that I understand the scale, I see that a joystick for the small control knob is out of the question. Even if there were a micro-joystick to fit the space requirements, I doubt it would be very robust. It's a shame, though. If the mini-games are ever mimicked for a real life Pip-Boy, they'll likely be played on a touch screen, but I've never felt that fit in with the Fallout aesthetic.
 
Erebus, I didn't realize they made these as integrated parts.
I found two small models on Digikey which I will look at using. Model 1, Model 2
There is more room behind the left-most knob, but that would require two hands to use.

--------------------------------

23738885943_68105df478_c.jpg


Okay folks, here are the pretty new 3D renderings of the game-accurate model. I know, more renderings, but it helps me verify the design and check for any odd shapes which aren't easily visible in the CAD software.

The image above is rendered in 4K, click it to see it bigger.

--------------------------------

24257477092_db40d0f7fa_c.jpg


I rendered the padding as a sort of loose knit cloth. I still need to design the 3D printed structure which will help hold the foam and cloth in place.

--------------------------------

23737516514_265fc41bbc_c.jpg


The holotape mechanism is now mostly done.

--------------------------------

24257477102_831e67d503_c.jpg


Here you can see the USB data cable pod. I still plan on making a model of the vault door interface this connects to.

--------------------------------

24339500056_e04a588727_c.jpg


Here you can see the backlit gauges. The plan is to try a water slide decal for the rad gauge, and laser-etching through black paint to make the radio gauge.

--------------------------------


24070123370_78971a3ddf_c.jpg


This image imitates the angle at which you view the Pip-Boy in the game.
 

Attachments

  • 23738885943_68105df478_c.jpg
    23738885943_68105df478_c.jpg
    94.5 KB · Views: 249
  • 23738885943_68105df478_c.jpg
    23738885943_68105df478_c.jpg
    94.5 KB · Views: 211
  • 23738885943_68105df478_c.jpg
    23738885943_68105df478_c.jpg
    94.5 KB · Views: 214
  • 24257477092_db40d0f7fa_c.jpg
    24257477092_db40d0f7fa_c.jpg
    52.7 KB · Views: 238
  • 24257477092_db40d0f7fa_c.jpg
    24257477092_db40d0f7fa_c.jpg
    52.7 KB · Views: 292
  • 24257477092_db40d0f7fa_c.jpg
    24257477092_db40d0f7fa_c.jpg
    52.7 KB · Views: 264
  • 24257477092_db40d0f7fa_c.jpg
    24257477092_db40d0f7fa_c.jpg
    52.7 KB · Views: 210
  • 24257477092_db40d0f7fa_c.jpg
    24257477092_db40d0f7fa_c.jpg
    52.7 KB · Views: 234
  • 23738885943_68105df478_c.jpg
    23738885943_68105df478_c.jpg
    94.5 KB · Views: 272
  • 23738885943_68105df478_c.jpg
    23738885943_68105df478_c.jpg
    94.5 KB · Views: 245
  • 24257477102_831e67d503_c.jpg
    24257477102_831e67d503_c.jpg
    95.4 KB · Views: 257
  • 24257477102_831e67d503_c.jpg
    24257477102_831e67d503_c.jpg
    95.4 KB · Views: 257
  • 24257477102_831e67d503_c.jpg
    24257477102_831e67d503_c.jpg
    95.4 KB · Views: 262
  • 24257477102_831e67d503_c.jpg
    24257477102_831e67d503_c.jpg
    95.4 KB · Views: 199
  • 24257477102_831e67d503_c.jpg
    24257477102_831e67d503_c.jpg
    95.4 KB · Views: 271
  • 23737516514_265fc41bbc_c.jpg
    23737516514_265fc41bbc_c.jpg
    144.2 KB · Views: 219
  • 23737516514_265fc41bbc_c.jpg
    23737516514_265fc41bbc_c.jpg
    144.2 KB · Views: 352
  • 23737516514_265fc41bbc_c.jpg
    23737516514_265fc41bbc_c.jpg
    144.2 KB · Views: 267
  • 23737516514_265fc41bbc_c.jpg
    23737516514_265fc41bbc_c.jpg
    144.2 KB · Views: 237
  • 23737516514_265fc41bbc_c.jpg
    23737516514_265fc41bbc_c.jpg
    144.2 KB · Views: 258
  • 24070123370_78971a3ddf_c.jpg
    24070123370_78971a3ddf_c.jpg
    145.8 KB · Views: 257
  • 24070123370_78971a3ddf_c.jpg
    24070123370_78971a3ddf_c.jpg
    145.8 KB · Views: 265
  • 24070123370_78971a3ddf_c.jpg
    24070123370_78971a3ddf_c.jpg
    145.8 KB · Views: 245
  • 24070123370_78971a3ddf_c.jpg
    24070123370_78971a3ddf_c.jpg
    145.8 KB · Views: 250
  • 24070123370_78971a3ddf_c.jpg
    24070123370_78971a3ddf_c.jpg
    145.8 KB · Views: 240
  • 24339500056_e04a588727_c.jpg
    24339500056_e04a588727_c.jpg
    99.2 KB · Views: 237
  • 24339500056_e04a588727_c.jpg
    24339500056_e04a588727_c.jpg
    99.2 KB · Views: 303
  • 24339500056_e04a588727_c.jpg
    24339500056_e04a588727_c.jpg
    99.2 KB · Views: 263
  • 24339500056_e04a588727_c.jpg
    24339500056_e04a588727_c.jpg
    99.2 KB · Views: 256
  • 24339500056_e04a588727_c.jpg
    24339500056_e04a588727_c.jpg
    99.2 KB · Views: 231
Last edited by a moderator:
I am currently obsessed with the game (inbetween jobs atm, averaging 8 plus hours a day) and this is looking more and more amazing each time I check out the page! Look forward to seeing a physical thing!
 
What kind of total cost estimate will this bad boy next tallying? Any idea yet? Haha just curious with quality and function like this, its gonna run a very pretty penny.
 
I'd give one of my arms for this one. Which one you take is up to you. Awaiting your offer.

Jokes aside, this is such a wonderful project to watch. Betting my other arm that Bethesda will step in contact with you.
 
LoneWanderer:

Original estimate was between $700 and $800., The 3D printing alone being about half the cost. I am working to try to cut some of the cost, but not at the expense of quality or function.
ThePropBox:

Either arm? If I took your left you couldn't wear it. If I took your right you couldn't use it...but you could still wear it, so right it is!
I also hope that Bethesda takes notice and wants to help the project along. They just slapped a Vault-Tec logo on a $400 set of batteries connected to vibrators, so lets hope they will want to put their logo on their own design coming into reality.
 
Last edited by a moderator:
@LoneWanderer:

Original estimate was between $700 and $800., The 3D printing alone being about half the cost. I am working to try to cut some of the cost, but not at the expense of quality or function.
@ThePropBox:

Either arm? If I took your left you couldn't wear it. If I took your right you couldn't use it...but you could still wear it, so right it is!
I also hope that Bethesda takes notice and wants to help the project along. They just slapped a Vault-Tec logo on a $400 set of batteries connected to vibrators, so lets hope they will want to put their logo on their own design coming into reality.
What are you referring to with the $400 battery comment?

Sent from my XT1060 using Tapatalk
 
Last edited by a moderator:
@ThePropBox:

Either arm? If I took your left you couldn't wear it. If I took your right you couldn't use it...but you could still wear it, so right it is!
I also hope that Bethesda takes notice and wants to help the project along. They just slapped a Vault-Tec logo on a $400 set of batteries connected to vibrators, so lets hope they will want to put their logo on their own design coming into reality.

Fair enough, worth it tough!
Hahahaha I'm not sure but are you referring to the PipBoy edition of the game?! If yes, I didn't know they sell for that high of a price.
I'm quite sure that you're going to get your credits from them; just let them know in a short email what you're up to bulding right now and I'm quite certain they will check it out. A real-life working replica of their most iconic item of their most iconic franchise (Skyrim aside) won't get unnoticed!!
Credit where credit is due!
 
WatchMeSoar:

I was referring to the "Vault-Tec Subpac M2 Wearable Tactile Audio System" A $400 vibration pack. Basically re-hashing a very old product. Sure they added Bluetooth, and a battery. But for $400 it better be able to give me a bruise from getting hit by a super sledgehammer.

I bought one of these gimmicky vibration devices over a decade ago, it was called the "Aura Interactor" and apparently you can still get one for $25, I bought it for that price at a goodwill shop. The guts of it are still somewhere in my parts bin.

Since both products use an analog audio feed, I am willing to bet is has the same issue of of passing through any and every low-frequency noise as a vibration. Which means every time a super-mutant talks with its low voice, it will feel like the the sound of God is thumping through your back. Open a hydraulic door in the game? It will feel like you just activated a small earthquake. Also, having the vibration on your backside when the action is happening in front of you is also a major disconnect. Hense why I think these things are just a gimmick. Over the years people have tried making directional versions of these things. Some actually interfaced with the games hit code. However typically they only work for one or two games, and quickly disappear off the market.

Also, for anyone thinking the Oculus Rift is a new concept? Well Bethesda's first ever game "Terminator Future Shock" (1995) supported a few different 3D head-mounted displays.
That said, I am looking forward to seeing if the Oculus Rift actually delivers with AAA game titles. I want to use one, but not for just Wii style games.
ThePropBox:

I know some people at Bethesda are aware of the project (and have posted on this thread). But I will push this more once I actually start bringing this together with 3D printed parts. Also, they don't have the same leverage over their assets like Valve does. Their assets are technically owned by the ZeniMax Media company.
 
Last edited by a moderator:

Your message may be considered spam for the following reasons:

If you wish to reply despite these issues, check the box below before replying.
Be aware that malicious compliance may result in more severe penalties.
Back
Top