Female WW2 Captain America [Pic Heavy]

outatime26

Active Member
Hi there
So this is one of my two costumes for London Film and Comic con in July
I started both in late January and I've been meaning to post a thread on the forum for a while but now it majority of it's finished I thought I'd start one up

I wanted to go for Cap's WW2 outfit with his first shield. So I started off with the major components, ie the shield and the helmet, seeing as they would make or break the costume.
The shield was originally made out of a steel sheet metal, courtesy of my father, but I later found out I wouldn't be able to take it with me around the con for obvious reasons so I needed a thinner lighter material that I would be deemed safe to take around the con. In the end I used the back off an old frame from IKEA.

Here's it after it's been cut out. I used a curved piece of wood which was then screwed to the back of the board to keep the shape of the shield. The screws were then covered up with a light layer of bodyfiller.


Here's it after a layer of black and then silver paint.


I then used vaseline to mark out bits where I wanted the paint to flake off. Then I proceeded to give it a coat of white, repeat the vaseline technique, tape it off and add a coat of red.


After the coat of red I realised the stripes were too far up and there wasn't enough room for the blue and the stars so I remeasured everything, taped off the new line for the blue, taped off the stars and then went straight to painting the blue layer.

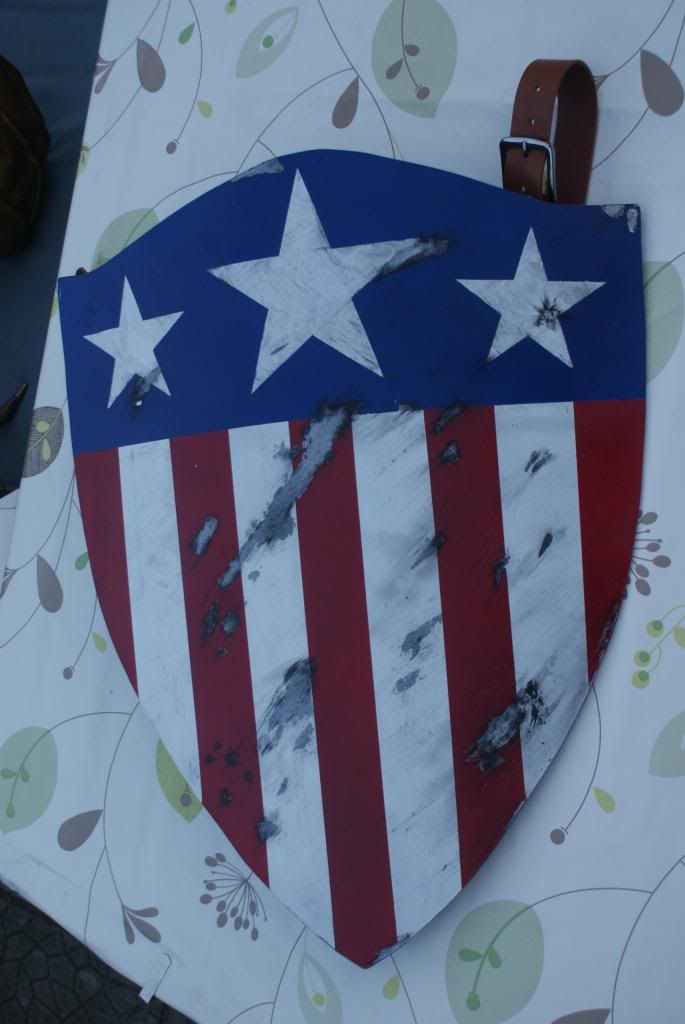
After weathering it this is the finished result.


So far so good :)
 
Hi there
So this is one of my two costumes for London Film and Comic con in July
I started both in late January and I've been meaning to post a thread on the forum for a while but now it majority of it's finished I thought I'd start one up

I wanted to go for Cap's WW2 outfit with his first shield. So I started off with the major components, ie the shield and the helmet, seeing as they would make or break the costume.
The shield was originally made out of a steel sheet metal, courtesy of my father, but I later found out I wouldn't be able to take it with me around the con for obvious reasons so I needed a thinner lighter material that I would be deemed safe to take around the con. In the end I used the back off an old frame from IKEA.

Here's it after it's been cut out. I used a curved piece of wood which was then screwed to the back of the board to keep the shape of the shield. The screws were then covered up with a light layer of bodyfiller.
[url]http://i134.photobucket.com/albums/q88/burnyourfriends26/03062013627_zps604dbda8.jpg[/URL]

Here's it after a layer of black and then silver paint.

[url]http://i134.photobucket.com/albums/q88/burnyourfriends26/03062013628_zps654ad4af.jpg[/URL]

I then used vaseline to mark out bits where I wanted the paint to flake off. Then I proceeded to give it a coat of white, repeat the vaseline technique, tape it off and add a coat of red.
[url]http://i134.photobucket.com/albums/q88/burnyourfriends26/05062013629_zps4457f51e.jpg[/URL]

After the coat of red I realised the stripes were too far up and there wasn't enough room for the blue and the stars so I remeasured everything, taped off the new line for the blue, taped off the stars and then went straight to painting the blue layer.

After weathering it this is the finished result.
[url]http://i134.photobucket.com/albums/q88/burnyourfriends26/shield_zps59ceb475.jpg[/URL]
[url]http://i134.photobucket.com/albums/q88/burnyourfriends26/05062013630_zps4b95f4a9.jpg[/URL]


So far so good :)
this is absolutely gorgeous work. Great job ill be following
 
That weathering is brilliant...I'd like to see your method for fleshing it out if you have any pics.

Fleshing it out?
Erm, after all the paint was added I basically just did a dry black cover. I used a tiny amount of black paint rubbed it on a piece of paper to remove any excess and just rubbed it around all the weathered areas. Then I added a thicker layer under the bottom of all the scratch marks and rubbed it diagonally with my thumb to create a kind of scuffed effect.
Hope that helps :)
 
Last edited:
So the helmet is completely finished and suitably battle damaged. Didn't want too much damage on this one because I just couldn't bring myself to do it, so I just scuffed it up a bit and made it look worn.


Some better pictures of the shield just because I added a bit more weathering around the edges of the silver and I seriously love this thing


Great work did you just draw around your original shield onto the wood panel or did you get it from a template please? fantastic work well done :D
 
That shield is amazing!!
I am starting my Capt WWII shield soon and this gives me so much more of a push

Love the Vaseline trick!

Will be keeping my eye on this one for sure

keep up the amazing work!!
 
I just used a photo of the screen used shield that was sold at auction. The measurements were on there so I just scaled everything up to fit my shield. It was pretty simple to do once I found the right images.
 
Lovely shield, I'm liking the battle damage on it, really makes it pop and the helmet looks great as well.
 
So finally finished with all the leather dye work
So the boots
Before


After


And the jacket is all finished now. A great find for only £3.70, alls it needed was a bit of leather dye and it shaped up perfectly.
Before. (The grossest yellow colour I've ever seen in my life)


After


And, I found the exact goggles that cap wore in the first avenger at flea market for £12. Bargain.


I'll be using a leather pocket belt I bought. It's not screen accurate but I'm not going for 100% accuracy anyway, plus it's cute and it looks awesome with the rest of the leather.
 
I am absolutely loving this! Fantastic work and I can't wait to see the whole ensemble together!

...pardon the eleventy!!1!!. I apparently have had too much sugar to be playing on the boards today... ;)
 
I've decided that I don't want to go down the blue shirt with appliqued star and stripes route. So I'm taking inspiration from the "scaled" look comic cap shirt to add more texture to the costume.
To make it more feminine I'll be adding the scales to just above the underbust then I'll be adding a red and white striped underbust corset to finish it all off.

Here's the shirt so far.
 
Back
Top