You are using an out of date browser. It may not display this or other websites correctly.
You should upgrade or use an alternative browser.
You should upgrade or use an alternative browser.
Death Star Micro Tiles + Trench Run (STL files V8 available)
- Thread starter monsterpartyhat
- Start date
-
- Tags
- death star scratchbuilt
That would be uber cool, tiles that interlock with lego plates!I watched your vid 5 times over and I'm giddy
monsterpartyhat
Sr Member
Got a few rounds of updates to the project.
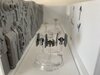
First, I got some rebel ships from the Fantasy Flight Star Wars Armada game. Rebel Scale puts them at about 1:600 to 1:950 scale, and I think they look really pretty good with these tiles. Really looks like you could actually fit three fighters in formation in this trench.


First, I got some rebel ships from the Fantasy Flight Star Wars Armada game. Rebel Scale puts them at about 1:600 to 1:950 scale, and I think they look really pretty good with these tiles. Really looks like you could actually fit three fighters in formation in this trench.
Attachments
monsterpartyhat
Sr Member
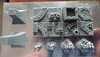
Second, someone at Form Labs printed out a set of tiles on a Form 2 and sent me these wonderful photos. I love how they turned out! It gives me a lot more confidence in modelling more tiles and parts for 3D printing.


monsterpartyhat
Sr Member
I just uploaded an update to the set of STL files -- once again, you can download them all here: Death Star Micro Tiles - monster.party.hat
There are release notes at the link, but in summary:
* Turrets! I haven't printed these, and they *do* get warnings about self-intersecting faces in one of online printability checkers, so YMMV. The engraved detailing on the slanted sides is tricky.
* 8 new 20x20 tiles
* 1 new 20x40 tile
* 1 new 40x40 tile
* Blanks, if you want to print out just the base and experiment with kit bashing new tiles to fit (you could, of course, cut them out of styrene too, like I did)
I believe this brings the total number of tiles, not including blanks, to 52. This will probably be the last STL update for a while, as I'm going to concentrate on finishing this project and a few others I have going.
monsterpartyhat
Sr Member
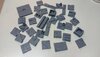
The faces of the tiles look so clean when printed flat like that! It's nice to not see print lines on them.
Thanks again for posting the tile files. I have started printing them to follow your lead and make my own version of the trench run. I also found an X-wing, TIE and X-1 STL files and printed them at about 1:1000 - which at 60mm wide seems to work with the published trench width of about 59M. The camera in my phone does not do them justice, they have extremely fine detail - especially the X-wing cannon tips.
30 tiles printed - only about 200 more to go.....
Wow - my workbench is dusty.....
30 tiles printed - only about 200 more to go.....
Wow - my workbench is dusty.....
monsterpartyhat
Sr Member
Thanks so much for posting your prints! I'm thrilled to see people having success printing them; yours look great. What were they printed on?
monsterpartyhat
Sr Member
So, here's a quick digression from the main trench run build, but it's very cool. My wife and I recently got new electric toothbrushes from Quip, and they came packaged in this long test-tube shaped container with a screw cap at the end. It looks like a very long, thing glass display case like you'd use for a small diorama or a fancy clock.


Hmmmmmmm, I says. The opening measures 21.5mm. My Death Star tiles are 20mm wide....

So, let's cut out a strip of styrene to fit....

And pick some tiles....

Yep, that'll do!

Now gotta work on mounting it to the screw cap base...

Lots and lots of CA glue gel later....

Looks cool already!

Hmmmmmmm, I says. The opening measures 21.5mm. My Death Star tiles are 20mm wide....
So, let's cut out a strip of styrene to fit....
And pick some tiles....
Yep, that'll do!
Now gotta work on mounting it to the screw cap base...
Lots and lots of CA glue gel later....
Looks cool already!
monsterpartyhat
Sr Member
I put a rectangular styrene tube on the bottom for rigidity.


The visible end is mitered (and later filled), and I put a small length of tube on the end to keep it propped up and level, so the run of tiles doesn't sag downwards inside the tube when it's horizontal. Then I started greebling it with pieces of sprue for piping and some of my cast Bandai parts.

The visible end is mitered (and later filled), and I put a small length of tube on the end to keep it propped up and level, so the run of tiles doesn't sag downwards inside the tube when it's horizontal. Then I started greebling it with pieces of sprue for piping and some of my cast Bandai parts.
monsterpartyhat
Sr Member
I also used some guitar string and random pieces of photo-etch to add additional detailing to the underside.


monsterpartyhat
Sr Member
This has actually been done for a few days, I've just not had time to finish writing it up. I painted the tile structure - first primed the whole thing in black, then the tiles on the upper surface got painted light gray with Tamiya Fine Surface Primer gray, leaving some areas with shading from the black primer, then washed with Flory's clay based washes.
The underside side is base coated in the red oxide Tamiya Fine Surface Primer, which I think is the perfect Death Star sub-structure color.
For ships I used fighters from the Star Wars Armada game, which rebelscale.com puts at between 1:600 and 1:950 scale. The TIE fighter was too tall to fit through the bottle opening, so Darth Vader has to go it alone on this one.
Similar threads
- Replies
- 6
- Views
- 1,411
- Replies
- 15
- Views
- 1,777
- Replies
- 18
- Views
- 2,444