You are using an out of date browser. It may not display this or other websites correctly.
You should upgrade or use an alternative browser.
You should upgrade or use an alternative browser.
COMPLETED -- Converting the FX toy X-Wing
- Thread starter PHArchivist
- Start date
That's no toy... it's a space fighter! :cool
Gold Leader
Active Member
That is pretty fracking sweet.:cool
You've done a fantastic job of bringing this up to spec.
You should be immensely proud.:thumbsup
You've done a fantastic job of bringing this up to spec.
You should be immensely proud.:thumbsup
PHArchivist
Master Member
Thanks for the compliments guys!
It's been a lot of fun doing this and I hope to have helped out and/inspired a few!
It's been a lot of fun doing this and I hope to have helped out and/inspired a few!
vaderdarth
Master Member
absolutely inspired!!!! ")
Excellent work :thumbsup :thumbsup
PHArchivist
Master Member
Thanks one and all for the compliments!
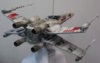
To sum up this build for those who haven't seen or read the other thread on the RPF (its huge!):
This was mainly accomplished by replacing parts that easily identified it as the well-known toy. Starting from front to back:
--Nose cone: I cast the original in resin (it matches the large-scale Red 3 only, not the 1:24 ILM models) and then remastered it to the correct shape.
--Hull: All screw holes and landing gear holes were filled, and all the toy mechanisms (levers, motors, lights) were removed).
--Canopy: clear plastic was cut out
--Cockpit: Replaced with an Icons cockpit cast
--R2: Replaced with R2 from 1:24 Jedi Starfighter model R2
--R2 strip: Replaced with studio scale cast
--Butt plate: Holes filled and some parts replaced with casts of original parts
--Engine nozzles/turkey feathers: Replaced with casts of Maxi-Brute model rocket nozzles, correct actual heat sinks inserted
--Wing interior surfaces: Sheeted with styrene, panel lines penciled-in
--Cannons: Original bodies, gaps filled; brass tubing for barrels
--Plus a few other "secret ingredients" (stuff too minor to really bring up)
What I didn't do that I could to further enhance the project
--Create actual panelling for wing interior surfaces so panel lines would be real, versus drawn on*
--Fill all original panel lines and either re-scribe or re-panel fuselage and upper wing surfaces
--Remaster cannon bodies so as to be able to incorporate correct, real heat sinks*
--Light model
--Cut open rear (fixed) portion of canopy*
*Items I will most likely do on my next conversion (Red 1 or Red 3)
Last edited:
PHArchivist
Master Member
No.
I own a CC kit (which uses an Icons cockpit cast) I purchased directly from the maker that I am more or less "parting out" to other X-Wing projects. I also paid for an R2 strip and some other parts long ago from another member who had made an earlier attempt at converting this toy.
The only castings I've sold are those of the Maxi-Brute engine cans, and the FX nose cone I re-mastered myself.
PHArchivist
Master Member
MORE PICS!! I want more pics!!!!
I'll have to see what I can do!
You did see page one, first post thouh right...?
I'll have to see what I can do!
You did see page one, first post thouh right...?
Actually, I didn't see those. :$
Are you going to put a pilot in?
rmschneider104
Sr Member
Very, very cool.
tgreco
Sr Member
Hey Rob
when you did the final assembly, did you remove the mechanism for the wings and prop them open (which is what I planned on doing) or did you figure something else out?
finally got my cannons done this weekend, and did the plumbers epoxy for attaching the nose (man, I hate working with that stuff... you stick to everything you touch for hours)
so mine should be ready to go under the airbrush with just a little more work...
Last edited:
Similar threads
- Replies
- 6
- Views
- 800