You are using an out of date browser. It may not display this or other websites correctly.
You should upgrade or use an alternative browser.
You should upgrade or use an alternative browser.
Captain Marvel Build - NEMA
- Thread starter Sni9er
- Start date
-
- Tags
- avengers captain marvel marvel
well good evening ladies & gents! today has been a very productive day!!


I started by finalizing the spine plate, and threw it over to netfabb for splitting and printing!

.png")


it contours really well to the spine and looks the part! *cheers*
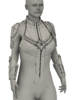
I also detailed up the shoulder in zbrush and I'm quite pleased with it, it's far from perfect but it has the detail where it counts


It's running on the printer as we speak! (well.. as you read my erratic posts!!)
and for part three of my successful day so far is the gaunts, really happy how quick they actually came together
this will leave me more time to spend completing all the knees and shins we thought I might have to skip due to our time constraints


and a pass-through Zbrush!

the front/back is queued up for print tomorrow morning after the shoulder finishes up!
overall the cap is starting to shape up nicely!

Thanks for the support folks it means a lot!!
I started by finalizing the spine plate, and threw it over to netfabb for splitting and printing!
it contours really well to the spine and looks the part! *cheers*
I also detailed up the shoulder in zbrush and I'm quite pleased with it, it's far from perfect but it has the detail where it counts
It's running on the printer as we speak! (well.. as you read my erratic posts!!)
and for part three of my successful day so far is the gaunts, really happy how quick they actually came together
this will leave me more time to spend completing all the knees and shins we thought I might have to skip due to our time constraints
and a pass-through Zbrush!
the front/back is queued up for print tomorrow morning after the shoulder finishes up!
overall the cap is starting to shape up nicely!
Thanks for the support folks it means a lot!!
Attachments
Mad Monkey
Well-Known Member
That's amazing!
What's your print setup?
What's your print setup?
I
I'm running a lulzbot taz 5 and a formlabs Form2 for the high res stuffThat's amazing!
What's your print setup?
Mad Monkey
Well-Known Member
beautiful machines!!
Evening folks!
so today I spent my time printing and modeling .. .. there is a theme here haha I worked on the knees which took a surprisingly long time more so than the forearms I suspect because of the compound curves involved, it's not 100% but I'm happy with it at this stage I may have another pass, fun fact .. Each knee is not the same (well they are mirror images), they have an extra tab on the inside knee only:


you pesky costume designers you *waggy finger*
however, I plan to make it with the tab on the outside so only have to make one mold then cut the tab off the outer left/right from the finished casts


also, the forearm printed out great the x/y is a little tight so I'm reprinting at 110% scale on the X&Y Only (as the height on Z was fine as is)


next up I think I'm going to remake the spine plate having it in hand it just feels a little small and when I went back to my Kree suit ref (which is mostly the same it confirmed it for me


much wider and longer than my print, which is fine nothing wrong with a bit of back to the drawing board, fortunately, the sculpt work for the detail lines was minutes of effort also I think the sculpt lines looking at this pic could be a better angle for more accuracy
I think what's thrown me is my make human pose the kinks where the armpits are are absolutely inaccurate so I'm going to have to go with my gut here on this resize until I have it printed again!

The Shoulder armor came off the printer today also I'm really happy with how it came out for scale it sits nice and snug (and when in rubber will have some give to it!

I also had a wonderful PM from someone following the thread (i won't name unless they are silently watching but don't want to be known) pointing out an obvious inaccuracy on my chest concept!
right under my nose in the first few pictures, we can already see the detail below the belt is a separate part mounted to the pants!.. go figure!

Anyway I'm going to fix this the old fashioned way with a hacksaw hahaha I'll cut it after I do a waste mold and clean it up from there, this will also allow me to extend the front tail a little also meaning it will work great for folks with longer torso's also in the casts
thank you for spotting and pointing it out!!
all the best folks thanks again!! tomorrow I'm also going to tackle those overly but beautifully complex shin covers which look honestly a little terrifying to present me .. but hey that's future luke's problem ...crap it's after midnight .. it's now later on today luke's problem ...

Anyway, that's for later!! I'm going to head off and blow off some steam!! more tomorrow folks!!

so today I spent my time printing and modeling .. .. there is a theme here haha I worked on the knees which took a surprisingly long time more so than the forearms I suspect because of the compound curves involved, it's not 100% but I'm happy with it at this stage I may have another pass, fun fact .. Each knee is not the same (well they are mirror images), they have an extra tab on the inside knee only:
you pesky costume designers you *waggy finger*
however, I plan to make it with the tab on the outside so only have to make one mold then cut the tab off the outer left/right from the finished casts
also, the forearm printed out great the x/y is a little tight so I'm reprinting at 110% scale on the X&Y Only (as the height on Z was fine as is)
next up I think I'm going to remake the spine plate having it in hand it just feels a little small and when I went back to my Kree suit ref (which is mostly the same it confirmed it for me
much wider and longer than my print, which is fine nothing wrong with a bit of back to the drawing board, fortunately, the sculpt work for the detail lines was minutes of effort also I think the sculpt lines looking at this pic could be a better angle for more accuracy
I think what's thrown me is my make human pose the kinks where the armpits are are absolutely inaccurate so I'm going to have to go with my gut here on this resize until I have it printed again!
The Shoulder armor came off the printer today also I'm really happy with how it came out for scale it sits nice and snug (and when in rubber will have some give to it!
I also had a wonderful PM from someone following the thread (i won't name unless they are silently watching but don't want to be known) pointing out an obvious inaccuracy on my chest concept!
right under my nose in the first few pictures, we can already see the detail below the belt is a separate part mounted to the pants!.. go figure!
Anyway I'm going to fix this the old fashioned way with a hacksaw hahaha I'll cut it after I do a waste mold and clean it up from there, this will also allow me to extend the front tail a little also meaning it will work great for folks with longer torso's also in the casts
thank you for spotting and pointing it out!!
all the best folks thanks again!! tomorrow I'm also going to tackle those overly but beautifully complex shin covers which look honestly a little terrifying to present me .. but hey that's future luke's problem ...crap it's after midnight .. it's now later on today luke's problem ...
Anyway, that's for later!! I'm going to head off and blow off some steam!! more tomorrow folks!!
Last edited:
Mad Monkey
Well-Known Member
I'm. Always screw-ing over future me! Eff that guy
Edit: I had to edit screwing... Really...
Edit: I had to edit screwing... Really...
George
Master Member
Thanks for sharing this project in-depth.
May I ask whether this Make-A-Human software enables people to make their own custom 3D mannequin? This would be a welcome tool,as I struggle with utilizing 3d models in the creation of a custom muscle suit,in particular the torso,which always results in me having to free-hand the waistline
May I ask whether this Make-A-Human software enables people to make their own custom 3D mannequin? This would be a welcome tool,as I struggle with utilizing 3d models in the creation of a custom muscle suit,in particular the torso,which always results in me having to free-hand the waistline
Last edited:
Thanks for sharing this project in-depth.
May I ask whether this Make-A-Human software enables people to make their own custom 3D mannequin? This would be a welcome tool,as I struggle with utilizing 3d models in the creation of a custom muscle suit, in particular, the torso, which always results in me having to free-hand the waistline
Hey George!
Thanks for the kind words!! Makehuman is FAR from perfect but in a situation when you have nothing better (scan data etc) then this can be a godsend
www.makehumancommunity.org
you can put in a HUGE raft of measurements to match you just bare in mind bend points like arms etc may lose dimensional accuracy (which we faced) when using anything except the standard Da-Vinci style pose
there is a tab you'll want called "Measure"
in here you can click the area on the right side your interested like Torso:
from there on the left side, a new panel will appear with all the dimensions for you to input!
when you click on one of the values you can see where it takes the measurement from so you can be sure to match your measurements best, like I said it's not infallible but it's a great start if you don't have anything better
from there you can export the mesh (I Use OBJ) and then import it into your app just make sure you select the scale unit "decimeter" centimeter, inch, and meter have always given poorly scaled results for me in past attempts but as long as you know the height it should be (your height) it shouldn't be a big deal if it comes in wrong in your target app provided you have the ability to scale the item (which most every 3D App can!)
good luck can't wait to see what you come up with!! if it would be useful I may make a video for it on our youtube channel! MakeDaley
Stunning work, just speechless...
Thank you, sir! really appreciate the kind words!! I hope we can do it justice!!
small update for today the knee's came off the bed, looking good! also, check out the sweet 70-degree overhang with no support


yes the underside is a little rough but it won't be seen or used after molding so pretty happy it succeeded


also thanks to the wonder of modern parametric design* I was able to mod the spine plate with only a few downstream errors, so that's back on the bed printing as I type this missive!
Much Happier with this pas matches the original much better and hopefully in scale when I pull it off the bed!
*Look Up "Pure Blind Luck" & "Parametric Design Fails"
I met up with Phil today to discuss all things paint and samples so I handed him some of the cured foam and rubber samples for test painting next up we'll buy some stuff for testing and take a pass on them to see how it goes!
all the best folks and thanks again for the kind words, means alot!!
Attachments
Mad Monkey
Well-Known Member
Because I know you love pouring over more resources to get the details JUST right....
Because I know you love pouring over more resources to get the details JUST right....
thanks !!!
Good Evening Folks!
sorry, it's been a quiet week, in true fashion returning to my 9-5 job killed every creative cell in my body... I still worked on some small tasks but nothing major, most of the work was done by Karen who worked diligently to sand the smaller parts we intend to direct cast.
we checked the new neck part on gwyn and it looked great!

as well as a few content appropriate snacks

we did hash out a new duct tape dummy for Gwyn we may have overstuffed it but it will be workable!


the rest of the week Karen as I said sanded and filled away:


we only did a very light pass to deepen the detail lines and take the worse offenses away on the chest as we intended to do a waste mold


Friday came thankfully and I got my spark back so I dove in and got straight into setting up the waste mold after the discussion about the lower detail from the pants being separate I sawed off the detail and extended with some polymer clay as it is a waste mold it didn't need to be A grade perfect just close I made a base mount for the part with EVA Foam to work on and act as a spill for the silicone


once I was happy with the extension I began applying my silicone in the following qty/order (i will have a full video describing my process for anyone interested by the end of the month)
100ml Silicone Brushed Detail Layer
100ml Silicone Brushed
150ml Silicone (Thickened) Troweled
150ml Silicone (Thickened) Troweled
100ml Silicone (Thickened) Troweled
100ml Silicone Brushed
100ml Silicone Brushed
I then applied 3 layers deep worth of Plaster Bandage and let it set up


the mold came out great after a little cleanup and clipping to secure things it was good to go


*drumroll*
*drumroll*
*drumroll*
*drumroll*


Really really pleased how it came out for a waste mold part the process was actually a lot more economical than I had presumed
my calculations had it at:
EVA £5.00
Glue £2.00
Sticks £0.50
Cups £0.60
bandages £5.00
Silicone £8.72
Total £21.82
Personally, I think this is ENTIRELY worth it for the hours saved, it took me all in about 5-6 working hours (not counting curing times etc however in that time I could not have made as much progress as I did after part came out within 4 hours of the pull I was able to resurface the join marks re-establish the detail lines over the fills, sand one top half down removing 90% of the striations and I was able to begin detail sculpting on the detail lines .. I cannot stress how much of a pain this would be to sand into the 3D Master


this, in my opinion, has taken an average-good master 3D and taken it to the next level (personally anyway) in a very time efficient way!
 sculpting detail lines by hand in Resin is a Breeze!

Comparing sides right side the raw finish and the left the sculpted detail lines


SO excited to progress further!!
sorry, it's been a quiet week, in true fashion returning to my 9-5 job killed every creative cell in my body... I still worked on some small tasks but nothing major, most of the work was done by Karen who worked diligently to sand the smaller parts we intend to direct cast.
we checked the new neck part on gwyn and it looked great!
as well as a few content appropriate snacks
we did hash out a new duct tape dummy for Gwyn we may have overstuffed it but it will be workable!
the rest of the week Karen as I said sanded and filled away:
we only did a very light pass to deepen the detail lines and take the worse offenses away on the chest as we intended to do a waste mold
Friday came thankfully and I got my spark back so I dove in and got straight into setting up the waste mold after the discussion about the lower detail from the pants being separate I sawed off the detail and extended with some polymer clay as it is a waste mold it didn't need to be A grade perfect just close I made a base mount for the part with EVA Foam to work on and act as a spill for the silicone
once I was happy with the extension I began applying my silicone in the following qty/order (i will have a full video describing my process for anyone interested by the end of the month)
100ml Silicone Brushed Detail Layer
100ml Silicone Brushed
150ml Silicone (Thickened) Troweled
150ml Silicone (Thickened) Troweled
100ml Silicone (Thickened) Troweled
100ml Silicone Brushed
100ml Silicone Brushed
I then applied 3 layers deep worth of Plaster Bandage and let it set up
the mold came out great after a little cleanup and clipping to secure things it was good to go
*drumroll*
*drumroll*
*drumroll*
*drumroll*
Really really pleased how it came out for a waste mold part the process was actually a lot more economical than I had presumed
my calculations had it at:
EVA £5.00
Glue £2.00
Sticks £0.50
Cups £0.60
bandages £5.00
Silicone £8.72
Total £21.82
Personally, I think this is ENTIRELY worth it for the hours saved, it took me all in about 5-6 working hours (not counting curing times etc however in that time I could not have made as much progress as I did after part came out within 4 hours of the pull I was able to resurface the join marks re-establish the detail lines over the fills, sand one top half down removing 90% of the striations and I was able to begin detail sculpting on the detail lines .. I cannot stress how much of a pain this would be to sand into the 3D Master
this, in my opinion, has taken an average-good master 3D and taken it to the next level (personally anyway) in a very time efficient way!
Comparing sides right side the raw finish and the left the sculpted detail lines
SO excited to progress further!!
Mad Monkey
Well-Known Member
WOW thats amazing, glad to see its coming together!!!
Looks amazing. Can't wait to see the finish. Will you guys be doing comic con in the UK?
Thanks Six i'm fairly sure gwyn will indeed be hitting Cons with the costume we will probably travel to a few to assist with kit up and see the reception
Thank you,Sni9er!
Keep up the progress!
No problems!
GenGarivas
New Member
Great Job! Looks amazing!
Similar threads
- Replies
- 2
- Views
- 728
- Replies
- 2
- Views
- 531