Hey Guys!
So after me and a few buddies saw the trailer and thought about it more and more I want to kick off the documentation of a new project, Captain Marvel

I'm working in part of a team NEMA (North East Makers Alliance) as we figure if we work together we can make something really special!

So clockwise from "Quality Control Cat" we have:
I'd broken the layers down into 4 parts and after some discussion with the team we were all in agreement
Under-Layer: For Sweat and heat control in costume:

Mid-Layer: For flexibility & Arm Movement in costume so the arms sewn to a flexible zipped top:

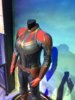
Waist-Coat: This is basically a sleeveless top for the ribs, stomach and back to be covered we dont have a ref shot of it entirely by itself but we can see it in the full kit up
Chest-Plate: were assuming this is Molded rubber more on that soon:

For the chest when we were looking at the hard parts i'd initially identified these as the molded parts of the costume:

however after some further looking and humming and more thinking the truth of it looks a lot more like this:

.....

my initial thoughts realising now how much I'd be biting off haha.. but I'm not one to shy away from a challenge so i decided it was best to totally ignore the hardest part and work on arguably the easiest part the glove details haha!
Modeled in SOLIDWORKS I took reference and approximated the sizing we will hone the scale on this more accurately before printing a master and molding this will be cast as a single piece of PU rubber and sewn into the leather gloving to best replicate that of the original!

it probably took me about 30 mins-45 mins just to play and get the scale how i wanted it and then i added a back plate for molding and base thickness

meanwhile conversation continued on fabrics and selections as we narrow down what we think looks best, I also ordered a range of PU foam and PU rubber samples to to some paint and feel tests with
Phil our Paint maestro begun playing with some golds and reds to experiment for the finishes

I decided it best not to avoid the most time consuming and complex part of the build any longer at this point and just give right in and get to work on the chest I'm modeling this in Fusion 360 as it has a great tool set for Sub-D for creating those more unusual organic shapes that i don't have the time to re-create in Solidworks, after a few hours of mashing out some general shapes i managed to get something i was reasonably happy with to match reference


At this stage I was happy with the surface and i went ahead and asked Gwyn for a full set of measurements I then made a replica Gwyn body in MakeHuman - www.makehumancommunity.org I'm not going to share that here because PG-13 hahaha
anyway with this it allowed me to tweak the base surface to match the female form better than the front elevation image alone that I had, modeling around [lady mountains]* I will say is a challenge on its own i was continually asking Karen who was sat next to me "does this look like it would be comfortable" haha
* (Apparently the B word is a bad word not even the *oob variation but the what i was quite tame *reast Variant!!)

after two days I'm probably at about the 15 hour mark here I'm not fully Fluent with F360 just yet but i'm getting there and happy with the progress
I spent some time experimenting in vain trying to model the star using Quads my brain just isn't programmed fully for that just yet! I knew i wanted to get Zbrush in the Chain at some point as it's something that has hung over me for a few years as I'd really love to get more proficient in it other than using just for detail lines surface textures and decimation after seeing such fantastically inspired production pieces by the likes of Sam Williams (TFA/Solo,R1 etc) if you don't follow him on Instagram go do it right now - @aristotles.lantern
I did some very rough work to give me a feel for if everything was in the right place i'm not get in a position to just finish the part here in zbrush but it's another step using ZB i'd never used before

granted this is the kree layout it's mostly the save save the wing details and an odd triangle i was pleasantly surprised with my rudimentary bashing and i may return later to do the layout and panel lines before finalizing i do want to keep that till last though as once i move into zbrush there is no going back (well not without loosing whatever i do in ZB, I love the Parametric nature of Solidworks and F360!
so i flipped back into Solidworks modeled it up and use the Flex tool to match the shape of the breast plate center (using a very low tec screenshot of a section view from the center of the plate/body) haha

Please don't judge me and my questionable modeling practices hahaha

the part came out great and my next few days have been spent laying out the hard panel lines that have steps as i can still get them done in F360 at this stage as well as working on the neckline which i retooled thanks to some great GREAT shots from My buddy Bruno in Brazil who snapped some ref for us at CCXP (FYI importing the Solidworks file into F360 was a doddle drop in the file with no weird export fiddling!!)


and of course cant skip a cheeky render!

I hope ahead it wont take me too long to finish up now on this part, i'll then print it FDM (SLA for the Star)and pass it off to Karen to Finishing and prep for molding which i'll do all at once with the team
I cant wait to share our developments as we have them and keep you up to date as we go!
So after me and a few buddies saw the trailer and thought about it more and more I want to kick off the documentation of a new project, Captain Marvel
I'm working in part of a team NEMA (North East Makers Alliance) as we figure if we work together we can make something really special!
So clockwise from "Quality Control Cat" we have:
- Karen - My Wife and part of =JJ= Industries - JJ Industries
- Suzzane - She will be helping us track our progress and make sure we stay on target for march!
- Phil - Suzzane's lesser half he'll be helping us on the Painting front, doesn't yet have a brand page but i'll link when he does!
- Gwyn - Our Own Captain she's also a sick seamstress and a great Costumer/Cosplayer and will be working on all sorts of patterns and fabric stuff!, one part of Seams Legit with Emma
- Emma - Seamstress extraordinaire and the other Piece of Seams Legit, we actually have passed each other for years but only starting to get to know each other now! - Seams Legit
- Some bearded guy: It me.. (I'll be heading up hard parts, design, 3d, molding, casting and bringing my own care and attention to the project!)
I'd broken the layers down into 4 parts and after some discussion with the team we were all in agreement
Under-Layer: For Sweat and heat control in costume:
Mid-Layer: For flexibility & Arm Movement in costume so the arms sewn to a flexible zipped top:
Waist-Coat: This is basically a sleeveless top for the ribs, stomach and back to be covered we dont have a ref shot of it entirely by itself but we can see it in the full kit up
Chest-Plate: were assuming this is Molded rubber more on that soon:
For the chest when we were looking at the hard parts i'd initially identified these as the molded parts of the costume:
however after some further looking and humming and more thinking the truth of it looks a lot more like this:
.....
my initial thoughts realising now how much I'd be biting off haha.. but I'm not one to shy away from a challenge so i decided it was best to totally ignore the hardest part and work on arguably the easiest part the glove details haha!
Modeled in SOLIDWORKS I took reference and approximated the sizing we will hone the scale on this more accurately before printing a master and molding this will be cast as a single piece of PU rubber and sewn into the leather gloving to best replicate that of the original!
it probably took me about 30 mins-45 mins just to play and get the scale how i wanted it and then i added a back plate for molding and base thickness
meanwhile conversation continued on fabrics and selections as we narrow down what we think looks best, I also ordered a range of PU foam and PU rubber samples to to some paint and feel tests with
Phil our Paint maestro begun playing with some golds and reds to experiment for the finishes
I decided it best not to avoid the most time consuming and complex part of the build any longer at this point and just give right in and get to work on the chest I'm modeling this in Fusion 360 as it has a great tool set for Sub-D for creating those more unusual organic shapes that i don't have the time to re-create in Solidworks, after a few hours of mashing out some general shapes i managed to get something i was reasonably happy with to match reference
At this stage I was happy with the surface and i went ahead and asked Gwyn for a full set of measurements I then made a replica Gwyn body in MakeHuman - www.makehumancommunity.org I'm not going to share that here because PG-13 hahaha
anyway with this it allowed me to tweak the base surface to match the female form better than the front elevation image alone that I had, modeling around [lady mountains]* I will say is a challenge on its own i was continually asking Karen who was sat next to me "does this look like it would be comfortable" haha
* (Apparently the B word is a bad word not even the *oob variation but the what i was quite tame *reast Variant!!)
after two days I'm probably at about the 15 hour mark here I'm not fully Fluent with F360 just yet but i'm getting there and happy with the progress
I spent some time experimenting in vain trying to model the star using Quads my brain just isn't programmed fully for that just yet! I knew i wanted to get Zbrush in the Chain at some point as it's something that has hung over me for a few years as I'd really love to get more proficient in it other than using just for detail lines surface textures and decimation after seeing such fantastically inspired production pieces by the likes of Sam Williams (TFA/Solo,R1 etc) if you don't follow him on Instagram go do it right now - @aristotles.lantern
I did some very rough work to give me a feel for if everything was in the right place i'm not get in a position to just finish the part here in zbrush but it's another step using ZB i'd never used before
granted this is the kree layout it's mostly the save save the wing details and an odd triangle i was pleasantly surprised with my rudimentary bashing and i may return later to do the layout and panel lines before finalizing i do want to keep that till last though as once i move into zbrush there is no going back (well not without loosing whatever i do in ZB, I love the Parametric nature of Solidworks and F360!
so i flipped back into Solidworks modeled it up and use the Flex tool to match the shape of the breast plate center (using a very low tec screenshot of a section view from the center of the plate/body) haha
Please don't judge me and my questionable modeling practices hahaha
the part came out great and my next few days have been spent laying out the hard panel lines that have steps as i can still get them done in F360 at this stage as well as working on the neckline which i retooled thanks to some great GREAT shots from My buddy Bruno in Brazil who snapped some ref for us at CCXP (FYI importing the Solidworks file into F360 was a doddle drop in the file with no weird export fiddling!!)
and of course cant skip a cheeky render!
I hope ahead it wont take me too long to finish up now on this part, i'll then print it FDM (SLA for the Star)and pass it off to Karen to Finishing and prep for molding which i'll do all at once with the team
I cant wait to share our developments as we have them and keep you up to date as we go!
Last edited: