Build: Greedo Killer: "Accurized" Denix

MastahBlastah

Sr Member
RPF PREMIUM MEMBER
So I'm finally getting around to posting the thread for my first build here on The RPF. I've decided to go with Han Solo's ANH Greedo Killer ... the blaster used to kill Greedo in the famous ANH cantina scene. It was of course a tough choice between this and the ANH Hero Blaster, but in the end I like the story behind the GK, and how it was used in just the one scene. Plus, I love the look of it and its significant size ...

37218303995_376e10f98c_k.jpg


If I had the money to do this on an MGC I would, but I don't, so I've purchased a Denix Mauser, which I intend to thoroughly sand down and refinish. Also, I was able to get in on BobaDebt's "Denix Accurizing Service" (Part of his ROTJ blaster project), which I'm quite excited about. The prototypes are looking great in the photos he's posted!

I've been acquiring parts slowly (mostly through eBay) over the past month or two. I have everything, save for the Scope Mount and Flash Adapter, which Scottjua has kindly agreed to take on for me! Here are some photos of what I've acquired thus far:


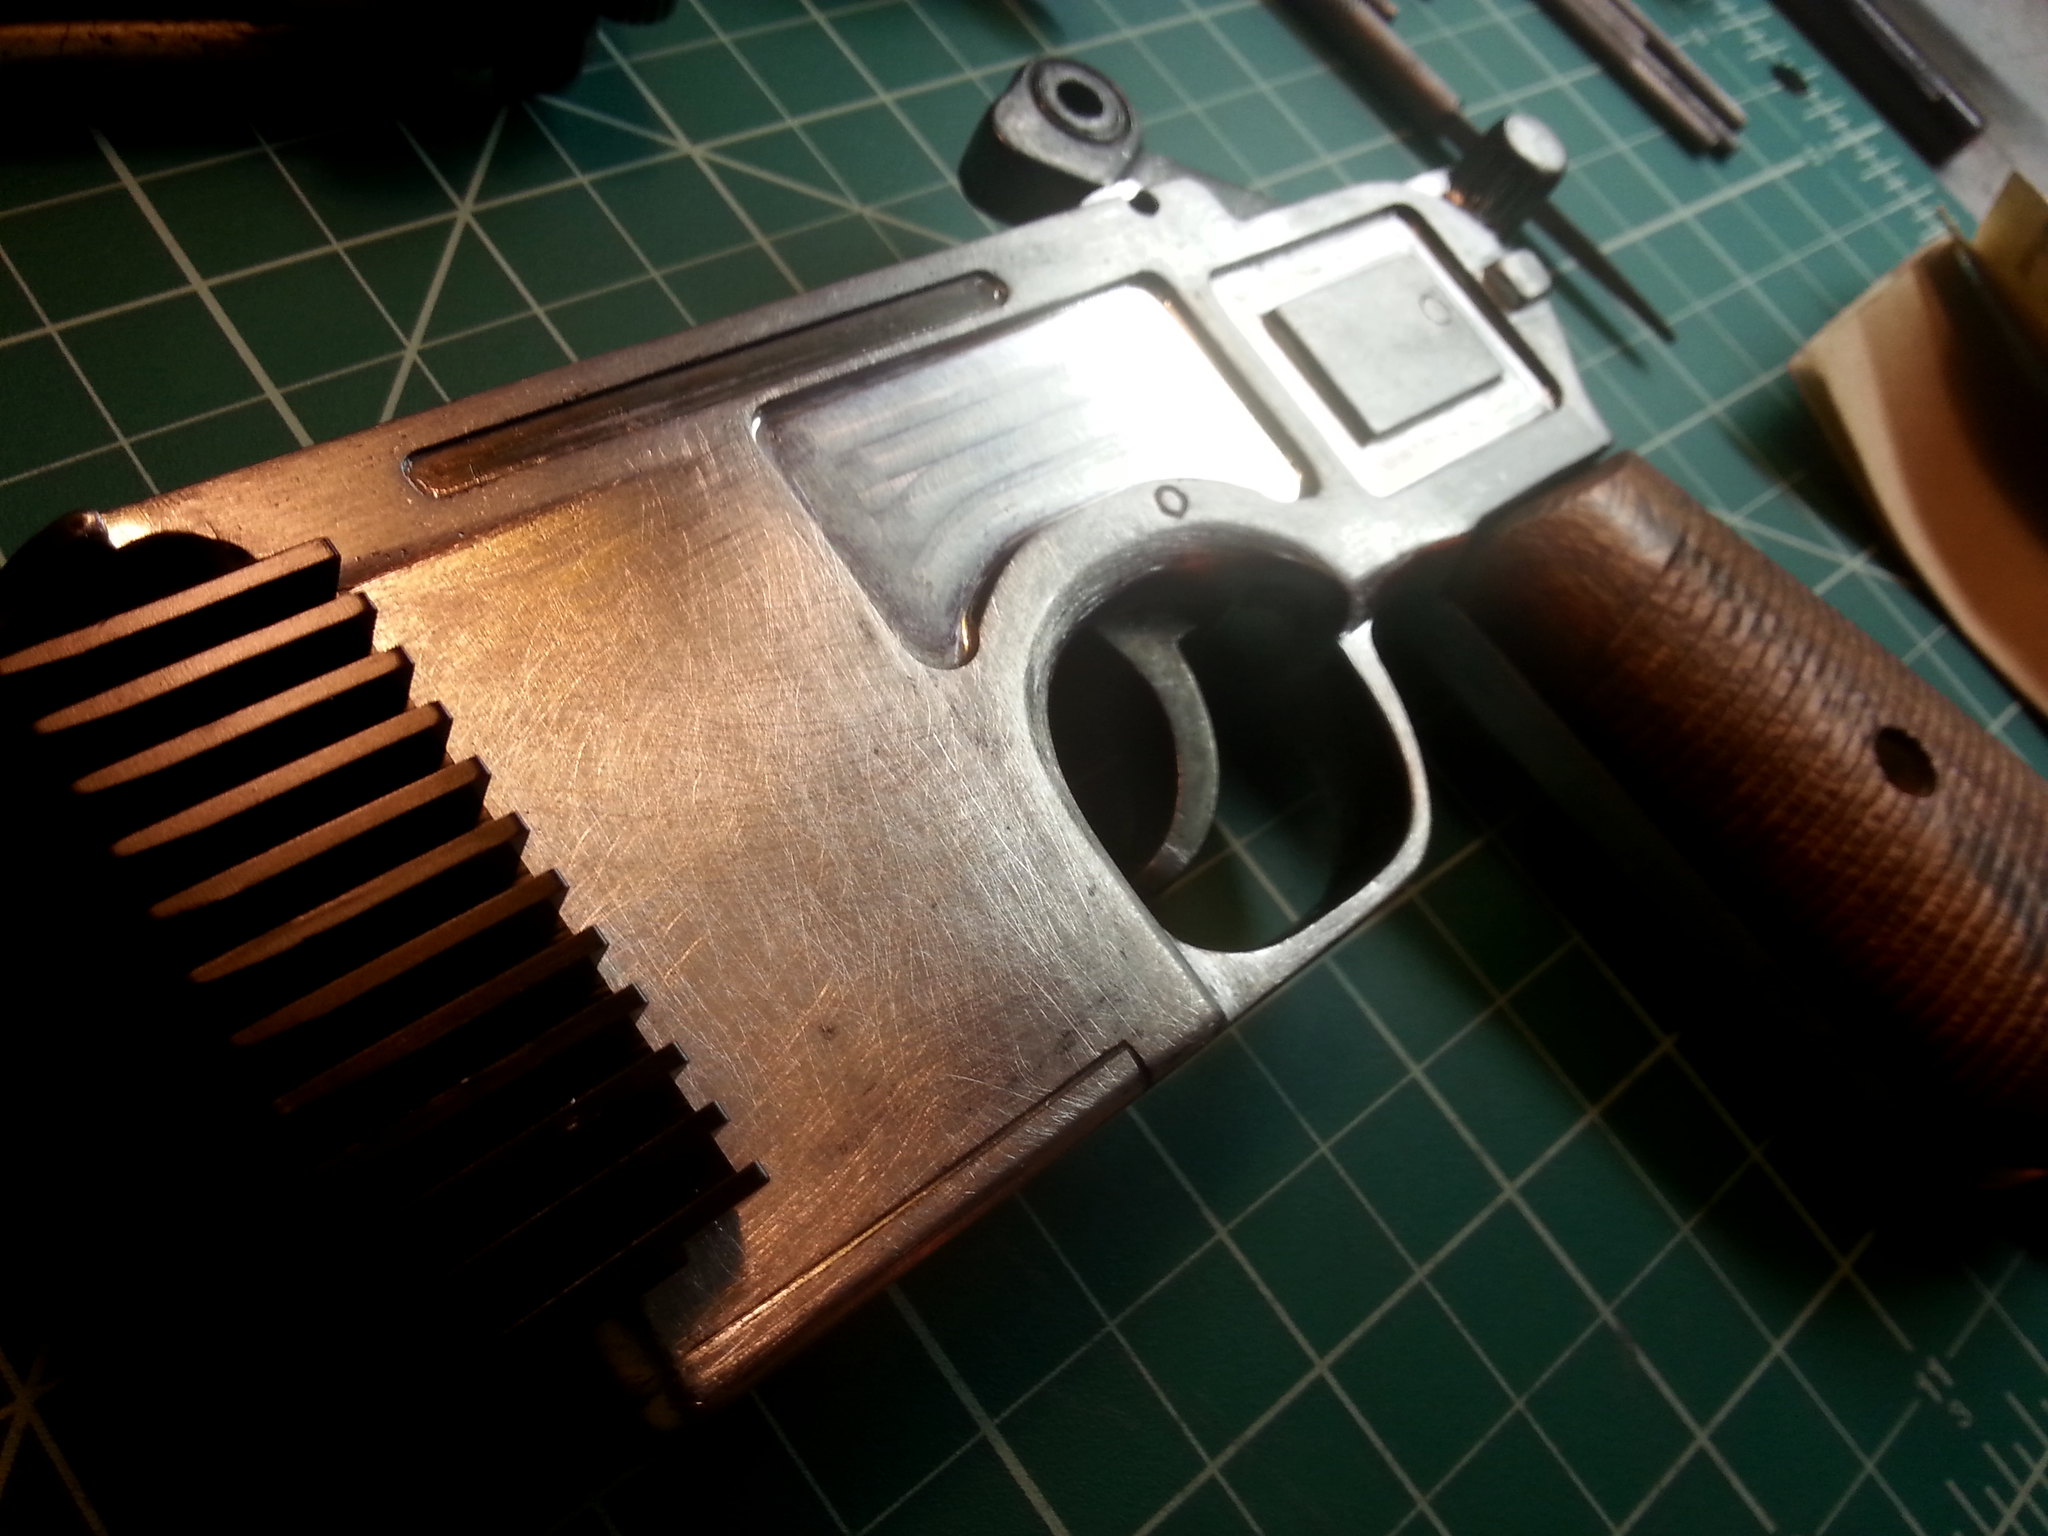
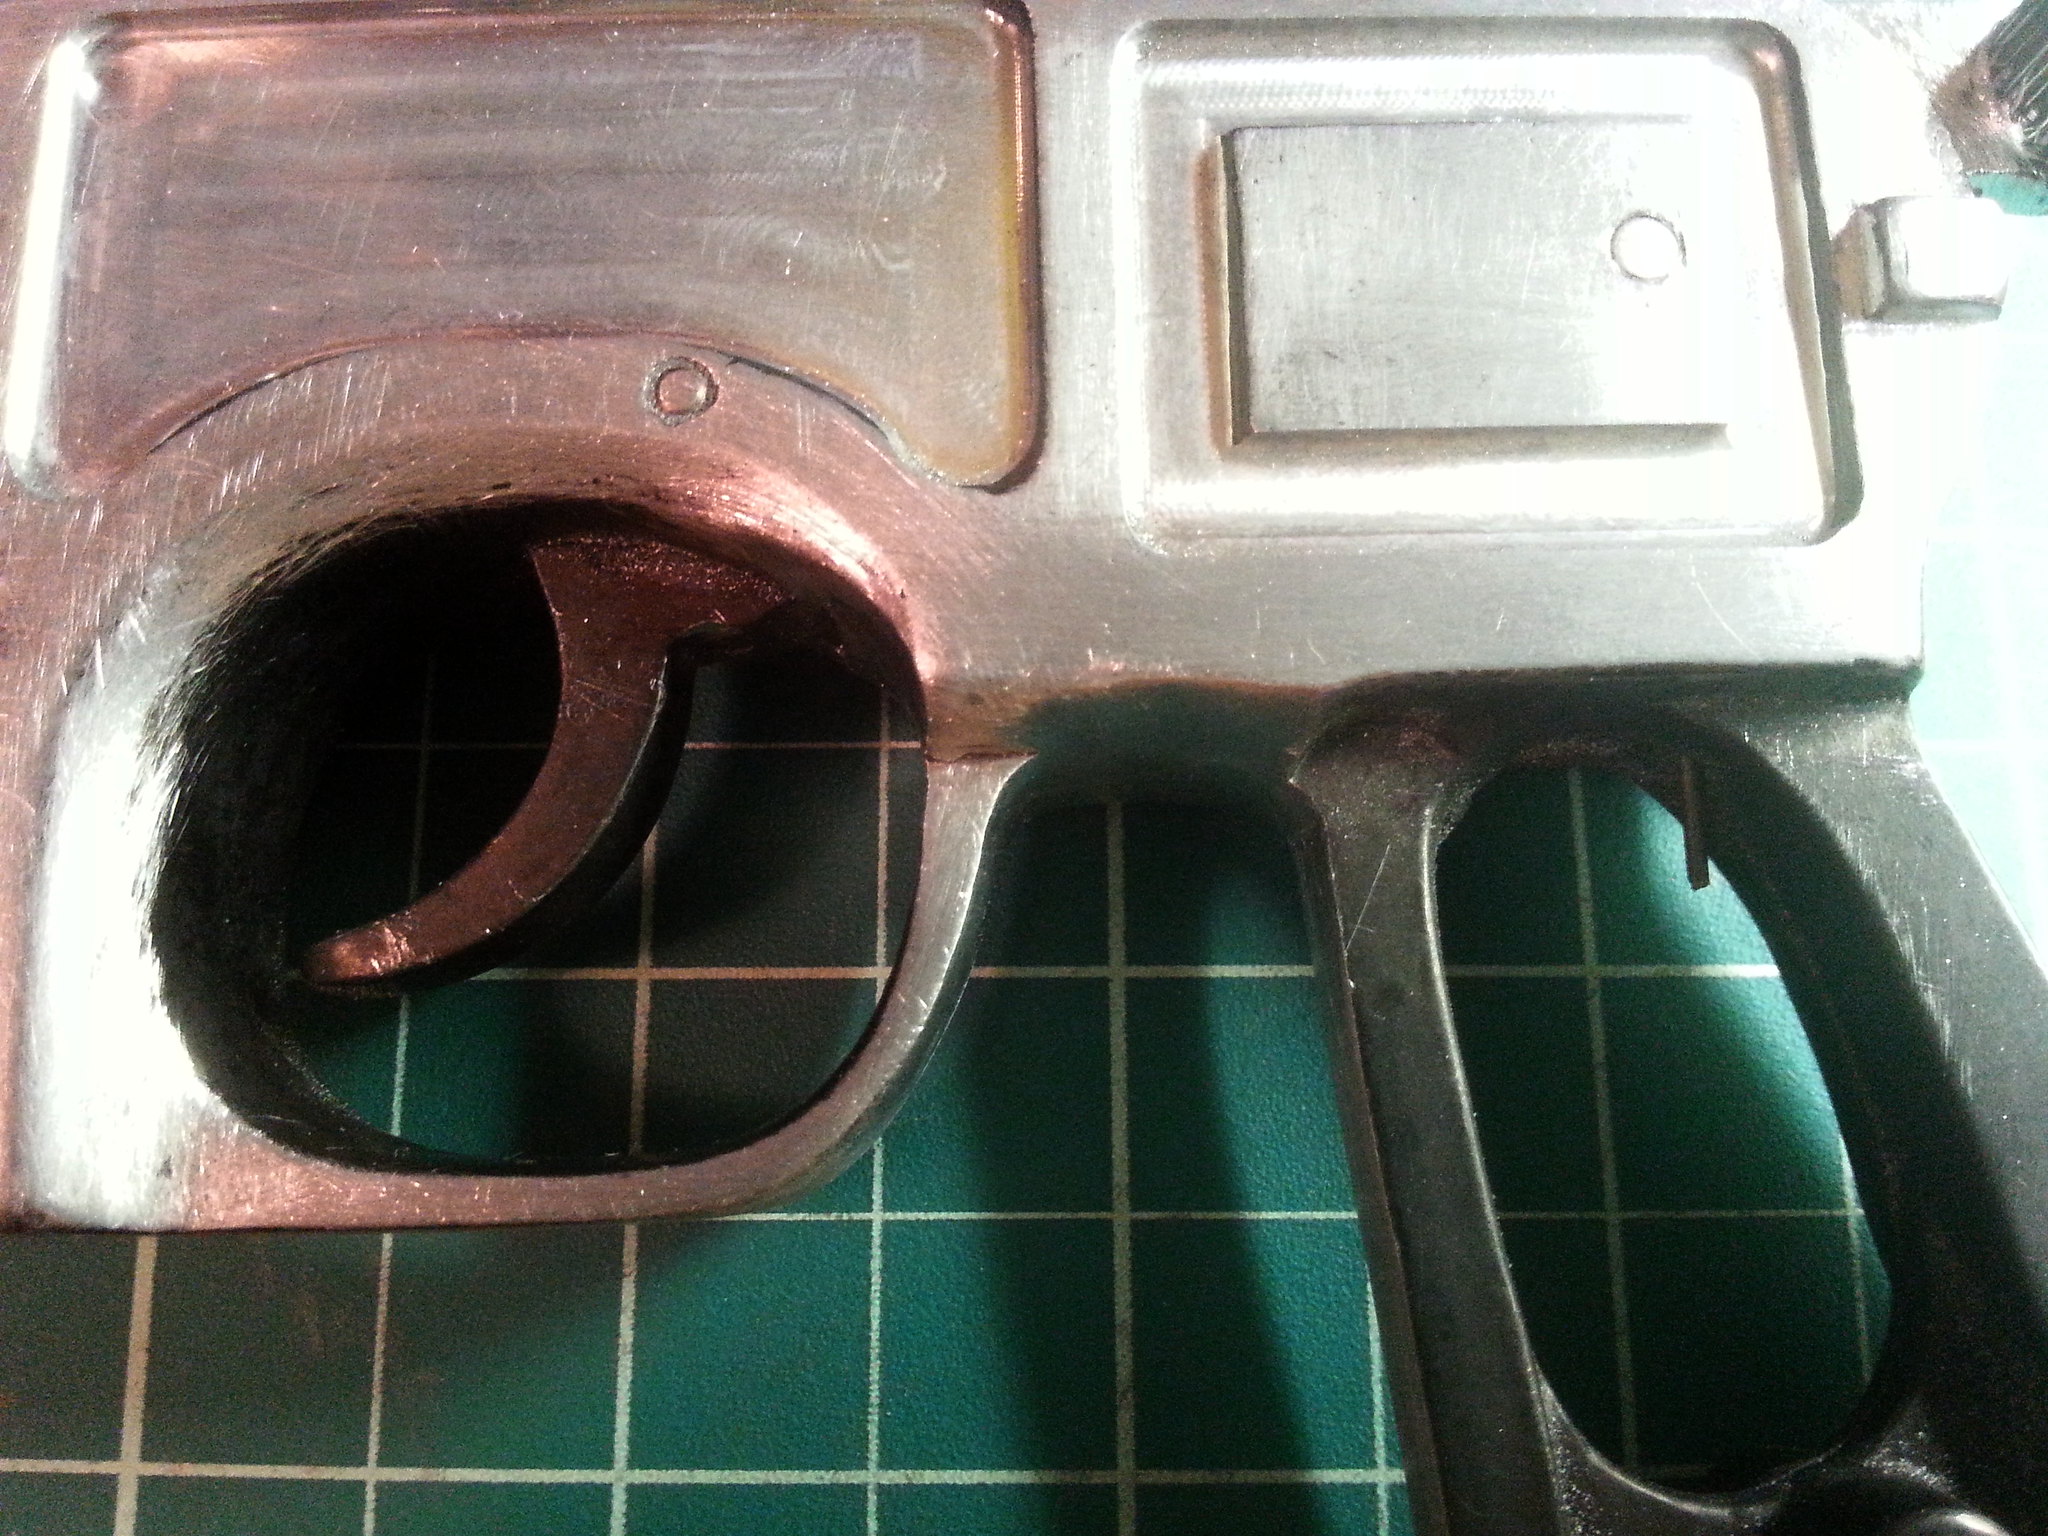
Denix Mauser To be refinished, with more accurate details milled in via BobaDebt's service.

37027882256_35eb98df1a_k.jpg


Original M9 Flash Hider ... Still in its Cosmoline Packaging. Cool!

37075804541_3c4780c6fb_k.jpg


37075806801_13cfaa6f8c_k.jpg


Corellian Exports Aluminum Grill ... This one has 12 fins rather than the correct 11, but it doesn't bother me enough to want to hunt down a new one just yet.

37075808681_af8baf4eaf_k.jpg


Vintage Weaver 1" Scope Rings ... I've seen other variants of these, one of which is slightly lighter and bluer, and doesn't have any lettering stamped on top. I think I might prefer that version to these, so I might look to replace them soon, but for now:

37027905136_8e4d390efd_k.jpg


Weaver K1.5-1 Scope ... Because I have little hope of finding the accurate Compac Super 4x31 Scope any time soon, I've decided to go with a good alternative used by others before me in their GK builds. I was able to find a good price on this Weaver K1.5-1, and I really like the look of it, so I am OK with this inaccuracy for now.

Edit: As much as I like this scope, I've decided to go with a replica Compac from the upcoming GK run from Solo's Hold and Scottjua.

37027906376_4078978da9_z.jpg


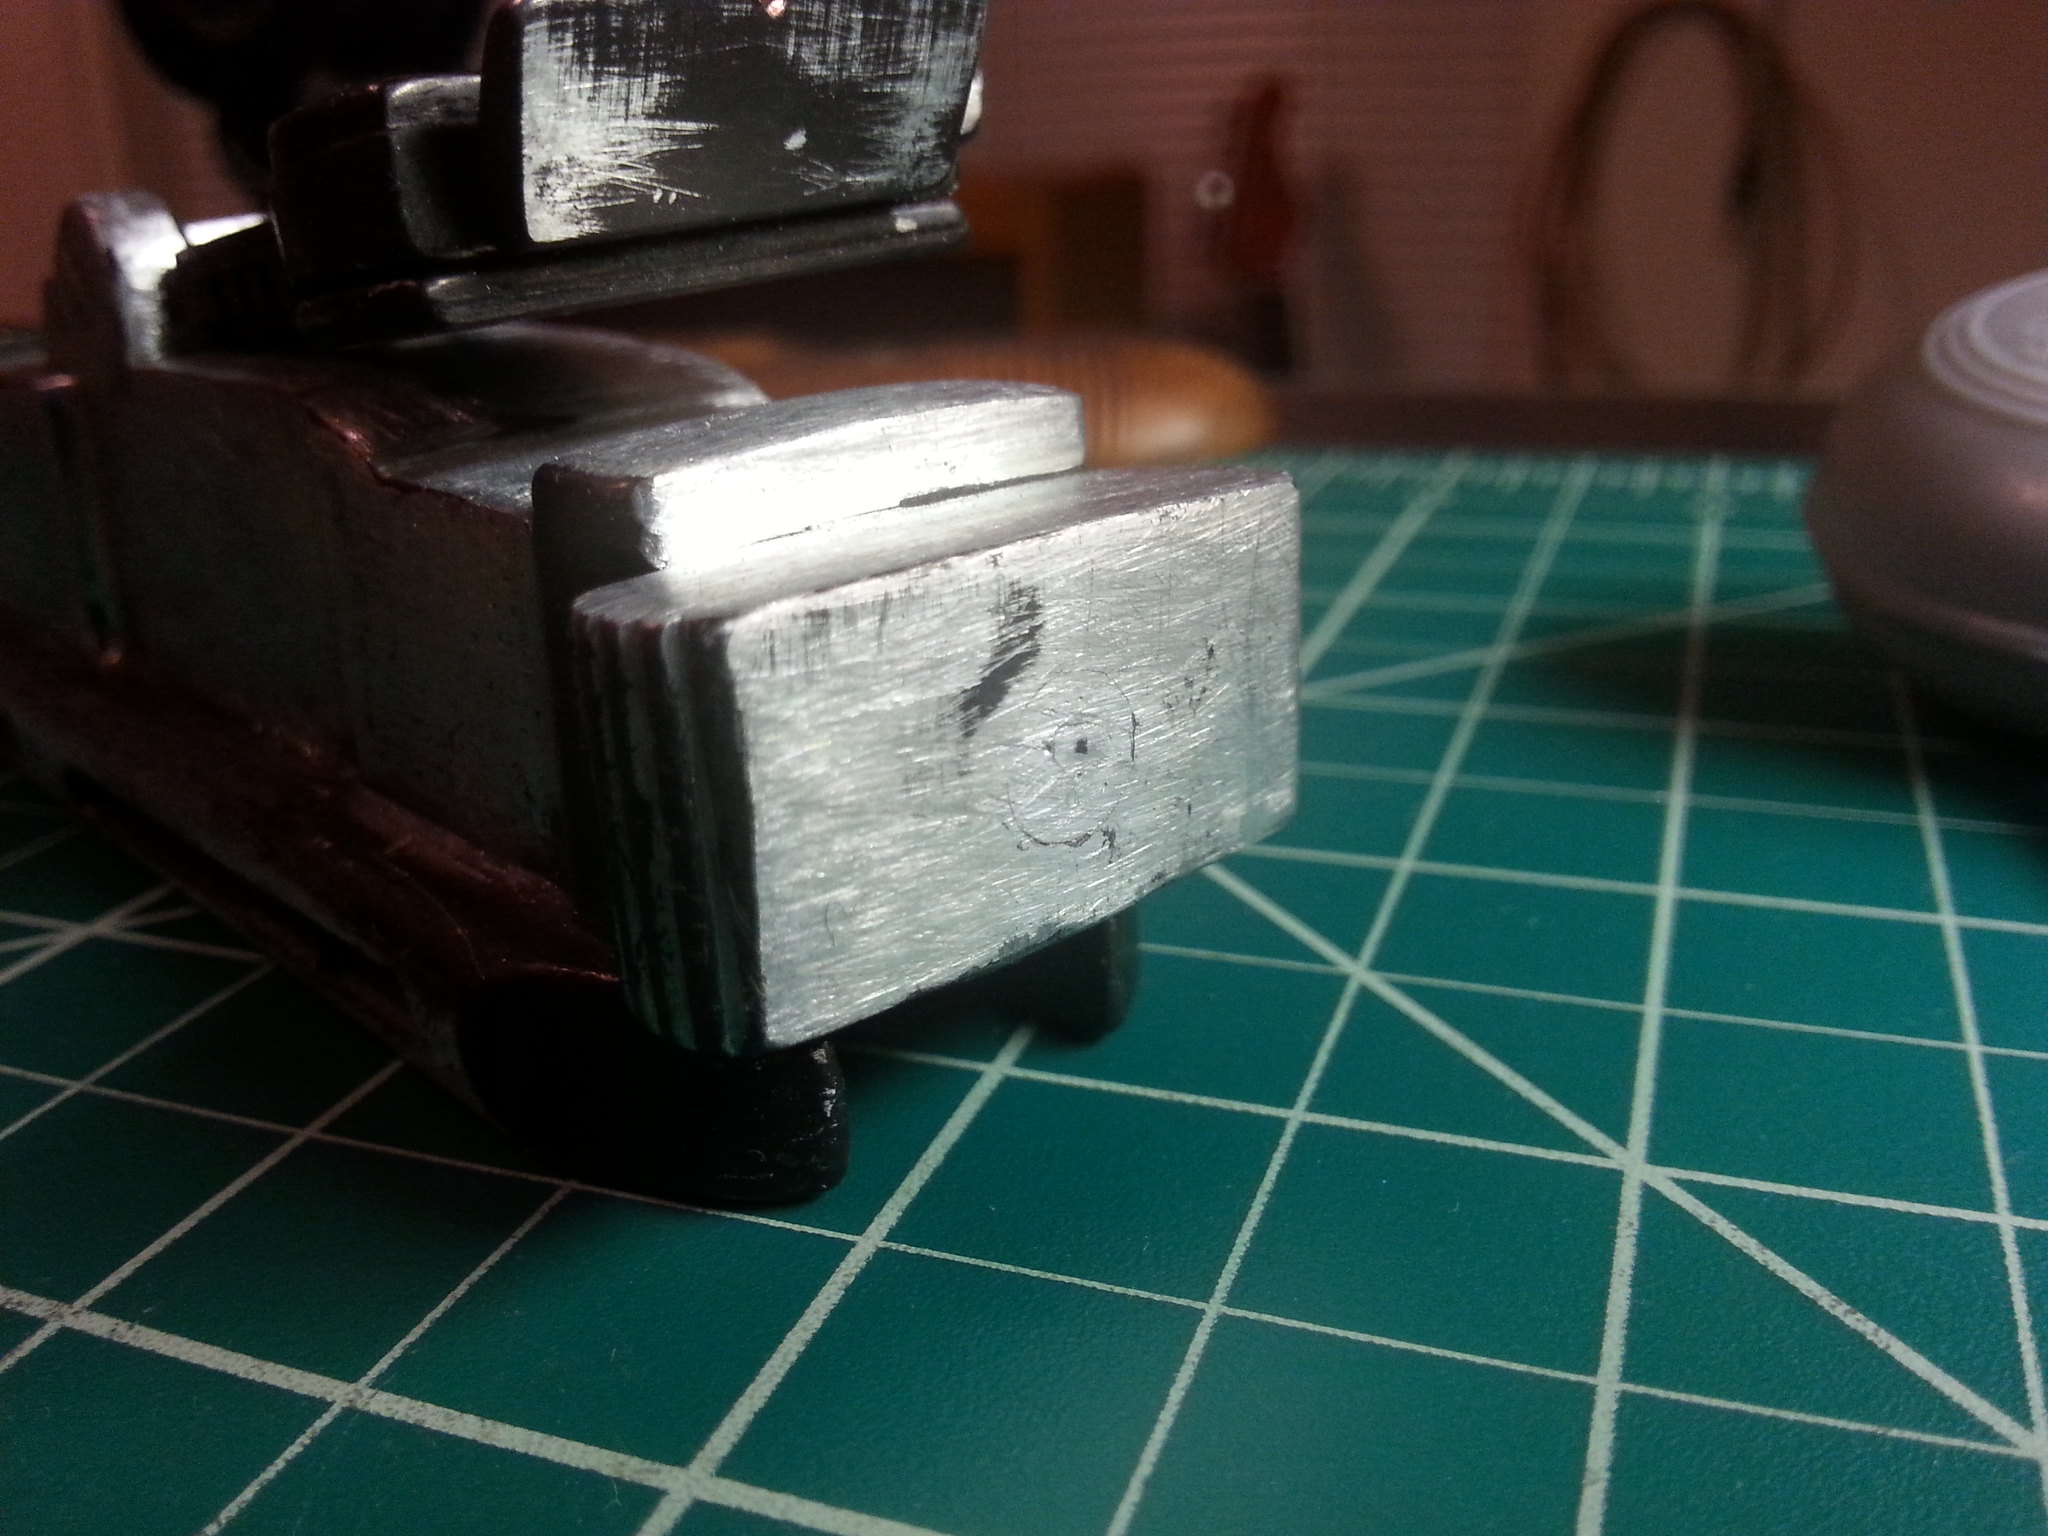
Aditionally, I've realized that this K1.5-1 has subtle differences to others I've seen used in GK builds or for sale on eBay that make it even closer in appearance to the Compac Super. For example:

The Knurled ring towards the front of the scope is closer in shape to that of the Compac.

37046308242_1ea6aeeb27_k.jpg


Also, the knurling on the adjustment knob caps is closer to that found on the Compac Super:

37027906926_3806960dc0_z.jpg


I'll be posting updates and photos as they come, but there's not too much work I can do until I get my Denix back from the shop. The Scope does however have some significant dust built up on the inside of the front lens. It doesn't affect your vision while you are looking through the scope, but you can see it when simply looking at the front lens. Does anybody have any experience taking these older scopes apart? I remember reading something about internal gases that can escape if you open them, so I am hesitant to crack it open just yet! Any advice will help! Thanks guys.
 
Last edited:
I like how you're coming along! Scott also has made some AWESOME Greedo Killer scope mounts in the past, so PMing him about that as well might be a good idea. I had intended to do a GK myself on an MGC ne day, but never got around to getting all of the parts, on difficulty of finding an accurate scope.

And, some advice in sanding and bluing a Denix: Sanding blocks work best for getting a smooth sanded surface that's LEVEL, instead of using sheets of sandpaper and your hands alone. Start with lower grits and work your way up higher and higher until you achieve a mirror finish. Before achieving a high level of polish, make sure to remove as much pitting as possible.

I would also recommend taking a round or half round file and widening the gap between the grip frame and the trigger guard. The Denix is VERY narrow and is quite uncomfortable to hold without modifications. Widening this gap not only makes it MUCH more comfortable to hold, but also more accurate: a real Mauser and an MGC have larger gaps there than the Denix.

For bluing, Birchwood Casey Aluminum Black produces the best finish, in my opinion. Heating the disassembled Denix just prior to bluing will produce nicer finishing. I experimented with this, and found the winning combination to be about 300 degrees Fahrenheit for 10 minutes inside of my mini oven. (Also, give the Denix a final polishing before heating will help too.) Apply the BC Alu Black with the finest grade steel wool that you can get for a more consistent finish. I was able to achieve a very dark-bordering on black-blue tone on my Denix. In direct sunlight, however, if looks VERY blue, which I like. Apply the Alu Black as many times as desired, until you achieve a satisfactory look.

Hope this helps! :D
 
Hope this helps! :D

Vanitas:

Thanks for the info! That is pretty much my plan, to a T, for refinishing the Denix. Been reading up on plenty of Dl-44 threads the past few months and this seems to be the best combination of approaches for cleaning up the frame/receiver. I had even read your "recipe" for preheating a Denix in my searches :)

I would also recommend taking a round or half round file and widening the gap between the grip frame and the trigger guard.

I was on the fence about widening the gap in front of the grip, because I was unsure of the level of skill it would take to do so, but might have to give it a go now that you've mentioned it as well.

Scott also has made some AWESOME Greedo Killer scope mounts in the past, so PMing him about that as well might be a good idea.

I've been in touch with Scott about a Scope Mount and Flash Adapter, so that is covered! I know he is super busy with other projects right now though.

Thanks for the comments, hope to keep hearing from you throughout the build!
 
Well thanks to you, I've now finally stripped the finish off my Denix GK. I'll need to pick up some BC aluminum black now :thumbsup
 
Nice start!

Yeah... I'm working other things in between my business, daddying, a full Obi Reveal replica, and blasters, so the mount will come.

As for the grill... I'll be working with Solo's Hold to hopefully make the accurate fins version a reality.

Kudos on the weaver scope. It's a great real alternative. Nothing like Looking through a real one.

Scott, I got the idea for the Weaver from your Denix build, so thanks! I agree, great alternative. I plan on weathering it a bit, if not trying to refinish it altogether. The Compac looks so black and glossy in photos, almost looks painted?

Good to hear about the Grill, I could see myself wanting to replace mine one day. I'll keep following your thread for it.

Thanks for looking!
 
The Scope does however have some significant dust built up on the inside of the front lens. It doesn't affect your vision while you are looking through the scope, but you can see it when simply looking at the front lens. Does anybody have any experience taking these older scopes apart? I remember reading something about internal gases that can escape if you open them, so I am hesitant to crack it open just yet! Any advice will help! Thanks guys.

Still wondering about this. I've googled the topic but could't find any info on my specific scope. Has anyone out there taken one of these or something apart or have any advice?
 
Check the project runs area, greedo killer grill run looking for interest. [emoji106]

Thanks, I've been participating on that thread as well, but although the proposed price of a new correct grill seems quite justified given the complexity of the piece and need for custom tooling, I simply cannot afford the upgrade at this time. I hope they get the support to have it made though!
 
OK ... so after practically a year of inactivity, I'm finally rebooting this build. I've gotten in on some GK parts from the latest run by SoloHold & Scottjua, so I'll be kicking it up a few notches. I've placed a deposit on the last remaining parts (Scope Mount & Flash Hider Adapter) and I decided to spring for the scope as well. I still stand by the Weaver K1.5-1 I had previously purchased for this build (see above), but I figured I'd most likely be kicking myself down the road when everybody else gets their Compac replicas in the mail to strap onto their GKs!

That being said, I got my Denix out of the closet, which had already been accurized thanks to Bobadebt. It still needs a bit of work, but I was able to get rid of the worst of the pitting on the lower receiver, and some on the top. I've still got more sanding/buffing to do, however. I also filed down the front of the blaster to fit the grill (I'll still be using my Corellian Exports 12 fin grill) as you can see below:


I've taken the accurization a bit further as well. I don't have much experience with hand files, but I tried my hand at filing away the "sight sphincter" as well as the excess metal and pins on the outside of the sight bracket:


I've also begun widening the gap between the grip and the trigger guard, as I've seen Scottjua do this on several of his Denix builds and it seems to make a big difference. It still needs a bit of shaping and some buffing:


I also tried to clean up the knurling on the hammer and safety ... we'll see how it looks when hit with the aluminum black (or maybe super blue? Haven't decided yet).


Filed down the firing pin:


I'm excited to be working on this blaster again! All of the hype for episode VII, and May the 4th have gotten me pretty motivated on it again ... my goal is to have the Denix refinished with the grips and grill properly fitted/mounted by the time my new parts arrive. I'm also planning on sanding down and re-staining/weathering the wooden Denix grips to further match a real C96 ... I know the GK was based on an MGC with plastic grips, but until I can find a proper MGC some day, I'll go with the idealized grips. looking forward to seeing other GK builds come to fruition in the coming months!
 
Last edited:
Still just sanding away ... It's getting pretty close, just about time to switch to some 500 grit sandpaper and then 0000 Steel Wool. I'll be heading to the store to pick those up soon, but in the mean time I ordered some Aluminum Black and some Renaissance Wax. I'm wondering if I'll be able to apply the Renaissance Wax directly after "bluing", or should I oil the gun beforehand? Judging from the description on the bottle it looks like that would be redundant ... Has anybody else used this on a Denix?

 
Last edited:
That's looking great but just a word of caution regards the sanding/polishing on the Denix

I've used aluminium black a few times now but when I built my ANH blaster I got a beautiful gleaming Finish on my Denix with fine wet & dry sandpaper & then polished with wire wool my instinct was to get it as perfect as possible,

when it came to bluing it would just not take the Aluminium black it was just running off & I only achieved a darkened steel rather than the blacker look I was after (see picture sorry it's not the best pic actually looks darker here than it was) this was after 2 or 3 passes with AB

I asked some members that had more experience with using AB than me where I was going wrong & they advised that I go back over it with a coarser sandpaper to rough the surface a little & give the AB something to stick to

it worked perfectly & I got the finish I was after 2nd time round

I don't know what finish you're going for I just wanted to share my experience with the Aluminium Black on these

enjoying your build, looking forward to seeing it finished
 

Attachments

  • image.jpg
    image.jpg
    534 KB · Views: 411
looks real real good, im curious being a novice to the greedo killer, why 2 different flash hiders?
 
I don't know what finish you're going for I just wanted to share my experience with the Aluminium Black on these enjoying your build, looking forward to seeing it finished

Paul:

Thanks for the encouragement and the advice! I've read most of the Denix build threads on here (including yours, which was a great read by the way) and have taken note that the Aluminum Black takes better to a somewhat rough surface. I actually prefer a more silver, bluish finish to a blacker finish, so I am gonna continue to sand it as smooth as possible, then rough it up just enough (which I'll have to feel out as I go) to take the AB after several passes. My eyes see the MGC used for the original GK as a bit closer to a dark silver/blue than black, but I realize that this is subjective and also just based on personal preference. Keep following and please chime in with any future input!

looks real real good, im curious being a novice to the greedo killer, why 2 different flash hiders?

Halliwax:

Thanks for the kind words as well! There's a pretty interesting story behind the Hero prop vs. the Greedo Killer ... they were actually two different guns all together that were used while filming A New Hope. The Hero prop was originally intended to be used as Han's blaster for the entire film (save for any resin stunt versions), which was shot over in the UK. The Greedo Killer however is the gun that is seen when Han draws his blaster under the table at the Mos Eisley Cantina to shoot Greedo. Most of the Cantina scene was shot in the UK as well, but the closeup shots of Greedo that feature his articulated head, and the aforementioned shot were filmed later in the US (with a different actor as well, who happened to be female!). Because of strict gun control laws, they were not able to fly the hero blaster over to the US for these remaining shots (since that verion was a real, live-firing Mauser), so the prop builders in the US had to build their own quick interpretation of the hero blaster for use in this very quick shot, and they based it on a Japanese Replica Mauser. The GK was also used for some promotional shots that were taken in the US. If you look closely, practically everything about the GK blaster is different to the hero blaster. I suppose the intent was just to create something close enough for a quick shot, but they never could have imagined the amount of scrutiny under which these blasters would later be placed by fans like us ... hah! I personally chose to create this version because it is the version that most clearly stuck out in my head as Han's iconic blaster when I imagined it as a kid ... I still don't know what material I was referencing at the time, but this is the blaster I always wanted to brandish.
 
thank you for taking the time and explaining that, that makes allot of sense. i never knew about a chick playing greedo at the table! thats pretty cool too, heck i just recently learned the original emperor in ESB was a girl as well!
 
thank you for taking the time and explaining that, that makes allot of sense. i never knew about a chick playing greedo at the table! thats pretty cool too, heck i just recently learned the original emperor in ESB was a girl as well!

No problem! Maria De Aragon was her name ... check the high heels!

Greedo 1.jpg Greedo 2.png

Never heard that the original emperor was a woman as well ... do you mean the hologram? I do recall hearing that his eyes were actually a chimpanzee's eyes, but I have no idea if that's true. Sorry to further derail!
 
Big update ...

I hope everyone had a good Thanksgiving break! Mine was spent out at my parents' house, so I was able to take advantage of my Step-Father's shop, as well as his steady hand.

Took the plunge and chopped the barrel. We scaled it to the screen-used GK photos as best as we could with just my phone screen and a ruler ... I think it looks close enough. Plus, there is a little leeway with the flash adapter ... you can cheat it backwards almost half an inch (which is nice) so we tried to cut a bit long if anything. What do you guys think?

37028145516_6532928439_k.jpg


Mounted on the upper:

36381349154_6d509761f4_k.jpg


Here's a closer look at the state of the Denix ... Most of the pitting is gone. I've been lucky so far and have hit minimal air bubbles. I'll rough it up a bit before attempting to use the Aluminum Black:

37028150096_295c5ebcfe_k.jpg


Removed the grip webbing, which is necessary to fit DEC's walnut grips. Not accurate, I know, but since my Denix already had inaccurate grips, I'm going with the idealized look.

Need to file down the inside to fit ...

36381350944_3858b206b4_k.jpg


We also drilled and tapped the lower for the scope mount:

37028152546_c75bfa055f_k.jpg


It's still in pieces, just figured I'd lay it all out and see how it's shaping up ... It's finally looking like a blaster! These machined parts are number one ... thanks Aaron & Scott!

37028151706_e98c08c78e_k.jpg


Hoping to get everything finished in time for TFA ... we'll see though. Still need to do a bit of reshaping and sanding of the Denix, refinish it, paint the machined parts, get the grips fitted/stained, maybe reshape the trigger, etc. Stay tuned!
 
Last edited:

Your message may be considered spam for the following reasons:

If you wish to reply despite these issues, check the box below before replying.
Be aware that malicious compliance may result in more severe penalties.
Back
Top