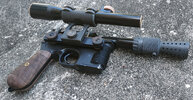
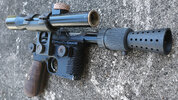
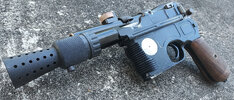
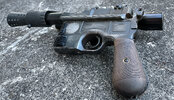
All these years I've never had a proper ANH DL-44.
Oh, there was a point very early on where I thought I did, and built a blaster from Bobadebt parts and such, but it was so early on that the perception of a what details were part of which movie's blasters was rather murky, and it was a mish mash.
I've since built (and mostly unloaded) halfway decent ESBs, and a ROTJ, and a Merr Sonn.
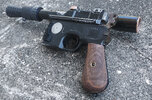
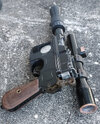
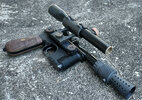
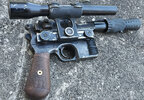
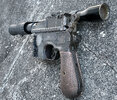
Well, I've finally gotten around to the original and best (IMO) incarnation of Solo's sidearm.
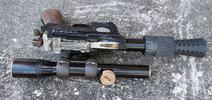
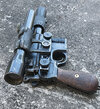
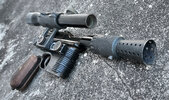
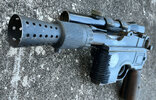
Steel Blaster Factory Mauser and scope mount, Aluminum Blaster Factory scope, bull barrel and flash hider, and Todd's Costumes tomtit parts for the push rods and front grill. (I don't know if Todd just ordered a bunch from the original source or replicated them.) I'd like to claim that I purposely duplicated the roughness of the screenused grill, but I knew my best effort would still turn out rough enough, and it did.
I wish the top section angled back a bit more, but owel.
scottjua stencils for the scope mount weathering (except the rear nut, which I lost seconds after painting. I had to hand-chip a replacement).


I went with two push rods, "as built" for this particular detail. I can always break one off later. I made the center thing out of a kit sprue from the Airfix Saturn V. I put a pin through it to add a mechanical attachment for the push rods to supplement the glue. Maybe if they'd done that in '76 it wouldn't have broken off.


I used Birchwood Casey Aluminum Black for the aluminum parts, and Ortho Blue for the steel. Rubbed 3-in-1 oil on. I tried a lot of different things to age the brass parts, and I've already forgotten what was the final thing that worked!
I started with tweaking a complete aluminum blaster from Blaster Factory, but when he blew out the last few minor defect steel Mausers, I grabbed one and transferred what I needed from the aluminum one. MAN is it heavy!
I had some duplicate/leftover parts from different sources, so I used those to finish the aluminum one (see next post).
Many thanks to everyone in the ANH Hero DL-44 Discussion - Three ANH Greeblies Found thread for tips and much inspiration.
more pics in attachments:
Oh, there was a point very early on where I thought I did, and built a blaster from Bobadebt parts and such, but it was so early on that the perception of a what details were part of which movie's blasters was rather murky, and it was a mish mash.
I've since built (and mostly unloaded) halfway decent ESBs, and a ROTJ, and a Merr Sonn.
Well, I've finally gotten around to the original and best (IMO) incarnation of Solo's sidearm.
Steel Blaster Factory Mauser and scope mount, Aluminum Blaster Factory scope, bull barrel and flash hider, and Todd's Costumes tomtit parts for the push rods and front grill. (I don't know if Todd just ordered a bunch from the original source or replicated them.) I'd like to claim that I purposely duplicated the roughness of the screenused grill, but I knew my best effort would still turn out rough enough, and it did.
I wish the top section angled back a bit more, but owel.
scottjua stencils for the scope mount weathering (except the rear nut, which I lost seconds after painting. I had to hand-chip a replacement).
I went with two push rods, "as built" for this particular detail. I can always break one off later. I made the center thing out of a kit sprue from the Airfix Saturn V. I put a pin through it to add a mechanical attachment for the push rods to supplement the glue. Maybe if they'd done that in '76 it wouldn't have broken off.
I used Birchwood Casey Aluminum Black for the aluminum parts, and Ortho Blue for the steel. Rubbed 3-in-1 oil on. I tried a lot of different things to age the brass parts, and I've already forgotten what was the final thing that worked!
I started with tweaking a complete aluminum blaster from Blaster Factory, but when he blew out the last few minor defect steel Mausers, I grabbed one and transferred what I needed from the aluminum one. MAN is it heavy!
I had some duplicate/leftover parts from different sources, so I used those to finish the aluminum one (see next post).
Many thanks to everyone in the ANH Hero DL-44 Discussion - Three ANH Greeblies Found thread for tips and much inspiration.
more pics in attachments:
Attachments
Last edited: