You are using an out of date browser. It may not display this or other websites correctly.
You should upgrade or use an alternative browser.
You should upgrade or use an alternative browser.
Apollo A7L Spacesuit Build
zachsbanks547
Active Member
That’s basically what I’m thinking: stick with IVA unless I find some soles.
Edit: one option I just remembered would be to buy boots from moonspacesuits.com. Most of their suits are pretty") , but the boots don’t look half bad. You could either use as is or disassemble it, pattern the pieces, and reassemble with better materials and maybe a paint job.
, but the boots don’t look half bad. You could either use as is or disassemble it, pattern the pieces, and reassemble with better materials and maybe a paint job.
Edit: one option I just remembered would be to buy boots from moonspacesuits.com. Most of their suits are pretty
, but the boots don’t look half bad. You could either use as is or disassemble it, pattern the pieces, and reassemble with better materials and maybe a paint job.
Last edited:
zachsbanks547
Active Member
My IVA boots are done!
I got the all the pieces cut out and sewn mostly up. Then I had to have my very talented seamtress mother sew up the (tricky to me at least) toes of the outer layer. Ended up coming out great.


Then I got the inner outer layers connected and velcro attached. It’s looking great. I’m really happy with the shape, especially once attached to the shoe.


Unfortunately I had an issue where the final piece ended up too small around to fit around the shoe (despite earlier fit ups working great). For now, at least, I just split the back seam (and reenforced it) enough to fit it around the shoes. I may end up covering that with a patch of some kind in the future.

I got the zippers attached to the boots and the suit.


And it’s all together! And looking and feeling great. I have plenty of space to move/stretch/bend over without pulling on the legs or them getting tight.


I also attached the front buckle. It was a pretty simple job with a few bar tacks. Again, it’s definitely a bit small, but I’ll worry about that later.


And lastly, I got a mannequin. I couldn’t think of a better way to display the suit and I found a good deal on eBay, so I went for it. I got it all set up in my basement/work room. (though my wife isn’t a huge fan; too many episodes of Doctor Who)

I got the all the pieces cut out and sewn mostly up. Then I had to have my very talented seamtress mother sew up the (tricky to me at least) toes of the outer layer. Ended up coming out great.
Then I got the inner outer layers connected and velcro attached. It’s looking great. I’m really happy with the shape, especially once attached to the shoe.
Unfortunately I had an issue where the final piece ended up too small around to fit around the shoe (despite earlier fit ups working great). For now, at least, I just split the back seam (and reenforced it) enough to fit it around the shoes. I may end up covering that with a patch of some kind in the future.
I got the zippers attached to the boots and the suit.
And it’s all together! And looking and feeling great. I have plenty of space to move/stretch/bend over without pulling on the legs or them getting tight.
I also attached the front buckle. It was a pretty simple job with a few bar tacks. Again, it’s definitely a bit small, but I’ll worry about that later.
And lastly, I got a mannequin. I couldn’t think of a better way to display the suit and I found a good deal on eBay, so I went for it. I got it all set up in my basement/work room. (though my wife isn’t a huge fan; too many episodes of Doctor Who)
zachsbanks547
Active Member
More progress!
I decided to start working on my PVC (possibly placeholder) neck ring.
I had the slice my piece in half to get to 1.5", which I did with a jigsaw.


After some sanding:

And after Duplicolor Metalcast base coat and red:


I added adhesive velcro to it, and did a test fit on the mannequin.


I sewed the velcro to the tops of my elbow pieces.

I added more magnets to my wrist rings, since the two pairs I had been using didn’t seem to hold quite as strong as I’d like. I added another two pairs per ring. It seems to work much better.

And I re-glued, for the third time, the PLSS loop onto the front buckle. The first two times I’d used super glue, but this time I used Gorilla Glue, which seems to have worked much better.

After having issues of the neck ring Velcro peeling off during donning, I ended up hand sewing the top of the zipper tape together to stop that area separating. It seems to have done the trick.

And here’s the whole (IVA) suit all together. The arms aren’t actually connected to the shoulders yet, but I wanted to try it all out. The neck ring definitely changes the feeling of the whole suit, and makes it feel much better and more real/substantial.

And lastly, I worked on attaching my PVC connecters to the front of the suit. I had a heck of a time getting the screws through for the first few, but I figured out a good system by the latter two. Unfortunately I didn’t end up having enough screws to do the last O2 outlet, so I have some more on order. These will, like the neck ring, most likely be placeholders for accurate, 3D-printed pieces. But I think they turned out good for what they are.

I decided to start working on my PVC (possibly placeholder) neck ring.
I had the slice my piece in half to get to 1.5", which I did with a jigsaw.
After some sanding:
And after Duplicolor Metalcast base coat and red:
I added adhesive velcro to it, and did a test fit on the mannequin.
I sewed the velcro to the tops of my elbow pieces.
I added more magnets to my wrist rings, since the two pairs I had been using didn’t seem to hold quite as strong as I’d like. I added another two pairs per ring. It seems to work much better.
And I re-glued, for the third time, the PLSS loop onto the front buckle. The first two times I’d used super glue, but this time I used Gorilla Glue, which seems to have worked much better.
After having issues of the neck ring Velcro peeling off during donning, I ended up hand sewing the top of the zipper tape together to stop that area separating. It seems to have done the trick.
And here’s the whole (IVA) suit all together. The arms aren’t actually connected to the shoulders yet, but I wanted to try it all out. The neck ring definitely changes the feeling of the whole suit, and makes it feel much better and more real/substantial.
And lastly, I worked on attaching my PVC connecters to the front of the suit. I had a heck of a time getting the screws through for the first few
, but I figured out a good system by the latter two. Unfortunately I didn’t end up having enough screws to do the last O2 outlet, so I have some more on order. These will, like the neck ring, most likely be placeholders for accurate, 3D-printed pieces. But I think they turned out good for what they are.zachsbanks547
Active Member
It’s so close!
The main structure and connectors of the suit are done!
After a few tries and a lot of frustration, I got the elbows attached to the shoulders. The velcro pulled off too easily, so I ended up just sewing it directly.


The screws came in, so I finally got the last connector attached to the suit. And the main thing is done!


To finish the IVA suit, I only have to finish the leg commander stripes, pressure release valve, pressure gauge, and pressure gauge cover.
For the EVA parts, I have a glove pattern that I can work on, and I have an idea for the boots, but it involves buying things I don’t want to invest in quite yet.
I have dimensions for the PLSS, but I don’t have a plan yet on construction.
And the one thing I have no idea what do for are the helmets, both bubble and EVA. I have STLs of the EVA helmet, but no printer yet (let alone one big enough for an EVA helmet). I also don’t have fabric patterns for the EVA helmet.
So if anyone has ideas there, let me know.
The main structure and connectors of the suit are done!
After a few tries and a lot of frustration, I got the elbows attached to the shoulders. The velcro pulled off too easily, so I ended up just sewing it directly.
The screws came in, so I finally got the last connector attached to the suit. And the main thing is done!
To finish the IVA suit, I only have to finish the leg commander stripes, pressure release valve, pressure gauge, and pressure gauge cover.
For the EVA parts, I have a glove pattern that I can work on, and I have an idea for the boots, but it involves buying things I don’t want to invest in quite yet.
I have dimensions for the PLSS, but I don’t have a plan yet on construction.
And the one thing I have no idea what do for are the helmets, both bubble and EVA. I have STLs of the EVA helmet, but no printer yet (let alone one big enough for an EVA helmet). I also don’t have fabric patterns for the EVA helmet.
So if anyone has ideas there, let me know.
Looks awesome.
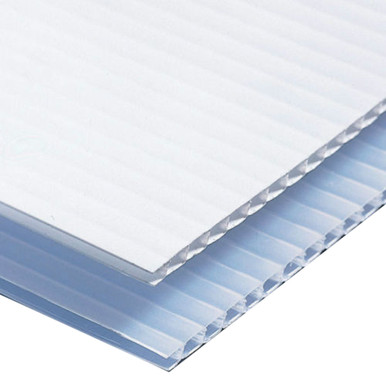
This is how i tackled the PLSS....I bought some 1/4 inch sprinkler pipe with various connectors to make a frame. Once the frame was done, I used corrugated polystyrene yard signs to make the top/bottom/sides. I linked an example but I think I found them at Home Depot:
 www.uscutter.com
I then used a rivet gun and wider than normal washers to attach the plastic signs to the PVC frame. Oh, I used a heat gun to make the 20-30 degree bend on the back of the PLSS above the grab handle. For the grab handle I used something like this that was lying around the garage: Off-White Flush Pull Handle 3" x 2.25"
Wrapped it in batting from the fabric store to dull the edges and made a pattern for the cover. As for the top of the PLSS I just used a block of foam because its light weight and not carrying any load like the PLSS back pack which has to be somewhat sturdy AND lighweight. The top and bottom parts of the PLSS are attached via velcro. Make sure to think out how you want to attach your hoses to the PLSS befor you start cutting your fabric. I made my cover to slip over the top like a pillow cover with a hidden velcro seam along the bottom three edges.
This is how i tackled the PLSS....I bought some 1/4 inch sprinkler pipe with various connectors to make a frame. Once the frame was done, I used corrugated polystyrene yard signs to make the top/bottom/sides. I linked an example but I think I found them at Home Depot:
18" x 12" Corrugated Plastic Sheets - Short Flute White
4mm Corrugated Plastic Sheets, Short Flute, 18" wide x 12" high. Light-weight PolyPro plastic ideal for temporary signage. Available in white. Stakes sold separately. "Short flute" refers to the orientation of the sign. Fluting always runs vertically with a sign (so the stake struts can be...
www.uscutter.com
I then used a rivet gun and wider than normal washers to attach the plastic signs to the PVC frame. Oh, I used a heat gun to make the 20-30 degree bend on the back of the PLSS above the grab handle. For the grab handle I used something like this that was lying around the garage: Off-White Flush Pull Handle 3" x 2.25"
Wrapped it in batting from the fabric store to dull the edges and made a pattern for the cover. As for the top of the PLSS I just used a block of foam because its light weight and not carrying any load like the PLSS back pack which has to be somewhat sturdy AND lighweight. The top and bottom parts of the PLSS are attached via velcro. Make sure to think out how you want to attach your hoses to the PLSS befor you start cutting your fabric. I made my cover to slip over the top like a pillow cover with a hidden velcro seam along the bottom three edges.
Rdann
New Member
Great job on the suit, I wish I had the talent to make one myself! Since I don't, I bought a replica suit and I'm in the process of making some mods and adding detail. I have a question: The velcro on the front of the suit around the PLSS connectors---is it the hook side or the loop side? Also the same question for the velcro on the back of the PLSS and top of the OPS. It's hard to tell from photos which type it is. Thanks for your help---
zachsbanks547
Active Member
I used loop side, which I’m pretty sure is the correct type. It’s hard to tell in original photos because the Velcro they use is a special type called “unnapped loop”.
Rdann
New Member
Thanks for that info, I believe you are correct in that the loop side is used on the suit. A little Googling turned up the info that the velcro on the PLSS/OPS is loop ( also called "pile".) This info came from the original manufacturer of the PLSS system. Here's possibly another clue: I found a couple of close up photos showing the inside of the pocket flaps, and it looks like the loop is tan and the hook is white. In most photos of the suit, the exposed velcro looks tan. Thanks again--RDI used loop side, which I’m pretty sure is the correct type. It’s hard to tell in original photos because the Velcro they use is a special type called “unnapped loop”.
octavio best
New Member
HELLO EVERYONE
congratulations to all A7L fans, great job, i´m also an apollo fan, i saw neil on tv setting foot on the moon, now i´m engineer and i want to make a A7L replica close as possible, i mean, "systems". i had some problems and i need help to locate a reliable source of sewing patterns of the diferent components, as micrometeorit garmet, some mechanical description of the internal componets of neck ring, wrist rings, gas hose connections, etc, I resolve some problems as the cooling garmet and the most importan one, I found the perfect material for pressure bladder, cheap an available to all.
salutes to all.
Rdann
New Member
HELLO EVERYONE
congratulations to all A7L fans, great job, i´m also an apollo fan, i saw neil on tv setting foot on the moon, now i´m engineer and i want to make a A7L replica close as possible, i mean, "systems". i had some problems and i need help to locate a reliable source of sewing patterns of the diferent components, as micrometeorit garmet, some mechanical description of the internal componets of neck ring, wrist rings, gas hose connections, etc, I resolve some problems as the cooling garmet and the most importan one, I found the perfect material for pressure bladder, cheap an available to all.
salutes to all.
octavio best
New Member
plenty of thanks, sire
zachsbanks547
Active Member
I’ve been quite busy for the last almost year.
But my EVA gloves are finally finished. I used kenlandrum’s pattern, the same nylon as the rest of the suit, RFID fabric I found on eBay, and rubber finger tips I bought from Global Effects on eBay. I’m so glad I found those finger tips, because I don’t know how I would’ve done it otherwise and it assuredly wouldn’t have turned out as nice.
I ended up hand sewing the fingers together and hand sewing the tips to the end of the fingers.


And here’s the finished glove. I’m very happy with it.


The shaping of kenlandrum’s pattern turned out very nice.
I had to make some adjustments to get the end of the fingers to fit my specific finger tips.
I also did some work on the PLSS. I used plastic corrugate stapled to a 1x2 frame. So my main structure is done, minus attaching the carry handle to the back. After that, I’ll cover it in a layer of batting and nylon.


The only work I have left on the suit itself is attaching my pressure release valve, and then making the pressure gauge and gauge cover.
I’m also working on my snoopy cap and will hopefully have a post on that soon.
I might at some point buy a set of EVA boot soles, or buy a complete set of boots and rework the fabric parts with my own material.
Anything helmet-related is definitely outside my current skills and available material. If anyone has ideas there, let me know.
But my EVA gloves are finally finished. I used kenlandrum’s pattern, the same nylon as the rest of the suit, RFID fabric I found on eBay, and rubber finger tips I bought from Global Effects on eBay. I’m so glad I found those finger tips, because I don’t know how I would’ve done it otherwise and it assuredly wouldn’t have turned out as nice.
I ended up hand sewing the fingers together and hand sewing the tips to the end of the fingers.
And here’s the finished glove. I’m very happy with it.
The shaping of kenlandrum’s pattern turned out very nice.
I had to make some adjustments to get the end of the fingers to fit my specific finger tips.
I also did some work on the PLSS. I used plastic corrugate stapled to a 1x2 frame. So my main structure is done, minus attaching the carry handle to the back. After that, I’ll cover it in a layer of batting and nylon.
The only work I have left on the suit itself is attaching my pressure release valve, and then making the pressure gauge and gauge cover.
I’m also working on my snoopy cap and will hopefully have a post on that soon.
I might at some point buy a set of EVA boot soles, or buy a complete set of boots and rework the fabric parts with my own material.
Anything helmet-related is definitely outside my current skills and available material. If anyone has ideas there, let me know.
zachsbanks547
Active Member
As far as patterns go, I used kenlandrum’s for the gloves as well as reference for the torso.
I’ll attach a link to a Drive folder with all my pattern info, including reference images and the SketchUp document I used to draw all of my patterns. Feel free to use anything in there. A lot of the drawings come from examining pictures of Nagata’s early builds, and the rest I worked out myself.
A7L Patterns - Google Drive
zachsbanks547
Active Member
I got the pressure release valve attached today. It’s also modded PVC parts.


Similar threads
- Replies
- 5
- Views
- 212
- Replies
- 1
- Views
- 1,442
- Replies
- 3
- Views
- 553