You are using an out of date browser. It may not display this or other websites correctly.
You should upgrade or use an alternative browser.
You should upgrade or use an alternative browser.
ANH Hero DL-44 Discussion - Three ANH Greeblies Found
- Thread starter deadbolt
- Start date
VFX Freak
Sr Member
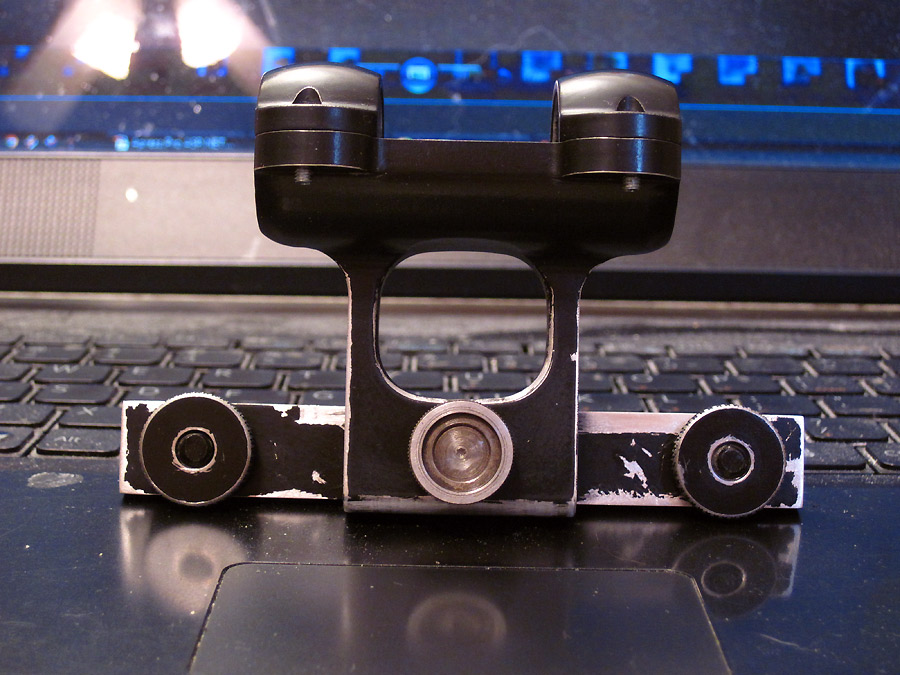
^ I have extreme admiration for your weathering skills, and even more extreme jealousy for your scope mount. That looks just freaking great. Like you popped it off the prop the day they stopped shooting.
Do you have the steel or aluminum parts, and what materials did you use for the black?
Do you have the steel or aluminum parts, and what materials did you use for the black?
Clutch
Master Member
Thanks! I got the anodized aluminum. I stripped it off though and polished it up. I then hit it with a coat of Rustoleum Satin Black. The exposed areas were just scraped off with a small screwdriver and my thumbnail. Some of the rougher areas were scrubbed with sandpaper. I polished the upper half with Novis #2. I still have to decide if I want to paint those screws or try to cut them off.
Lichtbringer
Master Member
Nice job on that mount, Clutch. :thumbsup
Looking great man.
I am still undecided if I should cover the black-ox parts with paint and weather or if I should weather directly on the factory finish.
Still have a set of stencils for the weathering on the scope brackets from back the days (created by either cking or GF IIRC).
Will start as soon as I receive my new barrel")
Markus
I am still undecided if I should cover the black-ox parts with paint and weather or if I should weather directly on the factory finish.
Still have a set of stencils for the weathering on the scope brackets from back the days (created by either cking or GF IIRC).
Will start as soon as I receive my new barrel
Markus
Clutch
Master Member
Looking great man.
I am still undecided if I should cover the black-ox parts with paint and weather or if I should weather directly on the factory finish.
Still have a set of stencils for the weathering on the scope brackets from back the days (created by either cking or GF IIRC).
Will start as soon as I receive my new barrel
Markus
I thought I remembered some stencils. The problem you might have with the black ox is the microscopic tooling marks showing up. It's also tough as nails, so it will be difficult to etch out an exact pattern.
carlatonina
New Member
one question more, a problem with one of the holes beside the trigger, is annoying.
Clutch
Master Member
one question more, a problem with one of the holes beside the trigger, is annoying.
Best way to make those disappear is to fill and paint.
carlatonina
New Member
Sorry, How do you drill hole to the side of the hammer? threaded rod is long and touch the hammer.
Sorry, How do you drill hole to the side of the hammer? threaded rod is long and touch the hammer.
Drill and tap the hole, then CUT the threaded rod before attaching it to the C96 body
Markus
Now, I'm also considering taking the "mystery" out of the "disk". I've become more interested in developing the spirit of the piece than making an exact replica of the prop. I've been thinking, if there were a disk on that side, what would it be for? An indicator dial? A way to adjust power? It seems logical that a real blaster would have a way to reduce or increase power, i.e. stun, knockdown, max power for fighting armored stormtroopers, etc. Then, the knob under the flash hider would make more sense as a beam width adjuster. Thoughts?
I seem to recall reading in one of the early Han Solo novels that the blaster was Han's when he was still in the Imperial Navy, and the disc identified the blaster as Imperial property. Han kept the blaster after he was booted out of the service and pryed off the disc in disgust for the Imperials. Which could explain the circular mark(or missing paint/finish). Although, it's been mentioned in several books that his blaster was custom-made; which could still be true, and the former-Imperial blaster was the base for his "custom-job."
Last edited:
carlatonina
New Member
There is little room between the hammer and the threaded rod.. :confused
Drill and tap the hole, then CUT the threaded rod before attaching it to the C96 body
Markus
Lichtbringer
Master Member
There is little room between the hammer and the threaded rod.. :confused
How about some Pics?
kpax
Sr Member
There is little room between the hammer and the threaded rod.. :confused
As Markus said, after drilling and tapping the hole, simply thread the rod into the frame leaving space between the rod and hammer.
1) Just screw it in til it reaches the inside surface of the frame..
2) place washer/spacer over rod.
3) place crossbar over spacer
4) screw thumb nut over crossbar
5) mark rod at top surface of thumbnut
6)disassemble and remove threaded rod from frame.
7) cut threaded rod and file/sand smooth.
8) repeat for front rod.
Note: for the front MagWell rod, you can also place a hex nut inside the magwell to make a more secure fit. You will need to adjust length of rod accordingly.
Similar threads
- Replies
- 7
- Views
- 1,326
- Replies
- 8
- Views
- 2,887
- Replies
- 38
- Views
- 4,618
- Replies
- 19
- Views
- 3,425