Gerard2567
Well-Known Member
Did anyone ever have the idea that the cone knob placed on the V2 in ROTJ was to fill the hole left by the toggle switch for the motor on the ANH version??
That has been theorised for years now. Not exactly new info.
Did anyone ever have the idea that the cone knob placed on the V2 in ROTJ was to fill the hole left by the toggle switch for the motor on the ANH version??
Did anyone ever have the idea that the cone knob placed on the V2 in ROTJ was to fill the hole left by the toggle switch for the motor on the ANH version??
And the mystery chunk plugged the hole for the wiresDid anyone ever have the idea that the cone knob placed on the V2 in ROTJ was to fill the hole left by the toggle switch for the motor on the ANH version??


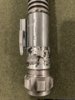
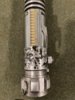
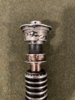
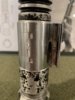
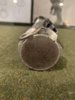
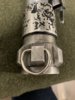
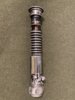
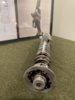
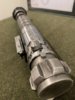
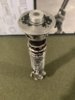
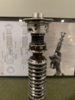
I weathered up my V2 today! I've been holding off for a while because I keep forgetting to buy aluminium black, but somebody said they used bleach. I gave that a shot. It's a little uneven but some of it sorta matches up with the paint wear patterns. Next I'll start on the paint, but man, before I sanded some of the darker parts to be a bit lighter, it REALLY looked like the patterns the chipped paint has anyway only greyish instead of black. It was almost a shame to smooth it out. I think I got the colors just the way I want em though! Let me know what you guys think!
View attachment 1251964View attachment 1251965View attachment 1251966View attachment 1251967View attachment 1251968

When I did mine (pics of which might be somewhere in this thread) I used a mix of bleach and water, about 1 part bleach to 2 parts water, and let it soak for a while. It can be a little splotchy, so my recommendation would be to fill a container with enough water that all the parts can be submerged, and then add the bleach, mix it up nice, THEN put the parts inthe result is very very nice! Can I ask how you applied the bleach? just rub so bleach on? put the saber completelly in bleach for a certain amount of time? or in the dishwasher?
I really want to try that
My bad lol just sharing thoughtsThat has been theorised for years now. Not exactly new info.
100% agreeI dunno...looking at the reference, I kinda think the knurling on the AS knob is closer to the prop than the coarser knurling on the SH knob.
I dunno...looking at the reference, I kinda think the knurling on the AS knob is closer to the prop than the coarser knurling on the SH knob.
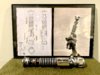

After a year of parts collecting and studying through this forum... I have FINISHED my V2. Thank you to all who helped me in any way and Halliwax for all your help and patience. Thank you Anakin Starkiller for your amazing model, and Trooper Trent for your attention to detail and perseverance on the stencils. I present to you...My Luke Skywalker V2...
Top tip for everyone, only cus i get asked all the time. Instead of sanding the v2 to prep it for a14, use a red scotchbright pad in a circular motion. Its changed my life lol. I used to get really tough to get off black from the chemical baths but now its 2 dips on the booster and 1 dip everywhere else. It helps the chemicals really work their magic without any sreaking or tough to get of black.
Anyway love this thread and Halliwax is THE v2 master.
Adam