Anakin Starkiller’s Darth Maul Assembly Tutorial Thread

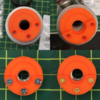
Since I can never leave well enough alone, I decided to repaint my red buttons.
I used a thin coat of Tamiya gloss aluminum followed by a few coats of Dupli-Color MetalCast Red Anodized (MC200).
I'm very pleased with the result. Because of the metallic base, the color looks darker when not in direct light. That's exactly what I was going for. Here's a before and after:

Maul_Buttons.jpg
 
Dan messaged me, he is selling half kits!! Grab one now before they are gone

Already done! I got my full hilt yesterday and immediately messaged him to order a half hilt for a battle-damaged post-TPM version. Couldn't resist after seeing how great this turned out!

Also, for those commenting on the fact the two halves don't line up perfectly, that is accurate to the original hero from TPM as this replica is constructed the same way... I know this has already been mentioned but I felt like restating it for those who may have missed it.
 
The half-hilts are also an excellent starting point for a Saesee Tiin saber.


Anyway, I received replacement 3/8” emitter discs from Anakin Starkiller, installed the Covertec, and now just have to repaint the red buttons before I call mine done. Such a gorgeous (And cheap!) replica.
 
Man, love the new red color on the buttons.

I'm kinda bummed out that I didn't get one of these!

They all look really nice.
 
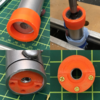
Drew up an insert for the cut end, along with a guide to help concentrically bore out the end (with a 1-1/8" Forstner bit).

Need to paint and install it but the weather has been soo damp the last week. I just plan to glue it to the back of a brad hole style T-Nut which will hold the threaded rod in place. A plain 3/8-16 nut would work just as easily.

I designed it with #4 screws in mind (lower left), and I think they are closer to the correct size, but I do like the look of the #2 (lower right). Any thoughts on details that should change? On second look the macaroni shape inner diameter should be a mm or two larger in which case the #2 screws would look more correct.

I do suspect there might be a couple of smaller screws in the original's inner ring, but it could just as easily be gunk.

upload_2019-5-8_16-7-59.png upload_2019-5-8_16-9-50.png upload_2019-5-8_16-18-11.png
 
Drew up an insert for the cut end, along with a guide to help concentrically bore out the end (with a 1-1/8" Forstner bit).

Need to paint and install it but the weather has been soo damp the last week. I just plan to glue it to the back of a brad hole style T-Nut which will hold the threaded rod in place. A plain 3/8-16 nut would work just as easily.

I designed it with #4 screws in mind (lower left), and I think they are closer to the correct size, but I do like the look of the #2 (lower right). Any thoughts on details that should change? On second look the macaroni shape inner diameter should be a mm or two larger in which case the #2 screws would look more correct.

I do suspect there might be a couple of smaller screws in the original's inner ring, but it could just as easily be gunk.

View attachment 1017357 View attachment 1017358 View attachment 1017359

Dude you read my mind on that hillman part!!!
 
I like the smaller screws, but the larger ones might look better once painted.

Can you do a side by side comp with the real prop and your version of the bottom?
 
Yeah, I think #2 screws are the way to go. I dropped the original image into Illustrator and checked the proportions based on an overall diameter of 1.125" -- my model did need a couple of tweaks and I think it's in a better place now. Thoughts?

The drill centering collar worked pretty well but I wasn't holding securely enough at first and the bit jumped and took a little out of the edge (battle damage??). The resin is tough, hard stuff! Just have to go slowly and carefully. Maybe there's a better way to do this?

upload_2019-5-9_23-31-10.png upload_2019-5-9_23-31-38.png
 

Your message may be considered spam for the following reasons:

If you wish to reply despite these issues, check the box below before replying.
Be aware that malicious compliance may result in more severe penalties.
Back
Top