Sorry it took me a bit to post these. Pesky employment....
The interior of the helmet is made in three pieces, and as I said before, these are raw castings so there may have been other details added on top of these.
Here's how they fit. I just shoved them in place, but they don't quite fit since they aren't trimmed yet.
View attachment 1481592
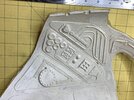
And here's the front piece out of the helmet. The ruler has centimeters and inches on it, and the table is inches.
View attachment 1481593
View attachment 1481595
......aaaaand some close ups!
View attachment 1481596
View attachment 1481597
View attachment 1481598
Hey Joberg - did you see the truck tires! Just wait, there's more!!
Here is the port side rear interior panel. Just look at those rows of tires! A wonder to behold!
I think I recognize some Plastruct parts too.
View attachment 1481599
View attachment 1481600
View attachment 1481601
Next is the Starboard side panel.
Again with the tires! You'd think they had a bunch left over from some previous models, or something.
Although I have to admit that they make pretty interesting buttons, vents, sensors or whatevers.
View attachment 1481603
View attachment 1481608
View attachment 1481607