Advice on making mold of a cube.

darkgreymatter

New Member
Hello! First time posting.

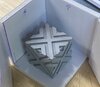
I want to make a mold of a 3D printed object to cast in pewter or bismuth. I'm using Smooth-On Mold Max 60 for the high heat. My object is basically a 1.25" cube with raised details. There are a few small undercuts.

Here's my question. I'm obviously making a two-part mold, but what is the best way to divide it? I was thinking molding 3 sides and 3 sides so the seams naturally go down the edges. Are there any issues with this that you see? Do you have any other ideas on a better way to create/divide the mold? Any advice would be appreciated. I'm a green hobbiest at model making.

I have attached a photo of my model. Thank you.
 

Attachments

  • AB166386-DCAF-40A8-B3A5-5CF2077BADB9.jpeg
    AB166386-DCAF-40A8-B3A5-5CF2077BADB9.jpeg
    339.1 KB · Views: 170
Hello.

For a mould of that kind of size, I'd say keep it as simple as possible. Why not mould five sides all in one and for your second part, mould the sixth face as a lid? Also, don't forget to put registration keys down in the bottom of your mould - as seen in your photo - you'll need this for when you come to pour up your lid.

Then in one corner of your "lid" mould you could place a pour spout and in the opposite corner a vent. When you cast in your material, if you angle the mould so that the pour spout is lower than the vent, you won't get air voids.

It may also be a good idea to mix up a small batch of silicone and brush on a thin layer over the five sides first, then mount the walls and pour the main volume of silicone once everything is ready. I say this just because you've got a lot of areas where you may get bubbles trapped in the details.

If on the off chance that you find de-moulding it is a bit tricky, you could always cut in a slit down one of the straight edges, do it in two passes; the first a wavy cut down to about half way, then a straight cut down to the object. This just helps your cut seam to register back together.

This is just an idea, other people may have other suggestions. But it's worth giving some thought to it.

Best of luck to you!
 
Thank you PB Props - Molding 5 sides and then a 6th would be much easier. I was just worried since Mold Max 60 isn't very flexible. I will look more into the technique of cutting down the side. I've seen it before, but just haven't done it myself. The few projects I've done in the past have worked well as 2-part down a side seam.
 
You're quite right, MM60 isn't very flexible, which is why I suggested the cut seam. That said, there's no reason not to go with your original parting line idea, but I'd recommend putting in those vents / pour spout that I mentioned - and perhaps incorporate some of the other suggestions too about brushing the silicone on first before the main pour.

Bottom line is go with what you're comfortable in doing. It'll work either way - one just seems to be a lot more work than the other.

I hope it turns out well for you - it looks like a nifty project.
 
Thanks again PB Props. I do have a vacuum pot. Should I degas before or after the pour (or both)? I will definitely take your advice on brushing it on first. I had also planned on some small vents to help with air bubbles and dusting with graphite first. I've had mixed results with talcum powder.

One more question (if you don't mind). Is it possible to pour the pewter in the mold in a pressure pot to eliminate bubbles? I figure I couldn't get the pot pressurized fast enough before the pewter starts to cool?
 
If it were me, I'd just degas the silicone first, obviously burp it a few times (depending on its pot life) and once sufficiently done, brush on a thin layer, then pour up your mould. That should be more than enough.

As to the second part of your question, I've never tried to cast pewter into a mould and then place it in a pressure pot because I've never been convinced it'd work, plus as you say, it'd probably cool too quickly. You could try heating the mould first, but I reckon the results would be negligible. The closest that I've done to that is to pour lead into a spinning mould to use centrifugal force - it worked pretty well and was excellent at making small burn holes all over the studio and both myself and my colleagues. Not that I'd recommend this route!
 
Thank you KAILUAZ . Some very interesting thoughts here! I have progressed on with my project but not to my intended completion. I feel like a Roomba with all the obstacles I've hit along the way. I am now at a stage of milling wax on a CNC to do lost wax casting.
 
Well, Here's a nickel's worth of my $0.02

My suggestion for the parting line is along the diagonal, where there is a flat surface. Yes, I DO understand that it is a crazy parting line to make, but the seam will be on an easy-to-sand surface, and not along any recesses.

If you were to do the 5side/1side seam line, (like pictured) the seam will follow highs and lows and corners.


The only difference in the two methods is the clean-up of the final piece. My method of the parting line is more difficult, and the clean-up is easier. The amount of effort that you want to put in should be proportional to the number of castings that you plan to make. If you plan to make many of these, may I suggest that you cast foundry wax, instead of pewter? If you have a dozed wax models that you attach to a wax tree an burry in plaster, you will cast pewter by lost wax casting.


Also be sure there is a pour spout with enough room to pour the pewter. (On a 1.25" model, that spout is going to cover some real estate) I suggest the corner, where it can be filed off the flat areas, and leave a corner.


If you can degas the RTV, that is a good plan.

There is NO reason to put the pewter into a pressure pot! NONE. Don't do it. The reason for a pressure casting is for urethane resin, which will for gas bubbles as it cures. (and those bubbles expand as the resin heats up during cure)
 
This thread is more than 3 years old.

Your message may be considered spam for the following reasons:

  1. This thread hasn't been active in some time. A new post in this thread might not contribute constructively to this discussion after so long.
If you wish to reply despite these issues, check the box below before replying.
Be aware that malicious compliance may result in more severe penalties.
Back
Top