Looking for molding suggestions and tips

Shapeshifter

New Member
Hello all,
I'm new to the forum. Glad to be here and great to see the threads are active. Lots of great work and tons of talent!

I'm new to sculpting and casting. I'm getting close to wrapping up a piece that I want to cast in resin and I'm looking for some insight on molding. My apologies for the length of this thread, I want to ensure I'm getting all the details out there so my questions make sense.

This piece has a lot of fine detail and nooks and crannies and I'm not certain on how to approach the casting process. This is my biomechanical homage to HR Giger - the head, tail, and two smaller heads all detach.

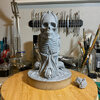
side-head-tail-heads-2.jpg front-view-head-heads.jpg front-no-head-no-tail.jpg

My initial thought was to do a brush on mold for the body with Rebound 25 and a support shell using free-form air. My thought was due to the small details and nooks, brushing in the silicone would be best so details were not missed, and bubbles were avoided, as well as saving a ton of silicone.

The head - was thinking a box mold, or potentially a two piece mold. The two piece mold may be overkill - I'm not certain - but I also wanted to have some practice at doing one. I thought I might be able to run the seam line along the base of the jaw and up along the midline raised rail. The two smaller heads and tail - box molds.

I have a vacuum chamber and a pressure pot. I was thinking the pressure pot would be perfect for curing the resin in the mold due to all of the detail and potential for bubbles, but I've read you should have your silicone mold made under pressure as well to avoid micro bubbles/impressions on your piece when curing. If I do a brush on mold, this doesn't seem possible.

I see this piece as having a hundred different ways to capture bubbles, and have never seen anyone run vents on a brush on mold, so maybe box mold would be best.

My questions:
  • Would I be better off doing the body in a box mold, allowing for as many flues as needed, as well as putting the silicone under pressure when making the mold?
  • When putting a sculpt under pressure while making the silicone mold: do I run the risk of the sculpture collapsing under the pressure (this is sculpted in Monster clay medium)? I haven't seen anyone remark on this, and cannot find anything about it.
  • the nooks, crannies, etc. - are they going to post significant problems? I thought the brush mold approach might overcome this due to being able to apply thick silicone to any undercuts.
Thank you in advance for any insight you may be able to provide!
 
Hi
Nice sculpt!
What size is this?
A brush up mold should work if done correctly. Brushing a first layer of non thickened silicone and thickening in the next two layers
A box mold too, but you use more silicone.
So in first instance it could depend on the size. If it's small a box mold would be my choice. I don't like to make brush up molds of small sculpts or pieces.
Using a pressure pot will always be good, but I have never used it with clay inside. I t will depend on the hardness of the clay as I see it. Pressure can distort.
There are also Cavity Pour Molds. I don't know if you are familiar with them.
When thinking of a durable silicone working mold it's a good choice. Brush up molds will last less if used very much as brush up layers can delaminate along time. And you save silicone opposed to a box pour, but again, size.
Also it allows you to set bleeders and vent holes in a more controlled way as I see it. But it takes time and work to prepare them, and a lot of care if the sculpt is too soft.
As for the casting there are ways of avoiding bubbles without using breathers. You can slush. brush or rotocast a first layer of resin and when it has set (and is still tacky, if it fully cures you might get adhesion problems, delamination etc.) and then pour.
Also brushing in some talc (that is completely dry, moisture free) and blowing out the excess prior to pouring can aid the material to grab better to the surface.
Many ways of doing this in any case. I think it will first depend on size.
 
Thank you for your reply!
Just the body, main head, small heads, and tail detached: about 8" tall with 6" diameter base.

I'm familiar with cavity mold though only through watching videos - I've yet to do one. I've only cast once before, and it was a simple box mold.
I've watched that video a few times recently :) when thinking about my approach to this. There are so many things to consider.

I have a question - have you ever run the silicone mold without using a pressure pot, but used a pressure pot for the resin cure? I'm curious if I degass the silicone before making the mold, if I then cure in pressure pot after pouring the resin I might avoid surface issues from the silicone.
 
For the "nooks and crannies", yes, they will post a significant problem. Even if you remove the details such as heads and tails, your sculpture has so much detail inside that demoulding the item could tear up the silicone and in some cases, depending on the type of silicone you use, could even damage the master. There are some softer silicones out there that can handle some undercuts, so it's best to speak to an experienced casting person here, or at a business that sells moulding supplies. I'm not talking about a hobby store, I'm talking about a business that only sells those supplies. Bring the master so that the person can see the model and determine if he has a product that can help you. They might even suggest in modifying your master in filling in or softening some detail in order for the moulding material being able to release the master more easily. A multi-piece mould (more than 3 sections) may be necessary.

TazMan2000
Thank you for the insight! I'm going to see what I can fill in.
 
I have a question - have you ever run the silicone mold without using a pressure pot, but used a pressure pot for the resin cure? I'm curious if I degass the silicone before making the mold, if I then cure in pressure pot after pouring the resin I might avoid surface issues from the silicone.
Yes, I have made molds without a pressure pot, and used the pressure pot for the resin curing. For a pour mold degassing the silicone is correct. And you can put the mold in a pressure pot for the the resin curing. But I would think of using a slow setting resin in that case.
There are different kinds of bubbles that you can get. One produced by the air you introduce in the mixing process and another will be trapped air due to the shapes in the piece. The pressure pot compresses mixing bubbles until they are invisible, and degassing pulls the mixing air out of the resin. But trapped air bubbles might remain. These can be solved with vents etc, or even the position you fill the mold in. Or as I said, brushing resin in prior to pouring. It's all a tricky thing.
As said above the silicone you choose is also important. Too high shore hardness can give certain problems like tearing in certain areas, softer can give others. Pot life and viscosity are parameters to take in account too, specially if you will be pouring. You might need one with a longer pot life that gives more time for air to come out, and low viscosity that allows the silicone to run into every detail.
Tearing is an issue. Also take in account that resin attacks silicone. So if you are planning to make many copies even if you take care of it, the mold will wear out. Starting in the thinner section parts (nooks and crannies), which are the weakest in any case.
It's a good advice to smooth out certain things if you are planning a long series casting. Also, if this is the case, I would save a rigid master copy of the sculpt to remold if needed.
I'm definitely planning on keeping a master. Likely will only run a few to start. This is mostly for the learning experience.
Not sure which route I'm going to go yet. Going to noodle on it for a few days while I get it wrapped up.
I greatly appreciate all of the feedback - this is super helpful!
 
If it's 20'' inches tall I would probably go for a pour mold for everything. As I said I don't like brush up molds for so small pieces.
Also a block mold will be more stable, and it's the easiest mold as I see it if you aren't very experienced. Cavity Pour ones are probably a more advanced step.
As for block molds there's also the option of using translucent silicone. This allows to make a slit cut in one side of the mold while you see what's going on in the inside. They are commonly used to create molds with only "one seam". Thinking of the small heads for example.
Every time I look at it I like more your design by the way.
Let us know how it goes.
Cheers
Thanks so much for the compliment!
I will post what I do and the outcome. I'm trying to get my garage winterized so it'll be warm enough to work with the materials. Hopefully within a couple of weeks.
Thanks again
 
Hello all,
I'm new to the forum. Glad to be here and great to see the threads are active. Lots of great work and tons of talent!

I'm new to sculpting and casting. I'm getting close to wrapping up a piece that I want to cast in resin and I'm looking for some insight on molding. My apologies for the length of this thread, I want to ensure I'm getting all the details out there so my questions make sense.

This piece has a lot of fine detail and nooks and crannies and I'm not certain on how to approach the casting process. This is my biomechanical homage to HR Giger - the head, tail, and two smaller heads all detach.
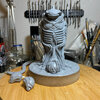
View attachment 1873345 View attachment 1873347 View attachment 1873346

My initial thought was to do a brush on mold for the body with Rebound 25 and a support shell using free-form air. My thought was due to the small details and nooks, brushing in the silicone would be best so details were not missed, and bubbles were avoided, as well as saving a ton of silicone.

The head - was thinking a box mold, or potentially a two piece mold. The two piece mold may be overkill - I'm not certain - but I also wanted to have some practice at doing one. I thought I might be able to run the seam line along the base of the jaw and up along the midline raised rail. The two smaller heads and tail - box molds.

I have a vacuum chamber and a pressure pot. I was thinking the pressure pot would be perfect for curing the resin in the mold due to all of the detail and potential for bubbles, but I've read you should have your silicone mold made under pressure as well to avoid micro bubbles/impressions on your piece when curing. If I do a brush on mold, this doesn't seem possible.

I see this piece as having a hundred different ways to capture bubbles, and have never seen anyone run vents on a brush on mold, so maybe box mold would be best.

My questions:
  • Would I be better off doing the body in a box mold, allowing for as many flues as needed, as well as putting the silicone under pressure when making the mold?
  • When putting a sculpt under pressure while making the silicone mold: do I run the risk of the sculpture collapsing under the pressure (this is sculpted in Monster clay medium)? I haven't seen anyone remark on this, and cannot find anything about it.
  • the nooks, crannies, etc. - are they going to post significant problems? I thought the brush mold approach might overcome this due to being able to apply thick silicone to any undercuts.
Thank you in advance for any insight you may be able to provide!

I pm'd you on Stan Winston. Not sure if you have your notifications turned on so wanted to post here as well. My advice would be brushing in the fine detail first and then making a solid mold box and filling it up over the sculpt. This gets your detail first and places any later formed bubbles in the mold material instead of between the sculpt and the mold material. But it also lends to giving it a box to hold the outside shape of the mold material when it might otherwise bow. Third and final tip, vibrating the mold during and after pouring to remove the most bubbles. Due to the complexity, I would still bow out and ask that you confirm all of the above with the SWSCA forum. Never be shy there. If you don't get a pro answer right away, you can always ask Chris to get one for you. Answers from other students, aka me, should always be backed up with a final from an instructor.
 
Nice sculpture! You've gotten some great advice on molds already!

I would suggest sending Smooth-On tech support pictures and maybe a video of you sculpture and asking for molding options. They have always given me clear advice. If you have a Reynolds Advanced Materials store in your area. Take pictures and video of your sculpture there as well.

I avoid Rebound because I haven't gotten many cast out of those molds before they start to fail. Dragon Skin silicone has given me very nice molds. I am not a professional, so LONG pot life and low viscosity (so the silicone flows really easily) are my best friends. Since you are learning, take into account the process will take you longer and plan for that.

Lately, I have been 3D printing mother mold jackets prior to cavity pouring silicone molds so I can carefully control the shape and amount of silicone used. This saves me a lot of material and makes much more thoughtful molds. Silicone is very expensive and a big block of it can be pain to deal with.

Honestly, considering the shape I would consider a 2-part silicone mold for the body so it could be easily released.
 
I pm'd you on Stan Winston. Not sure if you have your notifications turned on so wanted to post here as well. My advice would be brushing in the fine detail first and then making a solid mold box and filling it up over the sculpt. This gets your detail first and places any later formed bubbles in the mold material instead of between the sculpt and the mold material. But it also lends to giving it a box to hold the outside shape of the mold material when it might otherwise bow. Third and final tip, vibrating the mold during and after pouring to remove the most bubbles. Due to the complexity, I would still bow out and ask that you confirm all of the above with the SWSCA forum. Never be shy there. If you don't get a pro answer right away, you can always ask Chris to get one for you. Answers from other students, aka me, should always be backed up with a final from an instructor.
I just saw it! Thank you for the suggestion - I'll do that.
 
Nice sculpture! You've gotten some great advice on molds already!

I would suggest sending Smooth-On tech support pictures and maybe a video of you sculpture and asking for molding options. They have always given me clear advice. If you have a Reynolds Advanced Materials store in your area. Take pictures and video of your sculpture there as well.

I avoid Rebound because I haven't gotten many cast out of those molds before they start to fail. Dragon Skin silicone has given me very nice molds. I am not a professional, so LONG pot life and low viscosity (so the silicone flows really easily) are my best friends. Since you are learning, take into account the process will take you longer and plan for that.

Lately, I have been 3D printing mother mold jackets prior to cavity pouring silicone molds so I can carefully control the shape and amount of silicone used. This saves me a lot of material and makes much more thoughtful molds. Silicone is very expensive and a big block of it can be pain to deal with.

Honestly, considering the shape I would consider a 2-part silicone mold for the body so it could be easily released.
Hi Animator,

Thank you for the compliment! Good idea on smooth-on. I'll send them a support email as well. I'm also going to throw this over on the Stan Winston forum as greenmachines suggested.

As you said, the box mold would use a lot of silicone, and it is super expensive. That was why I was considering the brush on mold - save silicone. I just picked up a gallon of mold star 30 and a couple of quarts of rebound...so it is going to have to be one of those for the silicone. I can't drop any more coin on silicone for a bit.

3D printing the jackets sounds awesome!

2 part mold - yeah, that may be the way to go. I'll see what the SW crew and Smooth-on come back with, and I'll post a follow-up once I have it.

Thank you to everyone for all of your input and suggestions!
 
Last edited:
Oh, just noticed i hadnt said anything about mold material but I ditto the silicone because it will flex when releasing which helps battle lock points (negative angles). That is why I was referring to building the box (solid wood structure) and pouring the silicone in. I love the idea of a close hugging mother 3d print to lower yhe amount of silicone needed but i have 't made the 3d printing a part of my process yet. But remember that before you pour you want to brush the fine negatives and pockets with silicone first and use a vibrating table or similar to get the bubbles up.

The thing I am interested to see is if any of the SWSCA instructors mention a way to keep the silicone from sagging during the last stage of casting, when there is an empty cavity without the sculpture in it.

I would recommend asking that specifically as you will have a wide section of "roof" on this mold and I can't wrap my head around keeping it from sagging. Well actually yes I can but it would include adding some last minute anchors that stick up out of the top that could later be attached to a crossbar seated over the edges of the box... just conjecture though. Like the way a shower curtain hangs on the rod.

Excited to see what you get back from Chris and Matt.
 
You've invested a lot of cash in silicone! It's an exciting project!

I've had great luck with Mold Star silicone. I would consider using the Rebound as more of a backer layer rather than a detail layer. It might just be my limited skill with Rebound.

Good luck! Keep us updated with your progress!
 
A quick update on this - I reached out to Smooth-On and the community at SWSCA. Overall, the suggestions were basically the same as the suggestions everyone made here.

Smooth-on suggested making he mold with Mold Star 15 slow - starting with a print layer blown in with compressed air, followed up with a block mold. When I told them I had Mold Star 30 they said this would work, but it'd be a bit stiffer, and to be careful demolding the original. They also noted Rebound could be used as well.

SWSCA suggested about the same. Brushing on a print layer, using compressed air to push it in, then making a rigid mold around it. If a glove mold Chris suggested ensuring it had lots of keys to lock it into the mother mold. He went on to suggest doing a two or three part mold for the head.

I'll follow up when I mold and cast this. I'll definitely be doing a print layer, and either glove or box mold. Box molds for the three heads.

Thanks again for everyone's suggestions!

My last two cents..... I promise. First step, full circular scan photos as though you were 3d printing it later.

Second, I feel less than secure on mold release pre-spray prep. Did anyone cover this aspect?
 
My last two cents..... I promise. First step, full circular scan photos as though you were 3d printing it later.

Second, I feel less than secure on mold release pre-spray prep. Did anyone cover this aspect?
No one mentioned anything regarding release spray. I've seen/read mixed opinions on this. I'll likely follow a smooth-on video for this first time cast, so whatever it ends up suggesting. I have seen the spray can inhibit some paints though I'm fairly certain sandable automotive primer overcomes this. I'll have to double check my notes, but I thought that was what I came across.
 
No one mentioned anything regarding release spray. I've seen/read mixed opinions on this. I'll likely follow a smooth-on video for this first time cast, so whatever it ends up suggesting. I have seen the spray can inhibit some paints though I'm fairly certain sandable automotive primer overcomes this. I'll have to double check my notes, but I thought that was what I came across.
A plan is a plan. Sounds good to me.
 
I'd probably do a matrix mold for the body and a box mold for the head and tail.
With any mold, you want to degass the silicone. I wouldn't preasure pot the mold when you are making it. Casting resin out of that mold, sure. Also, if you make any box molds you can degass the silicone, pour it into the box mold and degass the entire mold, if your chamber is big enough. That will get rid of most, if not all of your voids.
 
Back
Top