A Stylized MAG - A Scratch Build - Almost Complete

cavx

Master Member
I am editing this first post as this thread is long and I think I can tell the story with this first revised edited.

Almost done :)
nike-mag-knockoffs-stage-7.jpg-121327d1350972215


Long story short: Like many, I've wanted NIKE MAGs since they appeared in BACK TO THE FUTURE PART II in 1989. I have always been a fan of the NIKE and the hi-top and owned many pairs of NIKE and Jordans over the last 25 years - I was already wearing NIKE hi-tops before the film came out.

In 2010, I bought a pair of the Mark Poon MAGs and whilst very well made, they are not my size so I could not wear them.

Last year I found a Chinese made version which I was able to buy in my size [US10] in January this year. These shoes are known on these forums as "K-MAG (K stands for Knock offs) and there is a long thread discussing them and everything MAG. They K-MAGs are comfortable and I thought they would have to do until NIKE released something more affordable (if ever) than the 2011 MAG.

Like many, I felt the K-MAG needed corrections. Until very recently, I had thought I was not skilled enough to do a full tear down and rebuild, so I initially planned on simply modifying some of the parts only. What I planned was some modifications that would include:


  1. Change out the Ankle Straps [I don't like the stitching and think it is only a matter of time before the hook and loop comes away]. After watching Jedifyfe's tutorials, I thought I would have a go at this, so thank you Jedifyfe for posting those most excellent videos.
  2. Ankle Strap Buckle. It is cheap, flat and needs to go. The replacement part I have created is slightly larger than the current one on the shoe and is much closer to the actual part. This turned out to be a project on its own and I ended up building a Vac Form to make them and the Heel Cups. Mine have that padded look like the ones on the real shoe.
  3. Mod the collars. This was as close to a rebuild as I was prepared to go at the time. As it turns out, I have been able to make complete new uppers. To do this, I had to make patterns and then learn how to sew. The patterns were made from images of the real shoe and using the K-MAG as a last.
  4. Add clear soles. I already have another thread on this so won't bother discussing that much more here. LINK
I also have a BLOG about the build.

So on to some images.
attachment.php

A diagram of the real shoe. Note the position of the 'finger pull hole' in relation to the ankle strap.

The Original Shoe
attachment.php


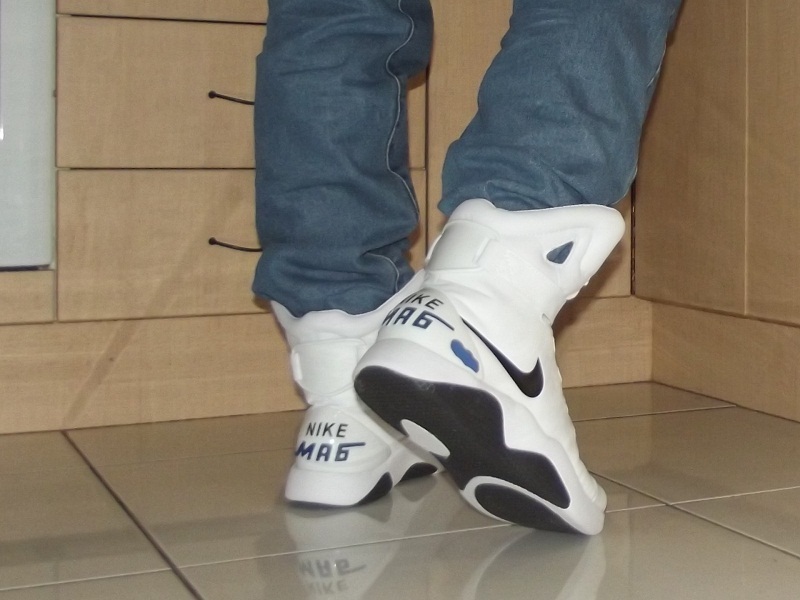
The K-MAGs come in 4 different colourways and I chose white with black soles because it seemed to be the best of the bunch and the most wearable right out of the box.

Painting Them Grey
attachment.php


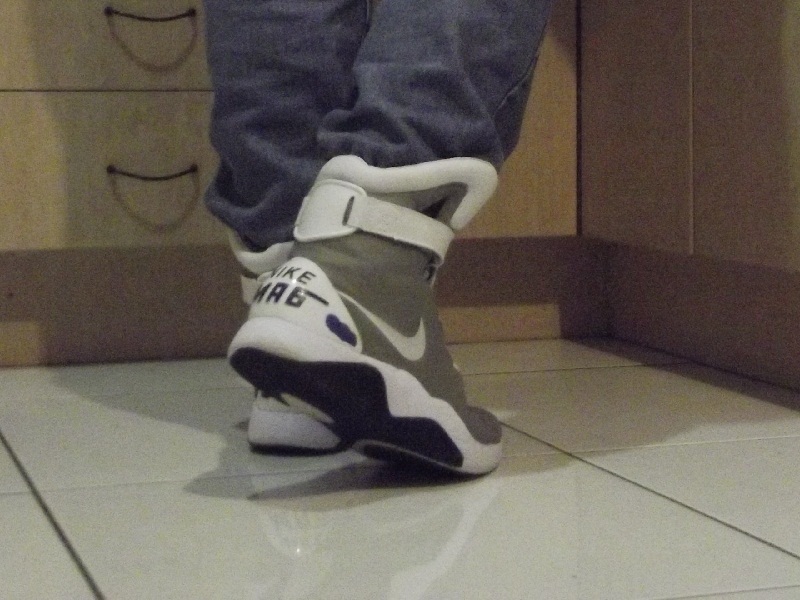
After some time, I realized white was just wrong, so after finding a spray paint made for upholstery, gave them a paint job and added some white SWOOSHES.

Adding Clear Soles
attachment.php


The creation of the clear soles was a huge learning curve and whilst they are far from perfect, they will have to do for this project.
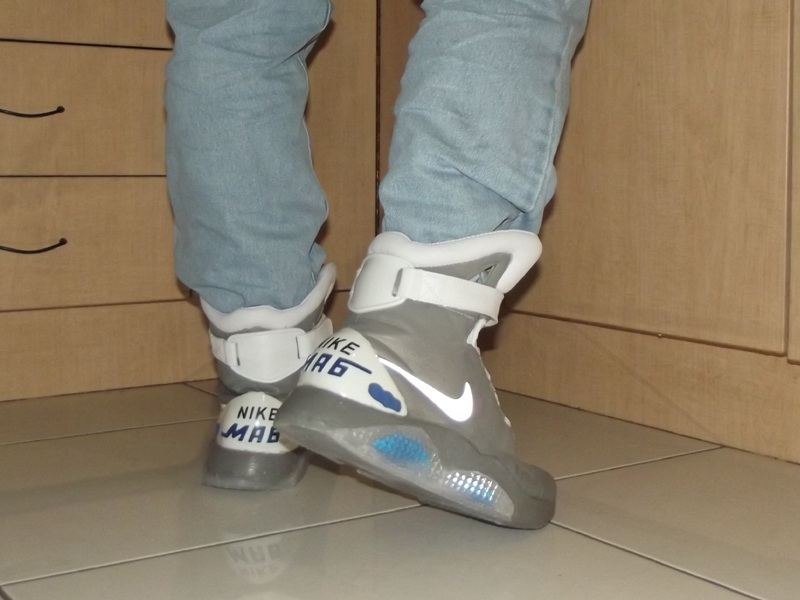
Creating New Uppers
attachment.php


I've always wanted a leather pair of MAGs and these uppers are made from a kangaroo hide I was given. Also shown is the new Ankle Buckle and Heel Cups I made from scratch.
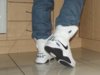
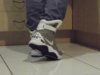
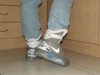
Almost Complete
attachment.php

I am still yet to glue the soles, so this is how the shoes should look when I am wearing them. I am almost hi-top complete :)

Anyway, if your still reading this, feel free to read through the rest of the thread. The good stuff starts about Pg6.
 

Attachments

  • Stage 1 Original Shoe.jpg
    Stage 1 Original Shoe.jpg
    185.6 KB · Views: 1,827
  • Stage 2 painted.jpg
    Stage 2 painted.jpg
    228.3 KB · Views: 1,725
  • Stage 3 adding clear soles.jpg
    Stage 3 adding clear soles.jpg
    136.8 KB · Views: 2,311
Last edited:
Re: My NIKE MAG Improvement project

I've owned a size 10 pair of the NIKE MAG CUSTOMS or so called K-MAG (K stands for Knock offs) since about January this year. They are comfortable and will have to do until NIKE release something more affordable (if ever).

Like many, I feel they need corrections, though I am not skilled enough to do a full tear down and rebuild, so I won't be doing that. What I will be doing are some modifications that will include:


  1. Change out the Ankle Straps [I don't like the stitching and think it is only a matter of time before the hook and loop comes away]. After watching Jedifyfe's tutorials, I thought I would have a go at this, so thank you Jedifyfe for posting those most excellent videos.
  2. Ankle Strap Buckle. It is cheap, flat and needs to go. The replacement part I have been working on will be larger than the current one on the shoe will also hold the battery for the lights. Mine will also extend around the shoe a bit further to hopefully look closer to the real part. This is going to be project on its own, but I will keep it in this thread rather start yet another. Mine will have the padded look to it.
  3. Mod the collars. This is as close to a rebuild as I will go and this will really depend as to if I can actually do this part myself. These shoes and other 'copies' including the Mark Poon shoes (that I also own a pair of) are not quite high enough IMO. Every image and video I have seen of these shoes being worn has the ankle strap over lapping or even covering the 'finger pull holes' and this is not the case on the actual shoe in the film, or the 2011 official NIKE release. They don't need to be much higher, but I feel a height increase will make them sit better when wearing these.
  4. Increase the length of the tongue. I don't intend to remove the existing tongue, rather sleeve it and extend its length. It will be made from the same material as the ankle strap and new (pending) collar.
  5. Add clear soles. I already have another thread on this so won't bother discussing that much more here. LINK
So on to some images.
attachment.php

A diagram of the real shoe. Note the position of the 'finger pull hole' in relation to the ankle strap. Toe correction will be out for my project.
attachment.php

The "BEFORE" shot as they are out of the box.
attachment.php


The material for the new ankle straps. I decided to do mine slightly different from the way Jedifyfe does his. I've made mine two inches wide and folded them so there in no visible seam on the top of the strap. How well this works out for me remains to be seen. It look quite OK here. Note that strap is sitting on the "finger pull hole" again.
attachment.php

in best Darth Vader voice - The force is with you young CAVX, but you are not a Jedi yet!

:lol

OK (sorry for the bad ESB joke) so I am just holding this strap in place for the photo. These are not the final deal BTW, rather a test run to see if I can actually do this. So no wires or EL tape just yet. The NIKE logo is simply printed on photo paper and laminated to get a feel for how these go together. I don't think my knife was as sharp as it should have been for this surgery either and why I have 'fluffy bits'.

Something else I will be doing to these is not physically attaching the straps to the buckle. When I first got these shoes, I could not actually do the strap up all the way. Over time, the strap appear to have stretched a bit, so I am looking at making the end adjustable with velcro that will be hidden under the strap. This might be the fail of the year when it comes time to install a set that light up, though I do have a plan B there.

More to come.

Good job. Let me know how you get on with the Anke Strap Buckle.

whats the easiest method to making a new ankle strap buckle?
I would like to make a new on too so I can house some batteries or a battery/el inverter inside.

I'm doing same for the strap, just making a new one from fake leather, pvc and then shoving a small el light in there. The only problem is where to put the battery/inverter, as the back ankle strap buckle is too flat to hide anything and way too small.

Something like the clonemag one would be great. If someone can give me some instructions on what materials and things to use, i would be happy to try and make one, might as well give it a go, even though im useless at creating stuff!

Overall though, I think the K Mags, because they are innacurate in a lot of main points, such as the heel cup, ankle buckle, height of the upper shoe, and the soles, its quite a mission to create something close to the originals.

The one thing i really like on these shoes is the inside material of the shoes, such as behind the tongue, and the inners of the whole shoe, the've used the same materials as other nike sneakers, so they are very comfortable.

For those that are ripping out the entire shoe and replacing it with their own material, It would be best to reuse the inner material or get something similar, as it does look very nice.
 
Re: My NIKE MAG Improvement project

i was checking out the upper part of the shoe again. the material is like a fake leather/pvc type filled in with foam in contrast to the lower part of the shoe.

i think it should be possible to simply take this upper part, remove the stitching, and then use it as a template to create a taller upper part. then its a matter of just taking some of the foam out, and stitching it back together, and then stitching this upper piece back onto the shoe.

I may have to ask my mum for some stitching help!
 
Re: My NIKE MAG Improvement project

Good job. Let me know how you get on with the Anke Strap Buckle.

whats the easiest method to making a new ankle strap buckle?
I would like to make a new on too so I can house some batteries or a battery/el inverter inside.

Thanks. This part needs to be quite a bit thicker than the very thin plastic part supplied. I am in the process of making a master mold and have use 100mm PVC pipe as a base (the curve fits well around the shoe) and I used a 146mm hole saw to make the initial cut.

attachment.php

I bought this size hole saw for building speakers as it is the right size for a 6.5" woofer and the systems I was making had 14 of these drivers. Excuse the rough cut as this was the first step. The part has since been cut into two, sanded off, and I have already drilled and cut out the slots for the straps. Another layer was glued yesterday and I am allowing 24 hours before I remove the clamps.

I'm doing same for the strap, just making a new one from fake leather, pvc and then shoving a small el light in there. The only problem is where to put the battery/inverter, as the back ankle strap buckle is too flat to hide anything and way too small.

Something like the clonemag one would be great. If someone can give me some instructions on what materials and things to use, i would be happy to try and make one, might as well give it a go, even though im useless at creating stuff!

Well Cloneprops ankle strap was the inspiration for this one. I was struggling with ideas on how to finish this, then thought about layering firbre glass over the plastic when I am done so that I get both a smooth finish, but also the smooth contours.

Overall though, I think the K Mags, because they are innacurate in a lot of main points, such as the heel cup, ankle buckle, height of the upper shoe, and the soles, its quite a mission to create something close to the originals.
They are wearable pair and why I have them. If I can make them look better, then great. If not, then it is a learning curve.

The one thing i really like on these shoes is the inside material of the shoes, such as behind the tongue, and the inners of the whole shoe, the've used the same materials as other nike sneakers, so they are very comfortable.

For those that are ripping out the entire shoe and replacing it with their own material, It would be best to reuse the inner material or get something similar, as it does look very nice.

They are quite well made. It is a shame that they copied a copy rather than go after the real deal, and so I will do what I can to correct what I can. Toe correction is clearly out, but I think that increasing the height of the ankle should make the toe look thinner anyway.

i was checking out the upper part of the shoe again. the material is like a fake leather/pvc type filled in with foam in contrast to the lower part of the shoe.

i think it should be possible to simply take this upper part, remove the stitching, and then use it as a template to create a taller upper part. then its a matter of just taking some of the foam out, and stitching it back together, and then stitching this upper piece back onto the shoe.

I may have to ask my mum for some stitching help!

Kind of what I was planning. I'll most likely use 4mm neoprene for the new collar and glue the vinyl to that. The trick is to allow extra size for stitching and reversal (turn then inside out once stitched).
 
Re: My NIKE MAG Improvement project

So after remodeling, this is where the ankle strap buckles are looking like now. These are still being built up but the images are just to share what my thoughts are.

attachment.php

The smaller parts are a traced copy of the actual part on the shoes. I've placed them in this photo just for a sense of scale. As mentioned, I wanted to make this part larger, but the more I looked at it, the less I liked it, so back under the saw it went today.
attachment.php

And the (still under development) next stage. Basically I took off the what equated to the inside edge of the original slots so about 85% of the original. I have also cut out the back to see about installing the battery here instead of cutting out the sole. I think if I went with that mini inverter and a watch battery, this could work out OK. So the next step on this part is to build up the back to give that "padded" look and I think fibre glass will be best here.

Oh, and I woke this morning to find that both ankle straps had come apart, so they have been re-glued and are currently being clamped between two sheets of MDF for 24 hours. We'll see how they are tomorrow.
 
Re: My NIKE MAG Improvement project

Back to Straps. So after 4 goes, I might (we'll see in the morning) have got this right. Jedifyfe made it look so easy in his video, but I can tell you from experience, this takes a bit of practice and it is tricky and fiddlely getting that NIKE logo to sit straight. I cheated and held it in place with some clear tape from the front until the glue dried. I also added that adjustment to the "fixed" side which was very needed after stuffing a large card tube into the MP shoes to give them support.

So anyway, I was going to fit the new straps to my size 10 K-MAGs only to find (and lucky too as I was just before I cut the strap of the K-MAG) that the strap on the K-MAGs is not a true 1" wide, so my new 1" wide straps would not fit through the slots on the buckle. So I dragged in my Mark Poon MAGs from the theatre and changed out the straps (I had some horrid webbing straps) on them. They look much better now to.

attachment.php


My collection of MAG shoes :cool ranging from size 8 on the right to 10 on the left. Now you can see why I want to add height to my MAGs and increase the tongue as well.

attachment.php


The Mark Poon shoes are supposed to be 9US or 9.5US, but these appear to be the same size or only slightly larger than the US8s. So not sure who got their sizing wrong here. No wonder I can't fit into them properly because I am actually a size 9.5 myself. I buy 10s because when I had my feet measured for a pair of Red Wing boots one, I discovered that my left foot is slightly longer than my right.
 
Re: My NIKE MAG Improvement project

After thinking of ways to increase the height of the collar, I came up with the following after taking a good long look at my shoes, I came up with the idea of using what already exists.

This image can be found in the thread by Cloneprops and is of his part for the amazing MAGs he is building.
attachment.php

It is very neat and almost looks like it was heat and vacuum formed. Something I can not do in my work shop.

Back to my shoes. I have marked the seam with a red arrow.
attachment.php

This seam is not on the Mark Poon MAGs and I don't think it is on the real MAGs either. It is there on these shoes because it the material used for this part is different from that on the rest of the shoe's upper. This is much closer to what is used on the real MAG shoes just for the white trim. This part is quite well made, so why not just recyle this part instead or making a new one that might not look as good?

attachment.php


So the idea now is to still make the vinyl/leatherette skin over neoprene and then attach that to the shoe, then attach this part to finish of the collar. In the end of the day, it is about adding an inch (or there abouts) between this stitched line and the bottom of the cutout of the "finger pulls".

Given it is more pronounced on the inside than the outside, I would probably reverse this part as well so it sits over the new custom collar.

Yeah i think its possible.

the only problem with these kmags, is that the upper, whilst its stiched ontop the main part of the shoe,

the inner material of the upper part, the sort of soft meshy type fabric, it extends all the way down to the bottom of the inner.

got to find a way of ripping this out without causing too much damage.
 
Re: My NIKE MAG Improvement project

Yeah i think its possible.

the only problem with these kmags, is that the upper, whilst its stiched ontop the main part of the shoe,

the inner material of the upper part, the sort of soft meshy type fabric, it extends all the way down to the bottom of the inner.

got to find a way of ripping this out without causing too much damage.

Why do you need to remove that? Are you thinking for mounting a power supply? After building that over sized buckle made for a 9V, I took a look at the batteries in my house alarm remote (also used in car alarm remotes). The battery is called A23. These are 12V and they are about 1/4 the size of a 9V battery and only cost about $2.50 each! Just don't confuse them with the batteries for a camera at about $40 each!

I am thinking of simply cutting my collar off just above the stitch line. When I attach the custom part, it gets stitched on upside down than folded over and up and this will cover the stitch line. I think if I was to run wires for the soles and heel cup, that would be the time to do it.
 
Re: My NIKE MAG Improvement project

Why do you need to remove that? Are you thinking for mounting a power supply? After building that over sized buckle made for a 9V, I took a look at the batteries in my house alarm remote (also used in car alarm remotes). The battery is called A23. These are 12V and they are about 1/4 the size of a 9V battery and only cost about $2.50 each! Just don't confuse them with the batteries for a camera at about $40 each!

I am thinking of simply cutting my collar off just above the stitch line. When I attach the custom part, it gets stitched on upside down than folded over and up and this will cover the stitch line. I think if I was to run wires for the soles and heel cup, that would be the time to do it.


ok yeah i see what you doing. you're going to just cut off at the seam, and create a slightly longer upper piece and just stitch back on?

i think i know what that inner liner fabric is called. Its just called a type of tricot polyester mesh fabric or something similar. So what we can do is just cut off that upper part at the seam. open it up, redraw a new upper piece in pvc/leather and then fill it with the foam, restitch it and then stitch back on at the seam.

it should then look much better and taller like the oriignal mag.
The k Mags are though are innacurate before the seam join, they start to go in a straight line upwards, whereas on the real mags, they are curved going upwards, but still a longer upper piece will be more accurate.

it will probably be best to remove some of the foam inside it too, as i think its too thick, the original mag and how clonemag has done it is that the foam is very flat like a sheet, while the kmags are like puffed out.

good job on this, i think i might get another few pairs first of the k mags, if i mess up, i can try again.

also, still hoping for a miracle that kmags version 2s will be coming out. would save us so much time and money.:confused
 
Re: My NIKE MAG Improvement project

Why do you need to remove that? Are you thinking for mounting a power supply? After building that over sized buckle made for a 9V, I took a look at the batteries in my house alarm remote (also used in car alarm remotes). The battery is called A23. These are 12V and they are about 1/4 the size of a 9V battery and only cost about $2.50 each! Just don't confuse them with the batteries for a camera at about $40 each!

I am thinking of simply cutting my collar off just above the stitch line. When I attach the custom part, it gets stitched on upside down than folded over and up and this will cover the stitch line. I think if I was to run wires for the soles and heel cup, that would be the time to do it.

yes, that battery looks good.
what inverter though would you use? theres a 12v inverter (blue) about 1 inch thick thats on sale at adafruit.

i was thinking of a solution where the inverter and battery fit inside the ankle buckle if at all possible, which is why i was thinking of low voltage solutions. But obviously most people are using a 9v batter solution. 12v would be longer lasting though. it might be possible to fit that adafruit 12v inverter and a single a23 battery inside the buckle.
 
Re: My NIKE MAG Improvement project

ok yeah i see what you doing. you're going to just cut off at the seam, and create a slightly longer upper piece and just stitch back on?

Correct. The ankle strap covers this stitching now, and will continue to do the same after the new top collar is added.

i think i know what that inner liner fabric is called. Its just called a type of tricot polyester mesh fabric or something similar. So what we can do is just cut off that upper part at the seam. open it up, redraw a new upper piece in pvc/leather and then fill it with the foam, restitch it and then stitch back on at the seam.

I am planning on using neoprene because it is slightly stiffer than foam.

it should then look much better and taller like the oriignal mag.

That is the plan :)

The k Mags are though are innacurate before the seam join, they start to go in a straight line upwards, whereas on the real mags, they are curved going upwards, but still a longer upper piece will be more accurate.

Yeah, looking at TheNickFox's re-do and he slimmed the upper down and found it became tight. I still want these to be wearable, so some restrictions will apply with the final shape.

it will probably be best to remove some of the foam inside it too, as i think its too thick, the original mag and how clonemag has done it is that the foam is very flat like a sheet, while the kmags are like puffed out.

Correct. I intend to remove all the foam from the main collar of this piece leaving just the trim padded on top - just like cloneprops part.

good job on this, i think i might get another few pairs first of the k mags, if i mess up, i can try again.

My first attempt at a NIKE MAG conversion was actually 1992. I messed them up and ended throwing out quite a nice pair of NIKE AIRs. Oh well, it happens I guess and why I am planning every step this time. Back then, there was no forums to share this stuff, so it was kind of a closet project :$

also, still hoping for a miracle that kmags version 2s will be coming out. would save us so much time and money.:confused
Maybe we all need to think like Sven :cool

yes, that battery looks good.
what inverter though would you use? theres a 12v inverter (blue) about 1 inch thick thats on sale at adafruit.

I am still interested in that "mini" unit about 40mm long. I think it would be best to still remove the contents from the case and build that into the buckle. Will see when I get mine.

i was thinking of a solution where the inverter and battery fit inside the ankle buckle if at all possible, which is why i was thinking of low voltage solutions. But obviously most people are using a 9v batter solution. 12v would be longer lasting though. it might be possible to fit that adafruit 12v inverter and a single a23 battery inside the buckle.

I don't know how long these A23 batteries last, but I am surprised no-one mentioned them before. They are 12V and small, so perfect IMO unless they go flat too fast or something I'm not aware of. The reason I want to house all the electronics in the buckle is because that part is removable and therefore serviceable.
 
Re: My NIKE MAG Improvement project

Another go at the ankle buckle. This is looking better. It is actually back to the original size, just much thicker, so providing a place to store a battery. These are finished yet and still need more work before they go on my shoes.
attachment.php

If they appear slightly off, they probably are. I have had to eye ball these as I don't have any precise manufacturing tools here. The lines will soften once I round the top and bottom edges and layer some fiber glass over the middle section.
 
Re: My NIKE MAG Improvement project

I got some sculptey in the mail yesterday, so decided to try and have a go at making the ankle strap holder.

I did it purely by eye, looking at lots of images of the real mags and trying to copy it, but its quite hard since the shape is unorthodox.

Not sure how they created the original back in 1989.

Anyway, here's what i've come up with so far after a few hours, excluding the slits for the straps. I figure I will have to bake it first, harden it and then do the slits and further modifications. I put some cling film over the shoe and then sculpted straight on them.

Do you think it looks too big? it's quite hard to sculpt all the curves, especially by hand. I guess we can call this method "ClayMag"!

magbuckle2.jpg
 
Re: My NIKE MAG Improvement project

i cut it down a bit from the back as it was too thick.
trying to see if can make it more accurate

magbuckle3.jpg
 
Re: My NIKE MAG Improvement project

Here is my latest Sketch Up of the MAG Ankle Buckle. It is actually a complex part and whilst there is still a bit more work to do, this is starting to get the shape and size I want (I think). The unit is smaller than my earlier plastic attempts and still large enough to house a 9V battery.

attachment.php

attachment.php
 
Re: My NIKE MAG Improvement project

that looks great. how long does it take to learn 3D modelling?

It looks so hard to do!

also, i took a picture of the clay model alongside a 9v battery to show its size.

magbucklesize2.jpg


On the Kmags, i think its slightly oversized as the upper part of the shoe is shorter than on the real shoe. I think on a restitched longer upper piece, the buckle would fit much better, as I could push it up and increase the distance between it and the heel cup.

I'm still looking at images though of the real ones, trying to gauge the correct proportions.

I think I might make another smaller version as well, one just for the kmag, and then keep the existing slightly bigger one for a proper modified kmag.

I thought sculpting in clay would be easy, but its much harder than I thought! its the first time i've sculpted anything since kindergaten lol.
 
Last edited:
Re: My NIKE MAG Improvement project

Here I have added some dimensions.
attachment.php


So the actual height in the centre is 85mm or 3.346". The ends are 55mm or 2.165".

that looks great. how long does it take to learn 3D modelling?

It looks so hard to do!

For years I struggled with 3D CAD software. I self taught myself because I needed a better way to show clients the Home Theatres I was designing for them and my competition post on Facebook that they were using Sketch Up. That gave me the push I needed to learn how to do this stuff.

Sketch Up offers easy step by step tutorials (via You Tube) when you down load the software. From there, it is simply a matter of drawing something. I did the simple house (external view) they do in the tutorial, but got impatient, so just took on a room I already knew dimensions for (my own HT) and went from there. The more I use it, the faster I get to do the same stuff, and the more complex I can go with what I am drawing.

What makes this buckle a challenge is that it has multi radii in different plains. Each one needs to be stepped out or broken down into smaller straight line pieces in order to roll the edges or link them to the next radius. From what I can tell, complex shapes like this are actually outside the abilities of the free version of the program, so why I took on the PEP style drawing to do this.

also, i took a picture of the clay model alongside a 9v battery to show its size.

magbucklesize2.jpg


On the Kmags, i think its slightly oversized as the upper part of the shoe is shorter than on the real shoe. I think on a restitched longer upper piece, the buckle would fit much better, as I could push it up and increase the distance between it and the heel cup.

That looks better in this shot and I agree with what you just said.

I thought sculpting in clay would be easy, but its much harder than I thought! its the first time i've sculpted anything since kindergaten lol.

Yeah LOL. Same thing when grinding my part out of plastic. You make a diagram and mark out the plastic and all looks good and easy until you start to cut. Lucky I have over 2.5m of the 100mm PVC pipe left from the original 3m length (my screen came packed in this and I never threw it out for what ever reason), so I have no worries about material shortage here. Not for a while, anyway :cool
 
Last edited:
This thread is more than 11 years old.

Your message may be considered spam for the following reasons:

  1. This thread hasn't been active in some time. A new post in this thread might not contribute constructively to this discussion after so long.
If you wish to reply despite these issues, check the box below before replying.
Be aware that malicious compliance may result in more severe penalties.
Back
Top