You are using an out of date browser. It may not display this or other websites correctly.
You should upgrade or use an alternative browser.
You should upgrade or use an alternative browser.
37 1/2 inch (1/2 studio scale) TOS Battlestar Galactica scratchbuild #2
- Thread starter mslz22
- Start date
-
- Tags
- battlestar galactica


Those look really awesome. I think the issue that i ran into with the cranes and the drop tanks was partially with the fit. I can't remember but the drop tanks may have been just a tad big for 1/2 scale, or the cranes a bit big. Nothing was exact using the available 1/2 studio sized donors, which is why some stuff got crowded in.
Not sure how that would translate to an easy upgrade for those drop tank sections, I'm guessing razor saw them off the castings?
Not sure how that would translate to an easy upgrade for those drop tank sections, I'm guessing razor saw them off the castings?
137th Gebirg
Well-Known Member
Did the reshaping over the weekend and it worked great. I was surprised at how pliable the piece was. I was actually scared to overcompensate the warp but it wound up being damn near perfect!NP, dude. Did this to my main hull section just last night, worked fine. I already had a couple of pieces of pine reinforcement epoxied in (didn't discover the twist until too late) but wasn't a problem. I'm just about to go off and epoxy some ply strips down the full length; it'll complicate fibre optic work but the model will never sag or warp again, which is a real worry in the Australian climate.
I was also inspired by your post to take the extra step of JB Welding two threaded zinc rods down either side of the model, and using them to hold on the head & engine. Virginia summers aren't as bad as how I perceive Australian summers to be, but when the AC goes out (and it has in the past), there is a threat of the ambient air getting too hot and humid, resulting in potential sagging, particularly with a single-post stand. She should be straight as an arrow from now til Ragnarok!
")
Mike, thanks. Just struggling to get them to fit properly myself right now. Not the same reasons but I think I know what you mean! Yeah, I'm gonna dremel or saw mine off, when I get a minute.
Gebirg - :thumbsup Humidity shouldn't matter but air temp can do. It's just a better risk, to sort it now rather than have to deal with it after it is all buttoned up. I should have used rod too, but I had the marine ply lying around.
Gebirg - :thumbsup Humidity shouldn't matter but air temp can do. It's just a better risk, to sort it now rather than have to deal with it after it is all buttoned up. I should have used rod too, but I had the marine ply lying around.
DarthVador
Active Member
Hello Mike just wanted to let you know Brad got the BSG Kit ok,Thank you so much for the kit..I was going to send you a PM but your inbox must be full,lol
Has anyone mapped out where the greeblies go? I know there have been two shots of where some go, but is there anyone with more knowledge on where they go?
Inability to place all the greeblies in your sleep means you will have to surrender your kit to me.
I have some time scheduled today to work on mine, last month has been pretty crazy with making the new molds, and the last week with a lot of spring cleaning in the shop. i am always amazed at the mess i am capable of making.
I'll do my best to post up some pics of the small stuff later this afternoon. Also, get back to some PM's I am lagging behind on.
mike
I'll do my best to post up some pics of the small stuff later this afternoon. Also, get back to some PM's I am lagging behind on.
mike
Spacejunk
Active Member
I have some time scheduled today to work on mine, last month has been pretty crazy with making the new molds, and the last week with a lot of spring cleaning in the shop. i am always amazed at the mess i am capable of making.
I'll do my best to post up some pics of the small stuff later this afternoon. Also, get back to some PM's I am lagging behind on.
mike
Hi Mike PM sent.
Hey Guys, we are finally in line for a nice warm week so i should be able to catch up a lot on the little parts that have put me behind a bit. It's not the big stuff that holds me up at all, it's the small parts with low mass in the colder weather, they take forever to cure and I wind up with a ton of big stuff like bodies/heads/landing bays and fall behind on the tiny add ons.
So i know that it may be a good idea to start a formal instructions thread, and maybe i will, but for now here is some more pics of how i got where i am.
For the head, here is what i did with the FOptics and LED's in the head. The black gunk is 5 minute epoxy with a bit of pigment powder in it. Why the pigment powder? IMO it minimizes the chance of a light leak. The head bound up with elastics after getting the alignment correct. Using the 5 minute stuff gives you enough time to get it just right, but be sure to do the dry fitting first of course.
Punched a hole for the bridge LED/FO cluster. Painting the bridge off the ship is the way that i am going, I was worried that the FOptics protruding the bridge would leave "shadows" on the head during painting.
For the arm to landing bay connection here you can see that i used 1/4 button head bolts, you can use any approx sized screw/bolt, does not need to be button head. The idea is to drill a hole into the bottom of the arms, which are marked with a slightly undersized drill bit, the the case of 1/4 inch i drilled the hole with a 7/32nd bit, then screwed the 1/4 bolt into the resin creating threads in the resin. Then i can make slight adjustments to the landing bays to make sure that they are both parallel and square to the body. Again i used 5 minute epoxy during this process, and with the lower landing bay NOT attached to the upper. Once those are bolted on and epoxied on, it should be pretty rock solid.


For the arm to landing bay connection here you can see that i used 1/4 button head bolts, you can use any approx sized screw/bolt, does not need to be button head. The idea is to drill a hole into the bottom of the arms, which are marked with a slightly undersized drill bit, the the case of 1/4 inch i drilled the hole with a 7/32nd bit, then screwed the 1/4 bolt into the resin creating threads in the resin. Then i can make slight adjustments to the landing bays to make sure that they are both parallel and square to the body. Again i used 5 minute epoxy during this process, and with the lower landing bay NOT attached to the upper. Once those are bolted on and epoxied on, it should be pretty rock solid.
Bridge with the FOptics. by putting the round FO thru the square details that i made on the bridge it kind of doubles the look of the layered details on there. I know it's not exactly the way the studio model is but it was a judgement call at the time i was making the pattern. One of those tiny greelbie parts is for the light bar thingy on the head.


- - - Updated - - -
Intended use for these greeblies is to help hide any gap in the arms to landing bay connection.

- - - Updated - - -
Intended use for these greeblies is to help hide any gap in the arms to landing bay connection.
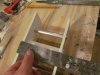
Sorry to go out of order a bit, realizing that i missed a few steps as i look thru the thread. Here is a serious of pics setting up the back engine box. The 1/2 aluminum is not included in the kit and this does not need to be aluminum, acrylic or styrene will do just fine. This is pretty self explanatory, the important stuff to keep in mind is that the plate marked # 1 goes into the transitional part between the body and the engines. It's really important to get that flush as you can see in the pics i kind of made a clamping rig for it out of scrap. Just be sure to use squares to keep all the panels true as you glue all this up.
mike


mike
Attachments

Similar threads
- Replies
- 2
- Views
- 317
- Replies
- 10
- Views
- 600