Ironman Costume for 5yr old - LINKS on PAGE 1 - tips & important bits

indiefilmgeek

Sr Member
Ironman Costume for 5yr old - MODDING THIS FOR MY DAUGHTER!

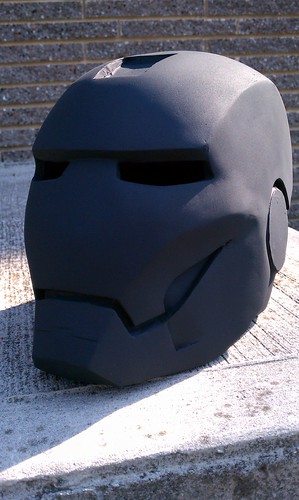
This build thread is over 26 pages long, so I wanted to show you what the finished suit looked like before you go hunting for it through all those pages!
6302138477_8e80ba5207.jpg


2013 UPDATE: For anyone starting an EVA foam costume, I wanted to point out a couple of newer techniques that have been developed after I made Mikey's armor. I used a rubberizing sealing technique involving Plasti-dip. Here are three newer options you should consider.

1. XRobot's plastic-coating method is worth looking into. He uses PVA glue to seal the foam and then coats it with Smoothcast. Here is his video on that.

2. docholiday78's heat sealing technique. Doc uses a heat gun to close-up the foam cells and then PVA glue. No need for Plasti-dip. HERE is his post.

3. Worbla. While more expensive, this is thermal plastic can produce some amazing armor pieces when used over EVA. A good source for more info and techniques would be Kamui's BOOK on the subject.


Regarding my build, I've provided below some helpful navigation for this thread (cause it's stupid long now):

HELMET WORK (just scroll down - it's in the first post)
PAINTING METHOD
WHERE TO GET EVA FOAM
CONSTRUCTION WITH EVA FOAM
VOICE CHANGER FOR HELMET
ELBOW JOINT EXPLAINED
BUILDING THE HAND-PLATE TRIGGER FOR THE REPULSORS 1
BUILDING THE HAND-PLATE TRIGGER FOR THE REPULSORS 2
GLOVE WORK 1
GLOVE WORK 2
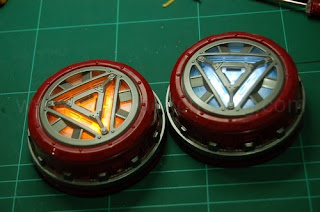
BUILDING THE ARC REACTOR 1
BUILDING THE ARC REACTOR 2
BUILDING THE ARC REACTOR 3
BUILDING THE CHEST/BACK PIECE 1
BUILDING THE CHEST/BACK PIECE 2
FABRIC UNDER ARMOR
BUILDING THE BOOTS 1
BUILDING THE BOOTS 2
LEG ASSEMBLY AND FINAL PICS OF THE BOOTS
SIMPLE VELCRO LEG TO HIP CONNECTION
FINISHED PICTURES - DAYTIME
FINISHED PICTURES - EVENING
FINISHED PICTURE - NIGHT
HELMET MAGNETS AND EYE LIGHTS EXPLAINED - IN DETAIL


------------------------------
Original First Post on 11-24-11:
------------------------------
I am working on constructing a Halloween costume for my 5 year old son, Michael. He would like to be Ironman, so I hit your forums (and 405th) and began working on some pep armor for his costume. I began with the helmet and only started this thread as I was finishing it up.

To be begin with, I'll mention that I'm using Robo's Ironman Mark IV files for most of this build (notable exception is this helmet, for example, is based on the Samuray did on dungbeetles helmet that had a smaller chin). They are clean and simple and perfect for this scale model version of the suit. A huge 'thank you' to Robo and all the guys/gals out there that help us all out by supplying these GREAT pep files!

To start the build I began with the helmet and here's some pics of that process...

5788783486_100faf9001.jpg

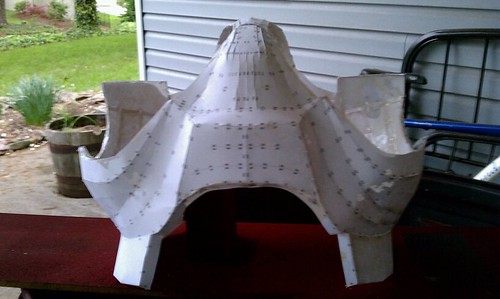
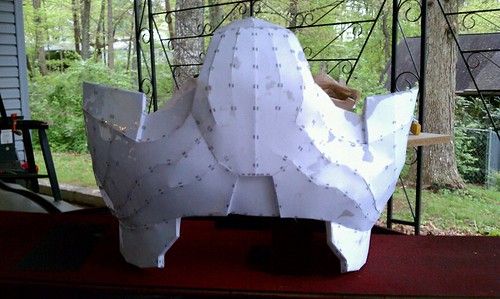
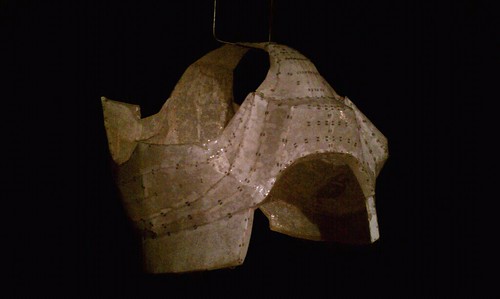
The larger was my very first pep construction, but I scaled it too big and had to go smaller. The second (smaller one) is the pep that became Mikey's helmet. On that piece, you will notice I also cheated and made the eye holes slightly larger.

5788232701_5a82a984a8.jpg

Big (test) helmet done... Final helmet, let to go! Since it was deep winter when I started this project, I borrowed my friends garage to fiberglass the two helmets I had pepped. I had decided to keep all the pieces together through the hardening process, so their edges would line up easier.

5788789424_ef7341b1cd.jpg


5788793380_efa9c15c06.jpg

Scary first application of bondo... I truly thought I'd ruined the piece! lol

5788243047_ac11052764.jpg


5788252577_f0dc539165.jpg

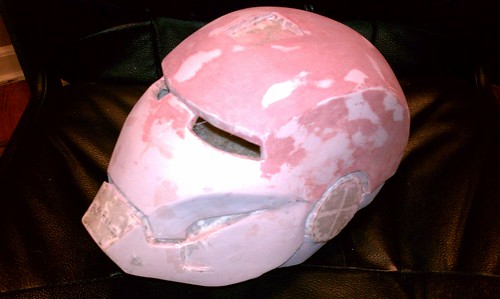
...but after sanding, it looked a bit better.

5788802630_5d0a3c46a9.jpg


5788256407_9f62d81759.jpg


5788802630_5d0a3c46a9.jpg

More bondo... more sanding.

5788260827_b388f2a237.jpg


5788272973_2520b2b879.jpg


5788266893_16139609c2.jpg


5634160921_7026b7984f.jpg

So, after LOTS of applications of bondo and glazing putty, I was ready to prime the helmet.

5634749040_8633c18683.jpg

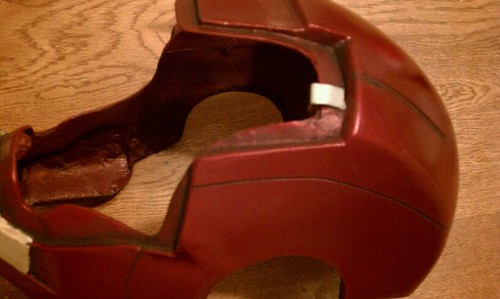
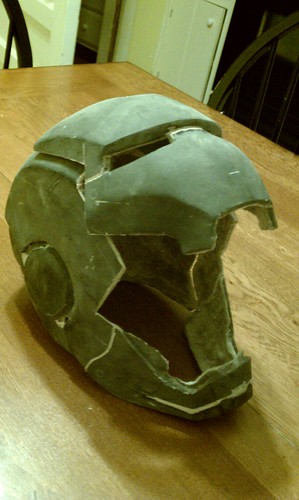
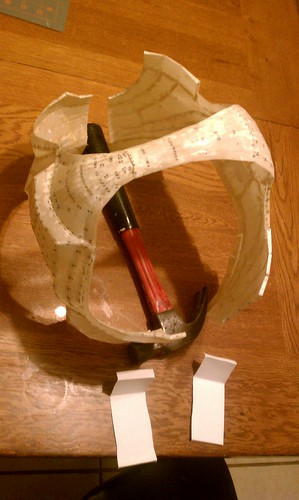
Primed and ready to be cut into three parts: Faceplate, back piece and the main helmet body.

5634753652_9f0ac1ae35.jpg

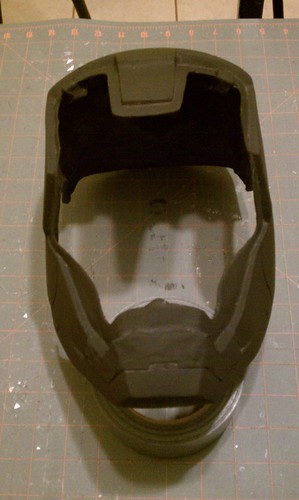
Cut into three pieces... showing the faceplate open!

5605187366_5eed4424d7.jpg


5605187480_dedf0a5a92.jpg

Test Fitting with Mikey.


And then in early April we created a manikin so I could start working on some of the body armor pieces. Here's a little time-lapse video for ya!


5626166042_f8d7185ec6.jpg


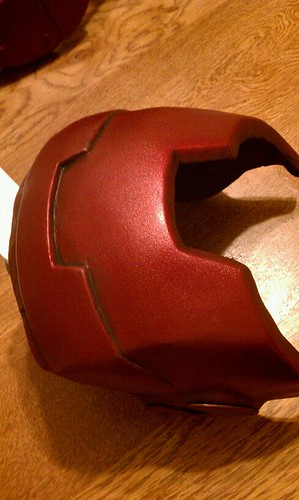
Here are a few update photos now that the main section of the helmet has been painted. The test fitting pictures (below) show both Mikey and I holding the helmet in place. This is because I still don't have padding added inside the helmet yet (probably won't until we're closer to Halloween and I know his head isn't going to get any bigger!)

5622909927_73554bd1d6.jpg


5623496396_e7c0a0062d.jpg


5622909857_5199b17b52.jpg


And finally... Here is a little video explaining the magnetic faceplate connectors (as well as the electrical connectors for the LED eye lights).


Next up is adding a bit of weathering and a final clear coat. I've also finished pepping his Cod Piece and started work on pep pieces for his gloves. More picture on those later this weekend (hopefully).

Lastly, I just wanted to give a huge THANK YOU to all the folks that posted pictures, tutorials and videos of their projects on this site (and others). I've never worked with any of these materials before, and I couldn't have come this far without all the experience and time you've put into fostering this community of awesomely create people!


NOTE: Further info on the magnetic/electrical alternative to building a hinge for the faceplate can be found HERE.
 
Last edited by a moderator:
re: Halloween Iron Man Costume for my 5yr old

Great Job! That's Reall Cool....It's cute the fact that its made for a toddler. :lol Hope to see more soon! Keep Building!....:thumbsup
 
Awesome! love to see other dads working costumes for their kids. Looks like a great start with the helmet. Keep the pics coming as it comes along.
 
re: Halloween Iron Man Costume for my 5yr old

Kids woke up at 6:30am this morning... The only positive thing about this is that I got to do a bit of light weathering on the helmet. I'm always surprised how just a little bit of weathering goes a long way toward making the pieces look very 'real.'

Weathering done with basic acrylic black paint (wiped off with a moist cloth). I tested a bit of silver rub-n-buff, but I didn't like the look of it. I might still consider it on the edges of the chest pieces or elbows/knees, but I'm skipping it for the helmet.

5624461722_f4b46a89f1.jpg

5624461762_59c3c87ee6.jpg
 
re: Halloween Iron Man Costume for my 5yr old

As I let some of the final painting dry on the helmet pieces, I started in on another piece I believe won't be too effected by another 6 months of grown (between now and Halloween). In this case, it's the pep file entitled 'Cod Piece.'

Just for reference, I'm individually scaling each pep file to fit (as it seems like a universal scale % isn't going to work for my a kid at 5-6yrs old). I also plan to modify the pieces I select to create via pep to make it easier for Mikey to move and wear the costume. In the end a very sharp looking armored suit that Mike will wear is more important to me than trying to stay true to the movie-accurate Mark III. :)

So, with that said, my working plan for the 'Cod Piece' is to modify this into more of a waist\belt-like unit without the rigid crotch piece connected between the legs (front to back). I've read a couple posts from people that have worked on kid Ironman builds and this piece seems to be a hard one to get 'right' for small bodies, so this seems like the best plan for my build.

However, we all know that plans always go out the window when you start to execute. lol

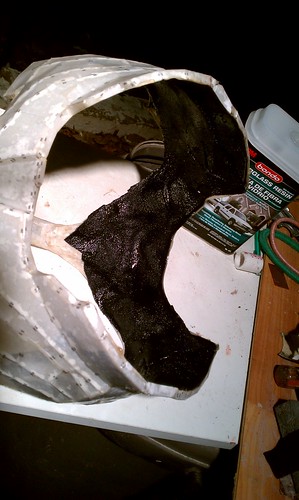
Here is the fully pepped piece after I've painted the inside with fiberglass resin. When this dries I'll paint the outside and then go back and use cloth fiberglassing on the inside before starting the bondo and sanding stages.

5626109318_735c4d294b.jpg

5626109300_ffc161e194.jpg
 
re: Halloween Iron Man Costume for my 5yr old

wow!! Great work. I love the blackwashing effect on the helmet.

The helmet is awesome :)
 
re: Halloween Iron Man Costume for my 5yr old

Thanks for all your positive comments! It certainly helps keep my enthusiasm up. :)

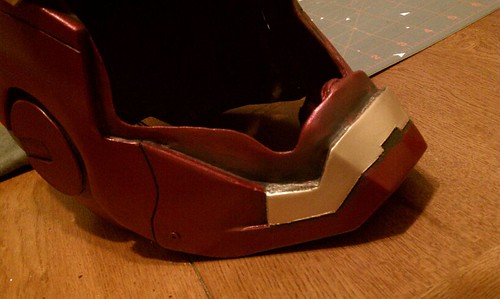
I had a very busy day with the family, so I didn't have much time to work on the Ironman project... I did manage to move the Cod piece along by Fiberglassing the outside (shown here hanging up to dry in my carport) and I touched up the gold 'chin' on the helmet. That should be the final application of the black-washing treatment. I might still do some brushed metal effect work on the gold faceplate, and I'm probably going to clear coat the whole thing for protection and a nice gloss effect - but those will have to wait until I see how some of the other pieces come out.


I've also be playing around with glove options. I purchased two different kinds of gloves and I have a couple materials I think I'm going to test out; however, I haven't landed at the right pep scale yet (despite two different print outs). I think I'll make full post coming up on just the gloves... Until then here's two more pics.

Hope you all had a great weekend!

5630063440_1fa7f171c0.jpg


5630063408_af20276fcb.jpg
 
Re: Halloween Iron Man Costume for my 5yr old

GENERAL MUSING ABOUT TINY GLOVES
The issue with creating a nearly half-scale Ironman suit, is that some pieces just don't scale well (and remain functional to wear). Ironman's gloves are proving to be one of those pieces for me. I definitely need fully functional gloves for Mikey with as close to 100% mobility as I can achieve; however, Mikey's hands and fingers are tiny - and not perfectly scaled down 'adult' hands.

PAA154000024.jpg
As this webpic shows, the finger length of kid hands is very much shorter than adult fingers. They are also shaped differently - more tapered toward the ends than adult fingers.

I actually remember Peter Jackson talking about the issue with using small people or kids for hobbits in LotR, and specifically stating that hand-size and shape didn't look 'right' unless they used camera tricks to 'shrink' full-sized adults. That's certainly the issue I'm currently running it with Mikey's armored gloves.

UNDER ARMOR BASE GLOVES - To Stretch, or Not to Stretch:

My first challenge was finding base-gloves that would properly fit Mikey's hands. I knew from last winter, the best fitting children gloves were Magic Stretch gloves.
magic-gloves.jpg
These are a very tight knit-looking glove made up of 95% acrylic / 5% spandex. They are tiny, but very stretchy. They also only cost $1-$2US each.

I picked up a couple of pairs of these and also purchased a couple of pairs of the smallest cotton dress gloves I could find online.
12091.jpg


The non-stretchy cotton gloves didn't fit AT ALL, so I endeavored to modify the fingers to Mikey-Size (via hand-stitching). This fit his fingers perfectly, but left WAY too much material in the palm of the glove and a large (awkward) space between the thumb and pointer finger. The end result of this experiment was to convince me that the only way to get a pair of non-stretching material gloves will be to buy fabric and sew them myself.

So, I have the stretching gloves that fit and I have confidence that I can sew up a pair of non-stretching gloves that will fit. That leaves me with the following conundrum: Do I want stretchy or non-stretchy base gloves?

I think the stretch gloves fit very nicely, but will probably be harder to attach armor pieces to (especially the larger palm pieces) and might prove problematic when I begin painting detail between armor plates. The non-stretch gloves will be easier to attach armor pieces to, but will not fit as well or allow much for growth over the next few months.

PEP vs SCRATCH BUILD
My other decision I'm wrestling with is in regard to using the pep files or just scratch building something relatively close to what the movie gloves look like.

Pepping these tiny pieces will be a pain the arse, and take considerable time. On the other hand (no pun intended), I have purchased some thin styrene sheets from a local hobby shop. I think I could fairly easily create some bands of armor along each finger even if they are just simple circular bands rather than the more movie-accurate squarish shape. I'm currently leaning toward the styrene method.

LIGHT IT UP!
Scale plays another part of my choice of repulsor lights. Most of the simple prefab LED light units folks are using for their adult-size suits will be way too big for Mikey's hands. So, the other day I picked up two 9 LED mini-flashlights, that I will cut down to just the thickness of the LEDs and then wire it to the main battery power pack for the suit.
31GHP9BRAVL._SL500_AA300_.jpg
The circumference of the mini-flashlight housing is almost perfectly scale for my 5yr old's hand and the light is intensely bright.

Now, I'm no electrical engineer so this next part will have to trial and error... I'd like to add sound and a nice strobe effect on the LEDs; however, I'm no breadboard-geek, so I have to make due with crap I can wire together (anyone with EE experience that would like to build me up something for this - please feel free!).

I ran across this cheap toy at Wal-Mart last night for $6.
ARC+054.jpg

One of it's two sound effects seems to resemble a repulsor sound. My first thought was to pick it up and see if (after I ripped out the lights and other crap) I could connect it to the same circuit that the repulsor glove lights would be connected to so the light and sound would happen at the same time. I would (theoretically) only need one of these toys, as I could house the toy anywhere within the suite. Then I could either let the sound come from the toy (if it was housed in the chest let's say), or I could get REALLY fancy and run speaker wires back to the gloves (where tiny speakers could produce the sound right there at the glove). I might still play with that idea if I have some spare time.

GETTING STARTED...
Finally, I guess I need to get started on the glove project (even if I haven't made all my design decisions yet). The first step is to get a rough mold of Mikey's hands (or at least ONE of them).

3305059414024040_-Baby-Plaster-Casting-Kit-Handprint.jpg
I just purchased two kits designed to make plaster casts of an infant's foot and hand. These kits actually use Alginate and were only $10. I figured a package designed to do an infant foot & hand, might do one of Mikey's hands... If I'm lucky the TWO kits I bought will get me BOTH of his hands... If not, I'll have plenty of material for a very good mold of at least one hand.

I doubt I'll use the kit's plaster for the final cast, however. I think I'd rather have a cast done in resin than plaster. I think it will handle the abusive use I plan to put it through while creating the glove pieces and attaching them to whichever type of glove I finally go with.


I'll take some pictures tonight and let you know how it goes. Until then, any thoughts, comments or ideas on the gloves for Mikey would be greatly helpful!

Thanks,
Jon
 
Re: Halloween Iron Man Costume for my 5yr old

Wow, awesome work!

You've got one lucky kid there. I'm not often jealous of 5-year-olds (Though I do find myself wishing I could have nap time most days :p) but this is an exception. Not only is that a good helmet for a child to wear, that would be a fantastic helmet for ANYONE...if only their head fit.

I've got to ask, how did you get that inner lip (the part that the faceplate rests against) so perfect? It's little things and attention to details such as those that always boggle my mind.

-Nick
 
Re: Halloween Iron Man Costume for my 5yr old

I've got to ask, how did you get that inner lip (the part that the faceplate rests against) so perfect?

Nick,

Thanks for the kind words.

There are two 'lip' areas I created. One for the main helmet section (which the faceplate lays on) and the lip around the removable back section of the helmet (which overlaps underneath the main helmet section).

As a disclaimer, this is my first helmet build - and first time working with these materials so, folks on this site and others might have better ways to execute this. It's probably a good idea to look around and check out all the master builders here. :)

Anyway, here's what I did...

First off, I built these after I had fiberglassed the pepped helmet, applied and sanded bondo to make everything smooth and then hit the whole helmet with several coats of primer.

5634160921_7026b7984f.jpg


5634749040_8633c18683.jpg


I then cut the pieces apart - which left either NO edge, or very ugly edges all around.

5634753652_9f0ac1ae35.jpg


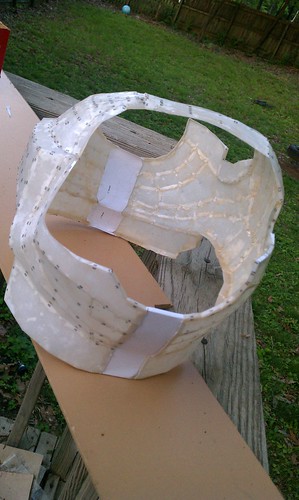
I sanded down the rough edges, and with hot glue and card stock paper, I created the lips I wanted on each of the pieces. The card stock is the easiest thing I could think of to make this out of, as you can manipulate it the easiest and still have it hold its shape. I also continually kept checking to make sure the faceplate fit nicely all the way around.

Then I fiberglassed the cardstock to give it rigidity - including a fiber layer on the inside (or backside) of the lip.

In visible areas (like the faceplate overlap), I applied bondo and sanded it smooth with a combination of dremel, small scraps of sand paper and needle files.

Once smooth, I added all the electronics and magnets and then painted the whole thing with primer again. In this image (below), you can actually see some of the slight 'wave' that the card stock had at the top right-hand side of lip. This isn't as noticeable in the final stages as the faceplate (up or down) masks that small issue nicely.

5634156855_dcb5d36b6f.jpg


Sorry, I don't have pictures of the creation of the lips. When I do another piece that requires one, I'll definitely take some pictures.
 
Re: Halloween Iron Man Costume for my 5yr old

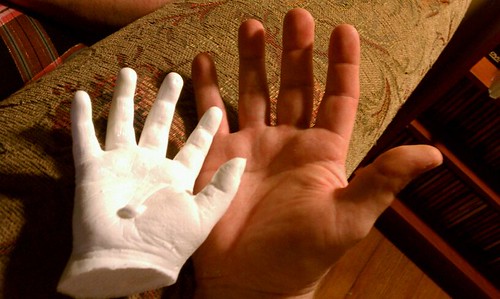
I was able to get my Mikey-hand created last night!!!

It took all the alginate in both kits I bought to get on full-hand mold for my son, but after some resin-pouring help from a friend, I've now got a full-size Mikey-hand that I can begin building the repulsor and glove armor on.

5634084349_cf44473e01.jpg


This is only his right hand... I'll probably need to do the same thing for his left hand - we'll see.
 
Re: Halloween Iron Man Costume for my 5yr old

Wow and I thought making an adult costume was going to be tricky, good luck and keep us posted on your progress :D
 
Re: Halloween Iron Man Costume for my 5yr old

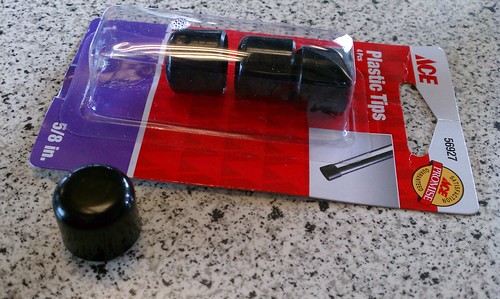
So, I was wandering through Ace Hardware this week - as I tend to do when I have some free time after lunch. As I zig-zagged through the isles, I found these 5/8" dia plastic furniture feet. They seemed about the right size for the end of the finger tips for Mikey's Ironman glove armor, so I picked them up ($1.75 - 4 pack). I also picked up a pack of 1/2" ones too (thinking they might work better for Mikey's tiny pinky finger tips).

5643788376_4576bed22f.jpg


I know that the movie-accurate finger armor is more squarish and these would be round, but I was already leaning toward creating styrene bands for his tiny fingers anyway - rather than trying to create teeny-tiny pep fingers that would require fiberglassing and probably bondo to make them smooth and ready to paint.

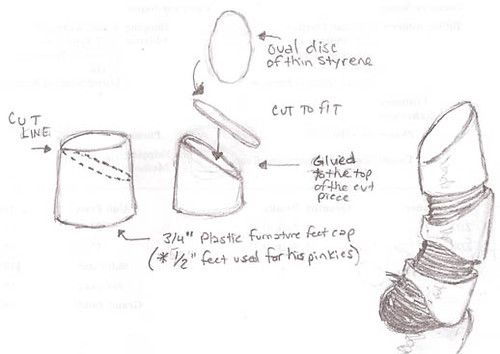
I do want to modify them slightly. Here's what I'm currently planning to try...

5643788368_5485de69b9.jpg


I'll post the result of this little test whether it works or not - just for reference.
 
Re: Halloween Iron Man Costume for my 5yr old

Ok, Furniture Foot update...

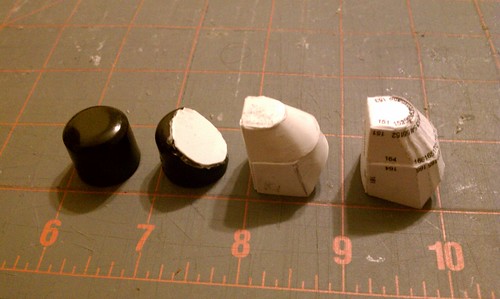
I did a very quick mod test with just an exacto knife, some model glue and a touch of hot glue (did I mention I was addicted to that stuff). I have not sanded or painted the piece yet.

For comparison to other options I have it placed here with an unaltered furniture foot, a pep finger tip build with styrene and a pep finger tip build with card-stock.

5644563621_73c8cd8c41.jpg


While not embarrassed by the attempt, I'm not overjoyed with it either. The reason I'm trying to work something out is a problem with how tiny his fingers get. This finger would be the BIGGEST of all the finger armor I'd be working on for Mikey, so whatever works here will only get harder to reproduce as things get smaller... Hence the desire to use something almost off-the-shelf.

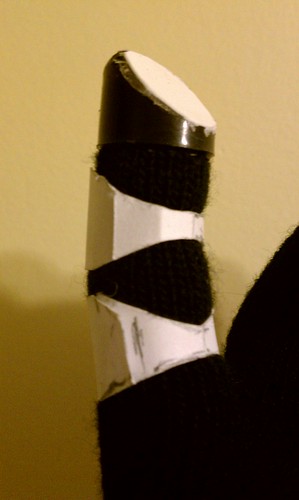
Anyway, I also through together a couple mockup bands out of card-stock so I could show you what this modified tip would sorta look like on the glove.

5645129052_c8bf7247b4.jpg


I think I will pursue this a bit further. I might sand and paint this just to see what it looks like with a couple round styrene finger armor bands before giving up on this method. I also might make the angle less steep. This cut left every little of the cylindrical shape at the bottom of the piece.

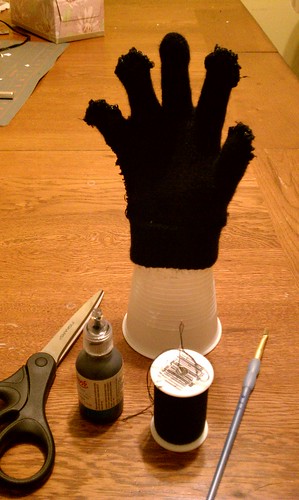
OH, and speaking of gloves... I was able to take some time today to modify the Magic Gloves (or at least one of them). As crazy as it seems, even though these tiny gloves fit nearly everyone, they're still too big for Mikey. So, I put the glove on the Mikey-Hand I have cast in resin and then snipped off the extra material at the end of each finger (except his middle finger) and then hand-stitched the open end re-closed. I was still afraid that the woven nature of this material would still unwind, so I also hit the new stitched edges with some fabric paint just to lock it down and prevent any 'unwinding'.

5645128822_cd64e3b863.jpg


And, YES, this glove is inside-out as the stitching covered in fabric paint dries. Also... Black gloves with black stitching and black fabric paint don't always show up well in pictures... sorry.


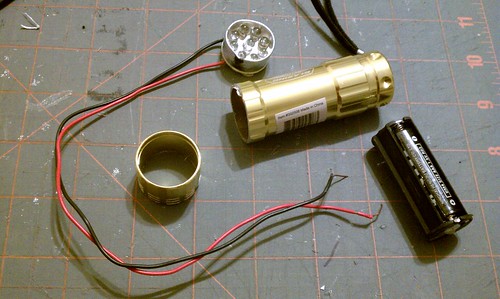
And, lastly, here is a look at the 'guts' of what will become Mikey's repulsors. The nine LED flashlight has been cut and gutted, so now I have JUST the parts I need to begin working this into the glove design. The only modification so far (besides cutting the flashlight apart) is the connection of two wires to the back of the LED circuit board.

5645128980_55e6e21831.jpg
 
Last edited:
Re: Halloween Iron Man Costume for my 5yr old

Cod Piece update...

So, I said I had the scale perfectly on the first try for this piece... and that was exactly true. After hardening the pep with figerglass it was pretty tight to get on and off. If Mikey grows over the next 6 months, it would need to be a bit larger.

Instead of re-pepping a full piece, I decided to just graft in two 1" expansion bands (one on each side of the cod piece unit).

5645270744_04245a1932.jpg


I hot glued these pieces into place (after slicing the sides open) and then began the inside fiberglassing with re-enforcing material (in this case cut up old t-shirts). I'll have to do the other half of the inside tomorrow when this dries, but then I should be ready to start the bondo and sanding process.

5645270588_ac6623188c.jpg


5645284634_2c3650d2c7.jpg


Nite all! :)
 
Re: Halloween Iron Man Costume for my 5yr old

wow I have the same flashlight for the arc reactor light I am working on ... good idea for it to also be in the repulsor light
 
This thread is more than 7 years old.

Your message may be considered spam for the following reasons:

  1. This thread hasn't been active in some time. A new post in this thread might not contribute constructively to this discussion after so long.
If you wish to reply despite these issues, check the box below before replying.
Be aware that malicious compliance may result in more severe penalties.
Back
Top