Ironman Costume for 5yr old - LINKS on PAGE 1 - tips & important bits

Re: WIP Halloween Ironman Costume for my 5yr old - updated pg #1

OT: Aren't kids utterly amazing in their ability to adapt to life sometimes dealing them a raw hand. You and your wife are amazing people. And to think I complain when my teenager is being...well a teenager.

Perspective my friend...you's got it :)

And amazing build. I am hoping I can get the PDF files for the cyberman helmet and give pep a try. These results are amazing. It's funny how I thought building this costume for my kid would be a cheaper alternative to buying one! LOL - live and learn.
 
Re: WIP Halloween Ironman Costume for my 5yr old - updated pg #1

Thanks for the nice comments! I feel like I haven't really show off many finished pieces lately, so I'll be very excited when I can post the full finished arm!

As promised here's a look at the hardware I'm using for the arm assembly. I must first credit MightyJohn's post on Robo's build thread for 100% of the design of the hardware.

As for adhesives, I tried epoxy... but that wasn't as effective as hot-glue when dealing with foam. I used an extra application of hot-glue that overlaps the edge of the binding post - sealing it to the foam. I ended up only hardening the area around the connection hole on the bicep with epoxy. I also strengthened that area by epoxying a washer onto the inside of the piece around the hole. That should prevent it from pulling through the foam when under stress.

Anyway... on to the pic!!!

5801288151_3934959468.jpg

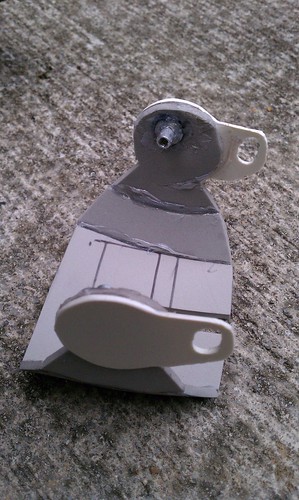
Forearm piece with binding post hot-glued in place (these are just temporarily attached in this photo as I was sizing it before painting anything today).

5801304591_cbdff12f7b.jpg

Here is the elbow piece. I used a hard plastic piece attached with hot-glued to the foam elbow piece to act as hardener for the area where the binding post will be inside the elbow AND to give me a solid place for the connection hole which will attach to the forearm piece.

5801311011_bbf6f2310d.jpg

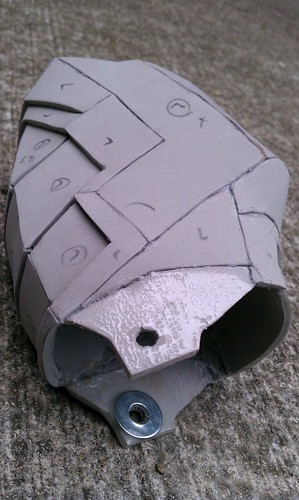
Here you can see the bicep piece with the hardened area near the connection point. You can also see the epoxy-covered washer I built into this so the hole won't be ripped out while Mikey is moving the arms.

5801300103_f5513122b7.jpg

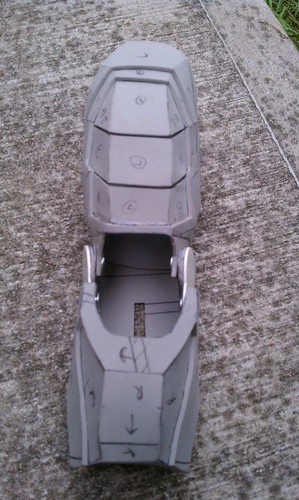
Here is the arm assembly -- fully extended.

5801849662_af8fe897e7.jpg

Here is the arm assembly -- fully bent


And, I also got to FINALLY paint one of the pieces that will officially be used in the suit today!!! So, here is what the final, final, final, final paint system turned out to be...

A. 2-3 coats Plasti-Dip
B. 3-4 coats of Adhesive Promoter
C. 2-3 coats of Desired Color (Dupli-Color Dark Cherry Metallic auto paint)
D. 2-3 coats of Adhesive Promoter
E. 1 coat of gloss for auto plastics

So, here is a shot after the Plasti-Dip...

5801834520_9bd5157b34.jpg


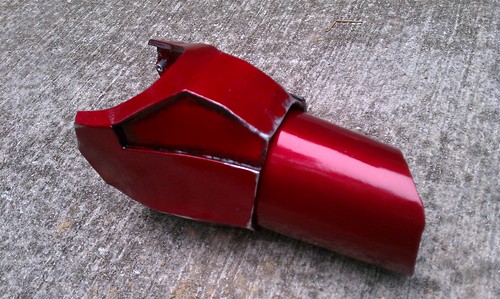
And... Here is the final piece after all that applications (and a bit of weathering)...

5801743565_33dd978db5.jpg

Top View with wrist piece (no weathering on the wrist yet).


Bottom View.
5802319804_b61a28b89a.jpg


All I can say is... Gosh darn it, those foam and fiberglass parts look awfully close to the same color! ...and the foam still has flex without cracking the paint.

One helpful tip: After apply the plasti-dip, if you want to cut down on the cracking... tape off the edges of the piece before apply the auto paint (and especially the gloss finish). Most of the tension on the auto paint comes along the edges of the pieces, so if they don't have the enamel paint on them, there's much less cracking.

****

As MUCH as I want to get the bicep piece painted -- I think it's going to look spectacular! I'm playing it smart and using that (my only foam bicep build) as an example as I build his other arm. This prevents me from putting the whole (painted) assembly together by this weekend, which is a bit of a disappointment. Maybe if I can build that piece tonight I can paint one quickly before our FL family vacation starts on Friday.

I hope everyone had a GREAT weekend! :)


Re: WIP Halloween Ironman Costume for 5yr old - Arm Assembly Pics

Those forearm gaunlets are beautiful!.... My foam pieces aren't even close! Youv'e done a wonderful justice to the foam using the techniques youv'e tried & mastered. That's darn good research on what works. I'm very Impressed.... I want to re make my soft armor pieces so they can look like yours. :love Mikey is very well blessed. Keep Building!.....
 
Re: WIP Halloween Ironman Costume for 5yr old - Arm Assembly Pics

All I can say is wow...I feel/wish there was a better word I could find to describe how I feel about this whole build. This is the type of parent I hope to be some day...and you're an AWESOME costume builder! This last post? with the paint? WOWEE!!!
 
Re: WIP Halloween Ironman Costume for 5yr old - Arm Assembly Pics

the looks are Awesome, like MightyJohn said I wouldn't believe it's foam if I didn't see the "before" pictures
 
Re: WIP Halloween Ironman Costume for my 5yr old - updated pg #1

Here is the final piece after all that applications (and a bit of weathering)...

5801743565_33dd978db5.jpg

Top View with wrist piece (no weathering on the wrist yet).


Bottom View.
5802319804_b61a28b89a.jpg


All I can say is... Gosh darn it, those foam and fiberglass parts look awfully close to the same color! ...and the foam still has flex without cracking the paint.

I really appreciate all your positive feedback. It makes the half dozen 'test' pieces I build and painted with other methods feel more worthwhile to hear nice things about the final result! :$


To be honest though, Rub-n-Buff makes high-gloss pieces like this look fantastic.... and it's SO easy to use! I'm always happy to give a great product it's due. :thumbsup

I think the only trick with that would be finding the right balance - you certainly don't want to over do it with this stuff. The rule, 'less is more' definitely applies for Rub-n-Buff.

For this piece I figured the ends of his limbs will be more 'scuffed' than most of the other pieces, as they would see the most general wear (from being bumped and banged against stuff). And then you have the joints were there should be a bit of 'rubbing' on the paint look as well.

I was going for about this much wear at a MAXIMUM - as I'm not designing the suit to be 'battle damaged'...

_mg_5177.jpg


Thanks, again, for all the kinds words... it certainly motivates me to keep working!

Have a great week.
 
Re: WIP Halloween Ironman Costume for 5yr old - Arm Assembly Pics

Wow this looks fantastic, i like the battle look to it, it lends a sense of realism to the armor.
 
Re: WIP Halloween Ironman Costume for 5yr old - Arm Assembly Pics

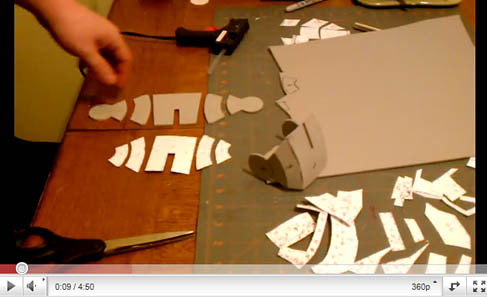
I thought I should post some videos showing how low-tech my foam building process is. :lol

Disclaimer on Material: As mentioned in the video, 3mm foam is NOT a standard construction material. Most of the talented artist and craftsman on this forum and others use a minimum of 4mm foam with many going MUCH thicker than this. I'm cheating as this build is a virtual scale model build and... I can get away with it! :love

Here is how I cut out pieces of 3mm foam to make parts for Mikey's suit... and don't laugh... yes, those are just house-hold scissors. :confused


...and this is a video of how I glue the pieces together...


I'll try posting a couple videos explaining more about how I figure out which pep parts to trace and use, as well as how I'm smoothing, painting and weathering the pieces.

Any comments, tricks, tips, etc are welcome... I'm always looking for an easier or time-saving way of doing these steps.

Thanks! :)
 
Re: WIP Ironman Costume for 5yr old - How I Make Foam Parts Video

I think you are going to have the happiest son on earth, amazing build and an amazing dad !

mike
 
Re: WIP Ironman Costume for 5yr old - How I Make Foam Parts Video

Your son is lucky to have a father like you. Very impressive work, can't wait to see it finished!
 
Re: WIP Ironman Costume for 5yr old - How I Make Foam Parts Video

Your son is lucky to have a father like you. Very impressive work, can't wait to see it finished!

Dextructive, I love your Dark Reign War Machine build in Sintra. I have some of that material (very thin sheets actually) that I will likely use for the gloves on my build. I've read your thread and a few others that work with Sintra and other plastics as I feel like my final build method of choice (beyond my work on Mikey's Halloween costume), will include pieces made from fiberglassed pep, foam, Sintra and random found parts. I guess you could call it 'mixed medium' costuming! lol

Thanks for the nice word! :)
 
Re: WIP Ironman Costume for 5yr old - How I Make Foam Parts Video

hey.. love your videos! its really gonna help me whem i build a war machine suit! a little off topic but what breed is your cat btw?
 
Re: WIP Ironman Costume for 5yr old - How I Make Foam Parts Video

Incredible work !!! can't wait to see your son wearing it :)
 
Re: WIP Ironman Costume for 5yr old - How I Make Foam Parts Video

Great videos and fantastic progress!!
This is my favorite build right now!
 
Re: WIP Ironman Costume for 5yr old - How I Make Foam Parts Video

Love the movies. they'll help me a lot since I am starting to build my neckpiece with foam soon.

just wondering 1 this though.
you talk in your 1st movie about adding an extra half inch for overlapping pieces. I guess this is for 2 curvaces not curved to eachother but they create a depth together.

do you hot glue those just like they'd be a normal flap on the cardstock?
 
Re: WIP Ironman Costume for 5yr old - How I Make Foam Parts Video

...you talk in your 1st movie about adding an extra half inch for overlapping pieces. I guess this is for 2 curvaces not curved to eachother but they create a depth together. do you hot glue those just like they'd be a normal flap on the cardstock?

The extra space I'm adding after tracing those pieces would be for areas where the foam is UNDER another piece of foam. There are a few places this might be done, but here are couple examples:

5801300103_f5513122b7.jpg

1. The ridge you see on both sides of the forearm piece (bottom of the photo).
2. The bicep area (that will eventually be painted gold) goes under the upper arm armor on the side and top of the piece - which create that 'ridge' look.


In these cases, I would trace the actual pep piece and THEN add extra (usually free-hand) around the sides I planned to use as the bottom piece of an overlapping situation. It's good to trace the actual pep piece, as you'll need that reference when you go to line up that piece under the top piece of the overlap. When the original pep line traced, you can easily line-up that with the edge of the top piece which should keep your pieces in proper shape and size.

I only needed probably 1/4" of overlap, but with heavier foam you might need a full 1/2" (Graphic Jordon, Chimmera30 or STEALTH might want to chime in here, as they work with thicker materials than I'm using for Mikey's suit).

I plan to shoot another video on how I transform my card stock pep pieces into foam templates. That might be an easier way to relay this info.

In the end, just remember that EVERYONE has a different build method (even when dealing with the same exact materials). I posted these just to show how I was building my pieces. I'm sure you'll find many more tricks and tips from videos by STEALTH and some of the other Foam Masters on this board. But after all that watching, you'll still have to create a process that works best for you - which is the greatest part of belonging to this creative collective! :)

Good luck!
 
Re: WIP Ironman Costume for 5yr old - How I Make Foam Parts Video

thanks, I'm confident enough to start building now.. had my foam gathering dus for a week now :p
 
This thread is more than 7 years old.

Your message may be considered spam for the following reasons:

  1. This thread hasn't been active in some time. A new post in this thread might not contribute constructively to this discussion after so long.
If you wish to reply despite these issues, check the box below before replying.
Be aware that malicious compliance may result in more severe penalties.
Back
Top