You are using an out of date browser. It may not display this or other websites correctly.
You should upgrade or use an alternative browser.
You should upgrade or use an alternative browser.
Ironman Costume for 5yr old - LINKS on PAGE 1 - tips & important bits
- Thread starter indiefilmgeek
- Start date
SDGlyph
Member
Re: WIP Ironman Costume for 5yr old - Leg, boot & underarmor 9/26
Just burning through the thread... this is an absolutely astounding project and one hell of a result! Thanks for keeping such detailed notes on your progress, I've learned an awful lot just reading through.
You've definitely inspired me to get going on a project I've been mulling for a little while: a Stormtrooper costume for my own 5 year old, in time for Christmas. Thanks!
indiefilmgeek
Sr Member
Re: WIP Ironman Costume for 5yr old - Leg, boot & underarmor 9/26
I've been playing with attachment methods for the slip-on shoes I have for Mikey. I think I've got something that will work... I'll be posting tonight (or tomorrow) on results.") :thumbsup
:thumbsup
That would be VERY cool to find under the Christmas tree! :cool
I definitely recommend checking out Joe's thread he did for his son's build. He's the reigning champ of Star Wars kids costume IMHO. If you run into any issues at all, drop TK171 a note - I'm sure he'll be happy to provide you any insight he has regarding your project.
*****
As a quick no-picture update... I finished up the other foam thigh piece last night. After test-fitting the pieces again, I've determined that I am going to add a bit MORE room at the top of the thigh for Mikey's leg - they're just a bit too tight for maximum comfort.
I've also decided to investigate cutting a velcro seam into the ankle section of the lower leg foam armor. That piece is VERY tight, and I'm afraid pulling it over this foot several times might tear it up (especially after painting it and all).
So, I've got some engineering challenges to tackle.
* Connection points for lower leg to thigh armor
* Cutting a Velcro closure into the ankle area of the lower-leg armor
* Connecting the slip-on shoes to the resin soles
I have some ideas for each (and hardware for the shoes).... I'll update everyone as soon as I take a shot at each of these.:thumbsup
In for a pair of soles, lol.
I've been playing with attachment methods for the slip-on shoes I have for Mikey. I think I've got something that will work... I'll be posting tonight (or tomorrow) on results.
:thumbsupJust burning through the thread... this is an absolutely astounding project and one hell of a result! Thanks for keeping such detailed notes on your progress, I've learned an awful lot just reading through.
You've definitely inspired me to get going on a project I've been mulling for a little while: a Stormtrooper costume for my own 5 year old, in time for Christmas. Thanks!
That would be VERY cool to find under the Christmas tree! :cool
I definitely recommend checking out Joe's thread he did for his son's build. He's the reigning champ of Star Wars kids costume IMHO. If you run into any issues at all, drop TK171 a note - I'm sure he'll be happy to provide you any insight he has regarding your project.
*****
As a quick no-picture update... I finished up the other foam thigh piece last night. After test-fitting the pieces again, I've determined that I am going to add a bit MORE room at the top of the thigh for Mikey's leg - they're just a bit too tight for maximum comfort.
I've also decided to investigate cutting a velcro seam into the ankle section of the lower leg foam armor. That piece is VERY tight, and I'm afraid pulling it over this foot several times might tear it up (especially after painting it and all).
So, I've got some engineering challenges to tackle.
* Connection points for lower leg to thigh armor
* Cutting a Velcro closure into the ankle area of the lower-leg armor
* Connecting the slip-on shoes to the resin soles
I have some ideas for each (and hardware for the shoes).... I'll update everyone as soon as I take a shot at each of these.
:thumbsupRe: WIP Ironman Costume for 5yr old - Leg, boot & underarmor 9/26
I can vouch for the coolness and skill you all have seen in the pictures posted here. I've seen the costume results first hand and had to pick my jaw up off the ground. It's amazing work! I can't wait until my 6 month old son gets old enough for Filmgeek to make him a costume.
Chris
I can vouch for the coolness and skill you all have seen in the pictures posted here. I've seen the costume results first hand and had to pick my jaw up off the ground. It's amazing work! I can't wait until my 6 month old son gets old enough for Filmgeek to make him a costume.
Chris
indiefilmgeek
Sr Member
Re: WIP Ironman Costume for 5yr old - Leg, boot & underarmor 9/26
Chris, your help on project has been deeply appreciated! Heck, I'm still using your tube of Rub-n-Buff and I couldn't have done the boots without you!
...but you have to know that you'll be sporting one of my costume long before young Danger is old enough to go all screen-accurate on us! :lol
I can vouch for the coolness and skill you all have seen in the pictures posted here. I've seen the costume results first hand and had to pick my jaw up off the ground. It's amazing work! I can't wait until my 6 month old son gets old enough for Filmgeek to make him a costume.
Chris
Chris, your help on project has been deeply appreciated! Heck, I'm still using your tube of Rub-n-Buff and I couldn't have done the boots without you!
...but you have to know that you'll be sporting one of my costume long before young Danger is old enough to go all screen-accurate on us! :lol
indiefilmgeek
Sr Member
Re: WIP Ironman Costume for 5yr old - Leg, boot & underarmor 9/26
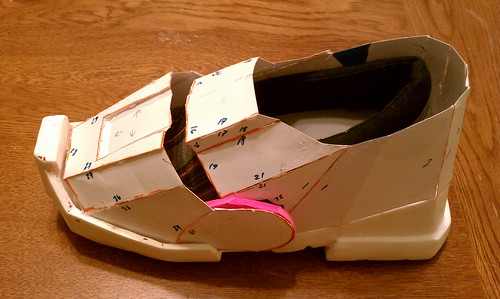
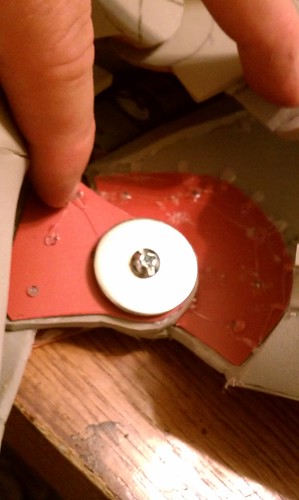
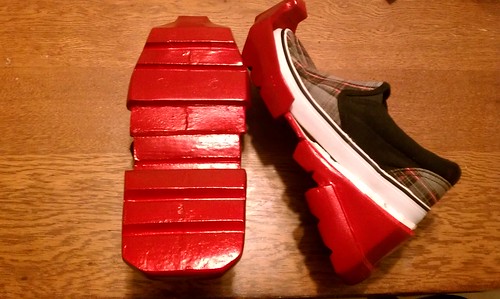
I did a little pre-mounting work for the boots...
Here's the position the slip-on shoes will be in:
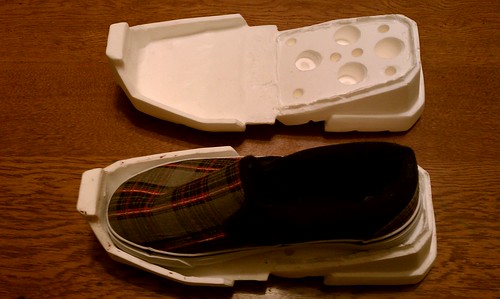
To mount them, I'm using 2-part epoxy to cement screw anchors into the resin soles of the boot. Then I used my drill to punch the same holes in the slip-on shoes. After the epoxy sets, I'll use screws with washers to lock the heel and ball of the slip-on shoes onto the resin boot sole.
** Yes, I will put a little foam insert in the shoe so Mikey isn't standing on the metal screw head and washer... Luckily, I have plenty of EVA foam lying around to make those insoles from!
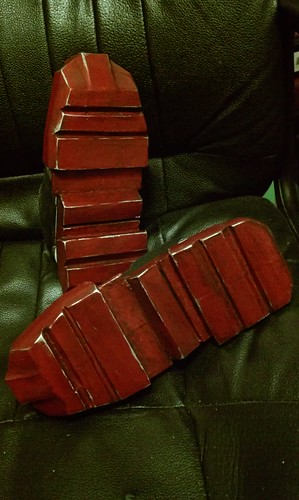
Screw Anchors in the sole...
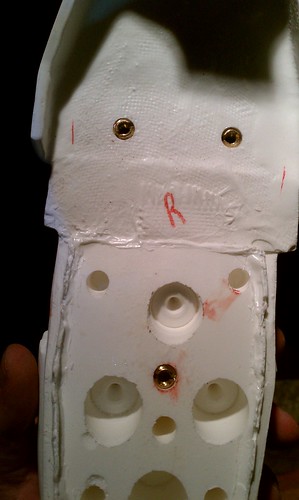
** And, yes, that's my blood on the heel... Let's all remember to use a drill on a TABLE, not on objects in your HAND. It's nothing serious - luckily, I have cat-like reflexes and the bit just barely nicked my finger.
Since the screw anchors went from surface to surface of the sole, I just let the bit clear the bottom of the sole and then (after applying the epoxied screw anchors) I just hit the holes with a bit of glazing putty.
I'll sand this down before hitting the piece with a coat of filler primer. After that, these will be ready to have the foam tops of the boots added!

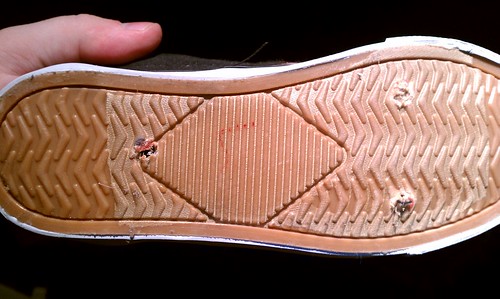
Lastly, here's the holes I drilled in the slip-on shoes. Not much to look at really...
I'm not feeling so hot this evening, so I'm calling it early and heading to bed. I should have these puppies mounted tomorrow and then I'll try to get some video of Mikey running around in the slip-on shoes with Ironman boot soles... that should be good for a couple laughs.
Nite all!:thumbsup
I did a little pre-mounting work for the boots...
Here's the position the slip-on shoes will be in:
To mount them, I'm using 2-part epoxy to cement screw anchors into the resin soles of the boot. Then I used my drill to punch the same holes in the slip-on shoes. After the epoxy sets, I'll use screws with washers to lock the heel and ball of the slip-on shoes onto the resin boot sole.
** Yes, I will put a little foam insert in the shoe so Mikey isn't standing on the metal screw head and washer... Luckily, I have plenty of EVA foam lying around to make those insoles from!
Screw Anchors in the sole...
** And, yes, that's my blood on the heel... Let's all remember to use a drill on a TABLE, not on objects in your HAND. It's nothing serious - luckily, I have cat-like reflexes and the bit just barely nicked my finger.
Since the screw anchors went from surface to surface of the sole, I just let the bit clear the bottom of the sole and then (after applying the epoxied screw anchors) I just hit the holes with a bit of glazing putty.
I'll sand this down before hitting the piece with a coat of filler primer. After that, these will be ready to have the foam tops of the boots added!
Lastly, here's the holes I drilled in the slip-on shoes. Not much to look at really...
I'm not feeling so hot this evening, so I'm calling it early and heading to bed. I should have these puppies mounted tomorrow and then I'll try to get some video of Mikey running around in the slip-on shoes with Ironman boot soles... that should be good for a couple laughs.
Nite all!
:thumbsupRe: WIP Ironman Costume for 5yr old - Leg, boot & underarmor 9/26
hey, quick question! I know you used plasti-dip on your foam pieces, but did you use it as well on the fiberglass/bondo pieces? Looks like I will prolly follow your paint scheme, (i like it and cost effective) and most of my pieces are not foam. Thanks!
hey, quick question! I know you used plasti-dip on your foam pieces, but did you use it as well on the fiberglass/bondo pieces? Looks like I will prolly follow your paint scheme, (i like it and cost effective) and most of my pieces are not foam. Thanks!
indiefilmgeek
Sr Member
Re: WIP Ironman Costume for 5yr old - Leg, boot & underarmor 9/26
Plasti-dip is only for foam pieces. I don't use it on the fiberglass pieces.
For hardened pieces I just use a good primer and then the auto paint. If it needs it (depending on paint type it might), hit it with a gloss coat as well.
For foam pieces I paint them in this order:
1.) 2-3 coats of plasti-dip
2.) 2 coats of adhesive promoter
3.) 2 coats of final paint color (Duplicolor IM colors: Dark Cherry Metallic & Sunburst Gold)
4.) IF it needs some extra shine, hit it LIGHTLY with some clear gloss for plastics (auto part stores carry this for flexible bumpers and stuff).
The trick with the gloss is to keep it LIGHT... just enough to have it shine without putting a thick layer on it that will crack. Also, you can mostly aim it on the surface... don't bother hitting the edges of the foam. That's an area you don't see much of and it's also the MOST flexed area on the piece.
Hope that helps! Let me know if you have any other questions!:thumbsup
hey, quick question! I know you used plasti-dip on your foam pieces, but did you use it as well on the fiberglass/bondo pieces? Looks like I will probly follow your paint scheme, (i like it and cost effective) and most of my pieces are not foam. Thanks!
Plasti-dip is only for foam pieces. I don't use it on the fiberglass pieces.
For hardened pieces I just use a good primer and then the auto paint. If it needs it (depending on paint type it might), hit it with a gloss coat as well.
For foam pieces I paint them in this order:
1.) 2-3 coats of plasti-dip
2.) 2 coats of adhesive promoter
3.) 2 coats of final paint color (Duplicolor IM colors: Dark Cherry Metallic & Sunburst Gold)
4.) IF it needs some extra shine, hit it LIGHTLY with some clear gloss for plastics (auto part stores carry this for flexible bumpers and stuff).
The trick with the gloss is to keep it LIGHT... just enough to have it shine without putting a thick layer on it that will crack. Also, you can mostly aim it on the surface... don't bother hitting the edges of the foam. That's an area you don't see much of and it's also the MOST flexed area on the piece.
Hope that helps! Let me know if you have any other questions!
:thumbsupindiefilmgeek
Sr Member
Re: WIP Ironman Costume for 5yr old - Leg, boot & underarmor 9/26
Some more minor work done on the boots tonight...
First off, here's a very short video of Mikey clopping around in the Ironman boot soles with this slip-on shoes bolted to the soles, but no foam boot-top yet built.
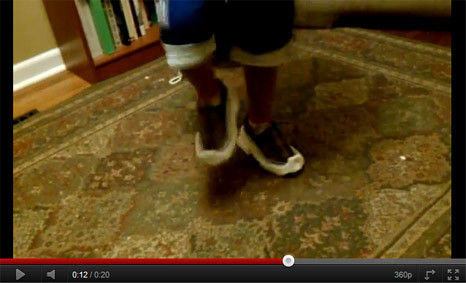
After making sure they fit and he can stomp around in them comfortably, I started work on the foam tops of the boots.
Here is what the paper pep looks like placed where those pieces will go once I have them built out of foam.
...and here is all the foam pieces laid out and ready to cut!
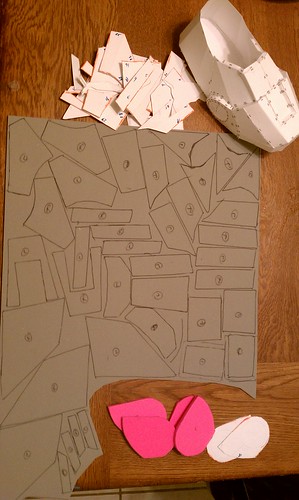
I actually got all these cut out and come thing glued together tonight, but my camera ran out of juice, so I'll add those pics to tomorrow's update!
Nite All!:thumbsup
Some more minor work done on the boots tonight...
First off, here's a very short video of Mikey clopping around in the Ironman boot soles with this slip-on shoes bolted to the soles, but no foam boot-top yet built.
After making sure they fit and he can stomp around in them comfortably, I started work on the foam tops of the boots.
Here is what the paper pep looks like placed where those pieces will go once I have them built out of foam.
...and here is all the foam pieces laid out and ready to cut!
I actually got all these cut out and come thing glued together tonight, but my camera ran out of juice, so I'll add those pics to tomorrow's update!
Nite All!
:thumbsupNobody
Well-Known Member
Re: WIP Ironman Costume for 5yr old - Leg, boot & underarmor 9/26
Wow! Everything looks amazing. You have some very ingenious ideas, Graphic Jordan's and your build are really inspiring be to build a foam Ironman of my own. I would also like to say how wonderful it is that you are taking the time to build these for your children, you're making memories that will last a lifetime.
Wow! Everything looks amazing. You have some very ingenious ideas, Graphic Jordan's and your build are really inspiring be to build a foam Ironman of my own. I would also like to say how wonderful it is that you are taking the time to build these for your children, you're making memories that will last a lifetime.
Last edited:
indiefilmgeek
Sr Member
Re: WIP Ironman Costume for 5yr old - Leg, boot & underarmor 9/26
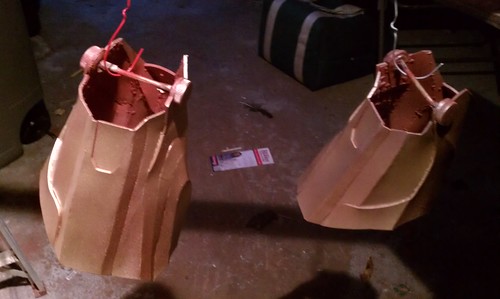
Quick updates from the weekend...
Regarding the boots, I've constructed the foam tops, but haven't glued them down to the soles yet. I need to at least prime the soles prior to the tops being added... Here's a test fit of the foam parts on the resin heels...
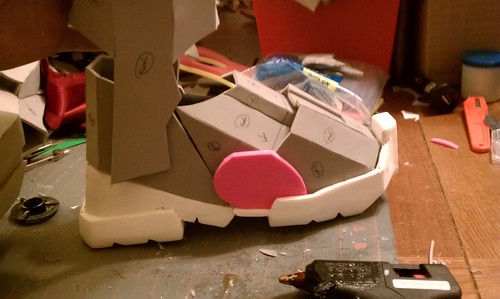
Unfortunately, the primer spray paint was junky, sputtered and died with 80% of the can still full.
Ready for primer... when I get a better can!
NOTE: Always keep your receipts for spray paint - I'm getting 1 bad can out every 10-15 cans I've tried out on this project. :confused
*****
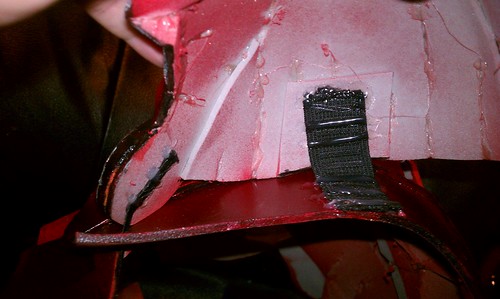
Then I did some work on the legs...
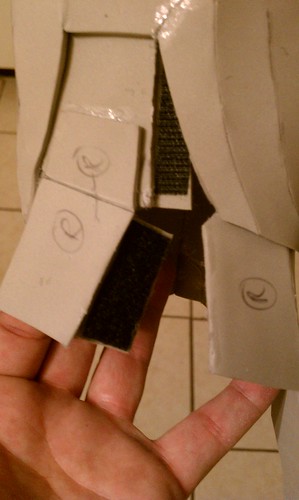
The ankle parts were pretty tight on Mikey, so I opened them up and created a velcro fastener for each. This should allow me to keep the perfect scale without tearing them up by having him push his 'big ole' feet through that tight ankle area.
CLOSED
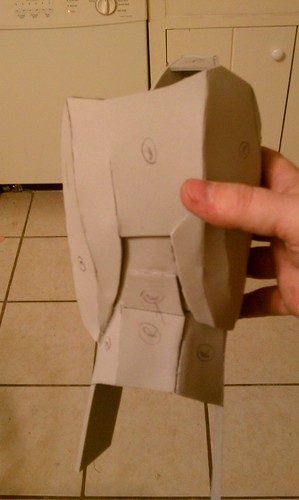
OPEN
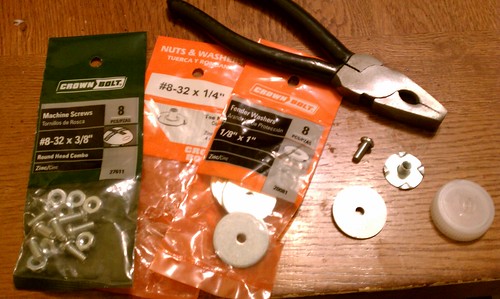
And right before plasti-dip and paint for the legs, I also had to install the hardware for the knee hinge.
I bought the following posts, bolts and washers for the job (2 on each leg - 4 total):
However, before mounting these I wanted to re-enforce the connection area.
On the elbow joint, I did this by gluing down a metal washer over the opening of the bolt hole with 2-part epoxy. This was enough for the elbow joint, but I wanted something a bit stronger for the knee joint (as I imagine this will have more torque on it then even his elbow).
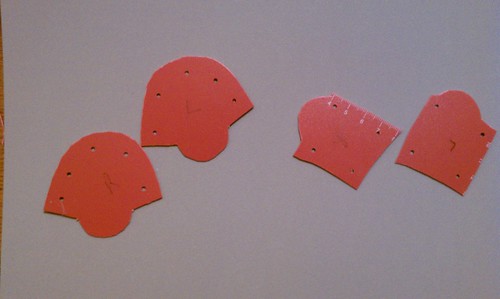
So, I cut out some heavy plastic pieces which will be glued to the inside of the connection points on both the upper and lower legs sections.
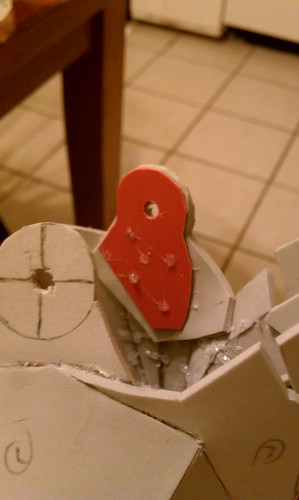
I then used 2-part epoxy to attach the screw posts (or binding posts) to the re-enforced areas of the upper leg sections.

The final joint hardware will look like this on the inside...
And that's pretty much it for Ironman progress...
In related news my daughter finally decided she what she wanted to be this Halloween, so some of my time this weekend was spent starting a budget/speed build of a World of Warcraft Murloc costume. :wacko
Quick updates from the weekend...
Regarding the boots, I've constructed the foam tops, but haven't glued them down to the soles yet. I need to at least prime the soles prior to the tops being added... Here's a test fit of the foam parts on the resin heels...
Unfortunately, the primer spray paint was junky, sputtered and died with 80% of the can still full.
Ready for primer... when I get a better can!
NOTE: Always keep your receipts for spray paint - I'm getting 1 bad can out every 10-15 cans I've tried out on this project. :confused
*****
Then I did some work on the legs...
The ankle parts were pretty tight on Mikey, so I opened them up and created a velcro fastener for each. This should allow me to keep the perfect scale without tearing them up by having him push his 'big ole' feet through that tight ankle area.
CLOSED
OPEN
And right before plasti-dip and paint for the legs, I also had to install the hardware for the knee hinge.
I bought the following posts, bolts and washers for the job (2 on each leg - 4 total):
However, before mounting these I wanted to re-enforce the connection area.
On the elbow joint, I did this by gluing down a metal washer over the opening of the bolt hole with 2-part epoxy. This was enough for the elbow joint, but I wanted something a bit stronger for the knee joint (as I imagine this will have more torque on it then even his elbow).
So, I cut out some heavy plastic pieces which will be glued to the inside of the connection points on both the upper and lower legs sections.
I then used 2-part epoxy to attach the screw posts (or binding posts) to the re-enforced areas of the upper leg sections.
The final joint hardware will look like this on the inside...
And that's pretty much it for Ironman progress...
In related news my daughter finally decided she what she wanted to be this Halloween, so some of my time this weekend was spent starting a budget/speed build of a World of Warcraft Murloc costume. :wacko
jayjayn
Well-Known Member
Re: WIP Ironman Costume for 5yr old - Leg, boot & underarmor 9/26
Great work too badi cant to the same with my soles, I'm really worried how I should do my shoes with the amount of time left its starting to look like i will have to resort to a pair of boots wrapped in the foam design but I'm not even sure that will work.
Great work too badi cant to the same with my soles, I'm really worried how I should do my shoes with the amount of time left its starting to look like i will have to resort to a pair of boots wrapped in the foam design but I'm not even sure that will work.
dabiddabird
Well-Known Member
Re: WIP Ironman Costume for 5yr old - Leg, boot & underarmor 9/26
Ugh I hate when that happens. It happened to me with the first can of paint I was using for my Red Hood helmet. I barely sprayed it twice and the metal pin got stuck so it kept on spraying by itself :eek. Couldn't get it to stop so I put in a bucket of water. Kept on spraying for hours lol.
Hands were covered in red paint. My gf comes home and the first thing she says, "Well it looks like I caught you red handed". :rolleyes
Unfortunately, the primer spray paint was junky, sputtered and died with 80% of the can still full.
Ugh I hate when that happens. It happened to me with the first can of paint I was using for my Red Hood helmet. I barely sprayed it twice and the metal pin got stuck so it kept on spraying by itself :eek. Couldn't get it to stop so I put in a bucket of water. Kept on spraying for hours lol.
Hands were covered in red paint. My gf comes home and the first thing she says, "Well it looks like I caught you red handed". :rolleyes
Scandvoice
Well-Known Member
Re: WIP Ironman Costume for 5yr old - Leg, boot & underarmor 9/26
Amazing! ;-)
Amazing! ;-)
indiefilmgeek
Sr Member
Re: WIP Ironman Costume for 5yr old - Leg, boot & underarmor 9/26
LOL - At least she didn't think you had killed the house cat or something. :lol
It's definitely one of the surprise discoveries of this project - the number of bad cans of spray paint. I've had bad Plasti-dip, auto paint, primer, etc. Of course, I've never played around with THIS much spray paint before, so it's all very new to me. However, it didn't take long for me to learn I needed to Keep those receipts - just in case I needed to take non-working cans back.
*****
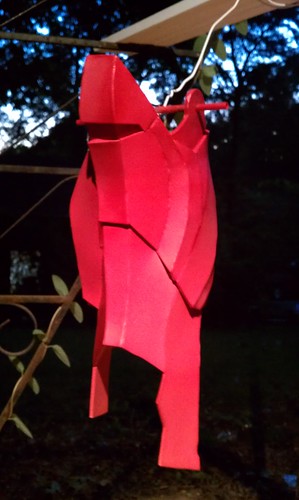
Speaking of 'red-handed'... I had started spraying the leg armor with plasti-dip last night and only after seeing the hand holding the pieces getting very 'RED' was I smart enough to get a pair of gloves on. :behave
The evening started with test-fitting the assembled leg armor on Mikey and prepping all four pieces for their first coat of plasti-dip. I'll probably have at least two more coats before I'm happy with the smoothness of the pieces, but since I plan to distress these a bit more than the upper armor (more natural wear-n-tear) I feel I can 'cheat' a bit on some of the uglier seams.
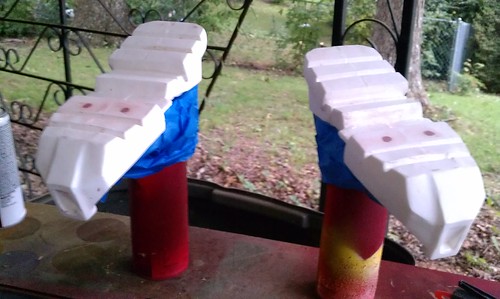
Here's a look at the set up.
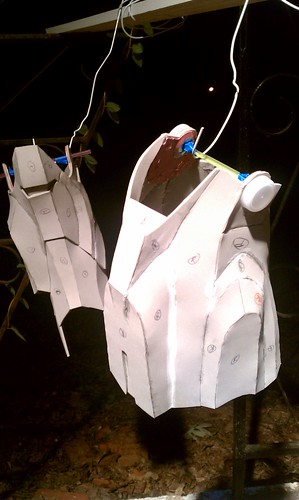
I've used latex caulk to clean up the bad seams or gaps and then taped off the connection points as well as installed spacers to both hold the shape of the piece and give me a place to hold the armor while spraying it.
Here's a couple 'after' pics... now I just have 2-3 more coats to do before I can get it painted Ironman Red/Gold!

Ugh I hate when that happens. It happened to me with the first can of paint I was using for my Red Hood helmet. I barely sprayed it twice and the metal pin got stuck so it kept on spraying by itself :eek. Couldn't get it to stop so I put in a bucket of water. Kept on spraying for hours lol.
Hands were covered in red paint. My gf comes home and the first thing she says, "Well it looks like I caught you red handed". :rolleyes
LOL - At least she didn't think you had killed the house cat or something. :lol
It's definitely one of the surprise discoveries of this project - the number of bad cans of spray paint. I've had bad Plasti-dip, auto paint, primer, etc. Of course, I've never played around with THIS much spray paint before, so it's all very new to me. However, it didn't take long for me to learn I needed to Keep those receipts - just in case I needed to take non-working cans back.
*****
Speaking of 'red-handed'... I had started spraying the leg armor with plasti-dip last night and only after seeing the hand holding the pieces getting very 'RED' was I smart enough to get a pair of gloves on. :behave
The evening started with test-fitting the assembled leg armor on Mikey and prepping all four pieces for their first coat of plasti-dip. I'll probably have at least two more coats before I'm happy with the smoothness of the pieces, but since I plan to distress these a bit more than the upper armor (more natural wear-n-tear) I feel I can 'cheat' a bit on some of the uglier seams.
Here's a look at the set up.
I've used latex caulk to clean up the bad seams or gaps and then taped off the connection points as well as installed spacers to both hold the shape of the piece and give me a place to hold the armor while spraying it.
Here's a couple 'after' pics... now I just have 2-3 more coats to do before I can get it painted Ironman Red/Gold!
indiefilmgeek
Sr Member
Re: WIP Ironman Costume for 5yr old - Legs Almost Done 10/4
I always find that painting things always makes the evening's work seem more impressive than nights spending pepping pieces, sanding, gluing, etc. I know it's just psychological, but it certainly seems like I got more done tonight than any of the nights from the past two weeks. :cool
First off, I got my final paint colors on the leg sections. I have their glossy base coats on all four pieces (including the 2-color thigh pieces). I also had enough time to weather the lower legs sections and work on the color and distressing of the boot soles as well.
So, here are some pics from this evenings work!
Here is a picture of the lower leg after two coats of my Dark Cherry Metallic Red auto paint.
As you can tell, this paint has been drying dull, so I hit these pieces with a light coat of a clear gloss for plastics and here's what they looked like prior to weathering/distressing...
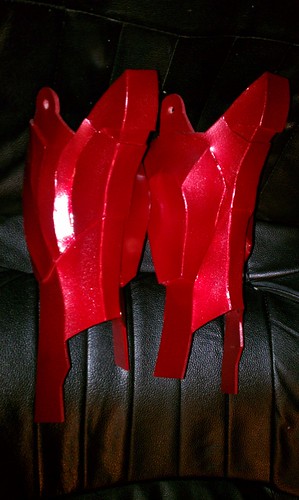
Oooohhh... shiny. :love
I actually painted the thigh pieces gold first and then just taped off the golds areas to protect them and hit the rest with 2 coats of my red paint.
After the first Gold coat...
And after the second red coat - and a light coat of clear gloss for plastics...
*****
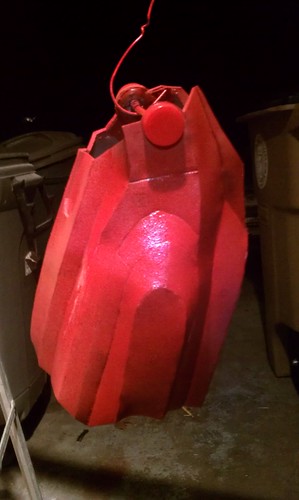
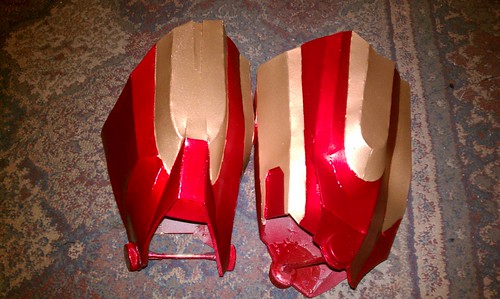
As for the boots, I decided to paint the soles separately from the tops. This might sound bizarre, but bare with me...
I hit them with my Dark Cherry Metallic auto paint and then brought them inside...
I then weathered them and distressed them (using rub-n-buff)...
I have to say, I'm pretty pleased with the way these came out!
Now that I had them distressed/weathered, I needed to fix the issue of them sliding around on any solid/smooth walking surface (and in doing so, scratching off the detail work I'd done!
So, I took them outside and applied 5-6 coats of clear plasti-dip paint to the bottoms of the soles! This has given these pieces a rubbery coating that should help Mikey walk easier.
It also locked in the distressing/weathering work I did!
*****
Lastly, I rigged up the shoulder bells with elastic.
I decided to go low-tech on this one... I just created a simple hinge from a thick piece of black elastic (folded in half). The top half is hot glued to the bell and the bottom half is hot glued to the shoulder piece of Mikey's chest/back armor.
This allows the pieces to rise and move around a bit with his arm movement, but also return to it's correct place after any of those movements.
The second connection point is is the 'front' of the bell, which I hot glued a thin black piece of elastic to, sent it THROUGH the shoulder section of the armor and attached it (via more hot glue) to the inside of the chest armor.
The advantage of this type of connection is both flexibility, but it also ties down both the shoulder bell in the front AND the the pesky shoulder section of the chest armor that I just could NOT get to stay down (it curled up after painting it for some reason).
Here's two pics to help show you what I did...
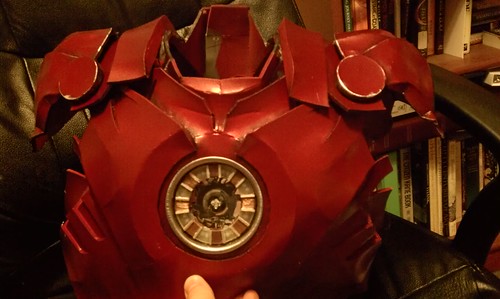
It's not that pretty, but since it's never going to be seen (except by you all), I'm fine with that! :lol
Anyway, that's it for me... I'm heading to bed!
I always find that painting things always makes the evening's work seem more impressive than nights spending pepping pieces, sanding, gluing, etc. I know it's just psychological, but it certainly seems like I got more done tonight than any of the nights from the past two weeks. :cool
First off, I got my final paint colors on the leg sections. I have their glossy base coats on all four pieces (including the 2-color thigh pieces). I also had enough time to weather the lower legs sections and work on the color and distressing of the boot soles as well.
So, here are some pics from this evenings work!
Here is a picture of the lower leg after two coats of my Dark Cherry Metallic Red auto paint.
As you can tell, this paint has been drying dull, so I hit these pieces with a light coat of a clear gloss for plastics and here's what they looked like prior to weathering/distressing...
Oooohhh... shiny. :love
I actually painted the thigh pieces gold first and then just taped off the golds areas to protect them and hit the rest with 2 coats of my red paint.
After the first Gold coat...
And after the second red coat - and a light coat of clear gloss for plastics...
*****
As for the boots, I decided to paint the soles separately from the tops. This might sound bizarre, but bare with me...
I hit them with my Dark Cherry Metallic auto paint and then brought them inside...
I then weathered them and distressed them (using rub-n-buff)...
I have to say, I'm pretty pleased with the way these came out!
Now that I had them distressed/weathered, I needed to fix the issue of them sliding around on any solid/smooth walking surface (and in doing so, scratching off the detail work I'd done!
So, I took them outside and applied 5-6 coats of clear plasti-dip paint to the bottoms of the soles! This has given these pieces a rubbery coating that should help Mikey walk easier.
It also locked in the distressing/weathering work I did!
*****
Lastly, I rigged up the shoulder bells with elastic.
I decided to go low-tech on this one... I just created a simple hinge from a thick piece of black elastic (folded in half). The top half is hot glued to the bell and the bottom half is hot glued to the shoulder piece of Mikey's chest/back armor.
This allows the pieces to rise and move around a bit with his arm movement, but also return to it's correct place after any of those movements.
The second connection point is is the 'front' of the bell, which I hot glued a thin black piece of elastic to, sent it THROUGH the shoulder section of the armor and attached it (via more hot glue) to the inside of the chest armor.
The advantage of this type of connection is both flexibility, but it also ties down both the shoulder bell in the front AND the the pesky shoulder section of the chest armor that I just could NOT get to stay down (it curled up after painting it for some reason).
Here's two pics to help show you what I did...
It's not that pretty, but since it's never going to be seen (except by you all), I'm fine with that! :lol
Anyway, that's it for me... I'm heading to bed!
Similar threads
- Replies
- 2
- Views
- 711
- Replies
- 1
- Views
- 572
- Replies
- 43
- Views
- 3,439
- Replies
- 7
- Views
- 804